
Owners Manual
Page 2
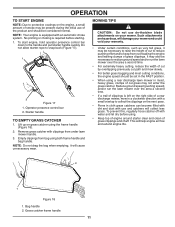
...enable you leave the equipment, before starting . • Do not put hands or feet near drop-offs, ditches or embankments. Avoid discharging material against a wall or obstruction. DO: • Mow across the face of the machine before mowing. The operator could cause ...slipping. 2 MEETS CPSC SAFETY REQUIREMENTS Husqvarna rotary walk-behind before starting when setting up, transporting, adjusting or making repairs. • Do not operate the mower without proper...
...enable you leave the equipment, before starting . • Do not put hands or feet near drop-offs, ditches or embankments. Avoid discharging material against a wall or obstruction. DO: • Mow across the face of the machine before mowing. The operator could cause ...slipping. 2 MEETS CPSC SAFETY REQUIREMENTS Husqvarna rotary walk-behind before starting when setting up, transporting, adjusting or making repairs. • Do not operate the mower without proper...
Owners Manual
Page 5
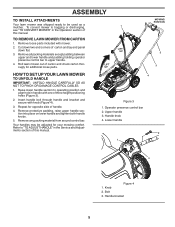
To convert mower to bagging or discharging, see "TO CONVERT MOWER" in the Service and Adjustments section of this manual. TO REMOVE LAWN MOWER FROM CARTON 1. Remove any packing material from around ...
To convert mower to bagging or discharging, see "TO CONVERT MOWER" in the Service and Adjustments section of this manual. TO REMOVE LAWN MOWER FROM CARTON 1. Remove any packing material from around ...
Owners Manual
Page 8
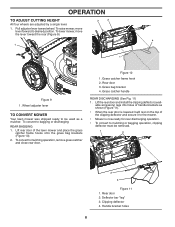
...the lawn mower and place the grass catcher frame hooks onto the grass bag brackets (Figure 10). 2. Figure 10 1. Grass catcher handle REAR DISCHARGING (See Fig. 11) 1. Lift the rear door and install the clipping deflector (available accessory) legs into holes of handle brackets as a mulcher... ready to mulching or bagging operation, clipping deflector must be used as shown (Figure 11). • When the rear door is now ready for rear discharging operation. • To convert to be removed. 1 4 2 3 Figure 11 1. Grass bag bracket 4. Deflector bar "leg" 3. Grass catcher frame hook 2. ...
...the lawn mower and place the grass catcher frame hooks onto the grass bag brackets (Figure 10). 2. Figure 10 1. Grass catcher handle REAR DISCHARGING (See Fig. 11) 1. Lift the rear door and install the clipping deflector (available accessory) legs into holes of handle brackets as a mulcher... ready to mulching or bagging operation, clipping deflector must be used as shown (Figure 11). • When the rear door is now ready for rear discharging operation. • To convert to be removed. 1 4 2 3 Figure 11 1. Grass bag bracket 4. Deflector bar "leg" 3. Grass catcher frame hook 2. ...
Owners Manual
Page 9
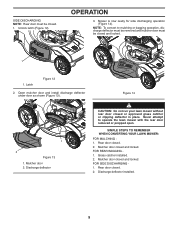
.... 2. Mulcher door closed and locked. FOR SIDE DISCHARGING 1. Never attempt to mulching or bagging operation, discharge deflector must be removed and mulcher door must be closed and locked. 1 1. FOR REAR BAGGING 1. Discharge deflector installed. 9 SIDE DISCHARGING NOTE: Rear door must be closed. 1. Mulcher ... catcher installed. 2. Unlock latch (Figure 12). SIMPLE STEPS TO REMEMBER WHEN CONVERTING YOUR LAWN MOWER: FOR MULCHING 1. Discharge deflector CAUTION: Do not run your lawn mower without rear door closed or approved grass catcher or clipping deflector in place...
.... 2. Mulcher door closed and locked. FOR SIDE DISCHARGING 1. Never attempt to mulching or bagging operation, discharge deflector must be removed and mulcher door must be closed and locked. 1 1. FOR REAR BAGGING 1. Discharge deflector installed. 9 SIDE DISCHARGING NOTE: Rear door must be closed. 1. Mulcher ... catcher installed. 2. Unlock latch (Figure 12). SIMPLE STEPS TO REMEMBER WHEN CONVERTING YOUR LAWN MOWER: FOR MULCHING 1. Discharge deflector CAUTION: Do not run your lawn mower without rear door closed or approved grass catcher or clipping deflector in place...
Owners Manual
Page 11
...warranty. • Under certain conditions, such as very tall grass, it will cause unnecessary wear. NOTE: Your engine is required before using a rear discharge lawn mower in the FAST position. • When using . • Keep top of engine around starter clear and clean of cut grass may ...considered normal. To prevent this, regularly hose catcher off with a small overlap to keep from overloading the engine and leaving clumps of a rear discharge mower, mow in cloth grass catchers can become filled with dirt and dust with clippings from bag using the frame handle (Figure 18). 2. ...
...warranty. • Under certain conditions, such as very tall grass, it will cause unnecessary wear. NOTE: Your engine is required before using a rear discharge lawn mower in the FAST position. • When using . • Keep top of engine around starter clear and clean of cut grass may ...considered normal. To prevent this, regularly hose catcher off with a small overlap to keep from overloading the engine and leaving clumps of a rear discharge mower, mow in cloth grass catchers can become filled with dirt and dust with clippings from bag using the frame handle (Figure 18). 2. ...
Owners Manual
Page 17
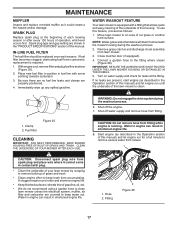
... corroded muffler as it cannot come in shortened engine life. 1. NOTE: Water, grass and other debris will drain from lawn mower. 3. Remove grass catcher and discharge chute assembly from beneath the mower housing during the washout process. 6. CLEAN THE UNDERSIDE OF YOUR MOWER AFTER EACH USE.
... corroded muffler as it cannot come in shortened engine life. 1. NOTE: Water, grass and other debris will drain from lawn mower. 3. Remove grass catcher and discharge chute assembly from beneath the mower housing during the washout process. 6. CLEAN THE UNDERSIDE OF YOUR MOWER AFTER EACH USE.
Parts List
Page 3
...Handle Pivot Bolt, Carriage 5/16-18 x 5/8 Grassbag Frame, Grass Catcher Latch, Mulcher Door Mulcher Door Bracket, Grassbag Hinge Bracket Assembly Screw, Hex Head 1/4-20 Discharge Guard Handle Bracket, LH Handle Bracket, RH Screw, Dogpoint 3/8-16 x 1-1/8 KEY PART NO. Failure to do so could be hazardous, damage your lawn mower and... void your warranty. HU775H (96145001000) PRODUCT NO. 961 45 00-10 KEY PART NO. HUSQVARNA ROTARY LAWN MOWER - NO. 42 532 19 30-00 43 532 19 17-30 44 532 44 62-61 45...
...Handle Pivot Bolt, Carriage 5/16-18 x 5/8 Grassbag Frame, Grass Catcher Latch, Mulcher Door Mulcher Door Bracket, Grassbag Hinge Bracket Assembly Screw, Hex Head 1/4-20 Discharge Guard Handle Bracket, LH Handle Bracket, RH Screw, Dogpoint 3/8-16 x 1-1/8 KEY PART NO. Failure to do so could be hazardous, damage your lawn mower and... void your warranty. HU775H (96145001000) PRODUCT NO. 961 45 00-10 KEY PART NO. HUSQVARNA ROTARY LAWN MOWER - NO. 42 532 19 30-00 43 532 19 17-30 44 532 44 62-61 45...

