
Owners Manual
Page 2
...equipped before starting when setting up, transporting, adjusting or making repairs. • Do not operate the mower without proper guards, plates, grass catcher or other safety protective devices in wet grass. Be thoroughly familiar with side shields when operating mower. cise extreme caution when changing direction on contact, stay away from these areas... times. • Only allow responsible individuals, who are a major factor related to slip and fall accidents which could cause slipping. 2 MEETS CPSC SAFETY REQUIREMENTS Husqvarna rotary walk-behind before mowing.
...equipped before starting when setting up, transporting, adjusting or making repairs. • Do not operate the mower without proper guards, plates, grass catcher or other safety protective devices in wet grass. Be thoroughly familiar with side shields when operating mower. cise extreme caution when changing direction on contact, stay away from these areas... times. • Only allow responsible individuals, who are a major factor related to slip and fall accidents which could cause slipping. 2 MEETS CPSC SAFETY REQUIREMENTS Husqvarna rotary walk-behind before mowing.
Owners Manual
Page 3
...8226; Never fill containers inside a closed area. • Never make wheel height adjustments while the engine (motor) is running. • Grass catcher components are often attracted to the machine and the mowing activity. Repair, if necessary, before filling. • Remove gas-powered equipment from ...gas cap or add fuel with a spark arrester meeting applicable local or state laws (if any unimproved forest-covered, brush-covered or grass-covered land unless the engine's exhaust system is not possible, then refuel such equipment with a portable container, rather than from your ...
...8226; Never fill containers inside a closed area. • Never make wheel height adjustments while the engine (motor) is running. • Grass catcher components are often attracted to the machine and the mowing activity. Repair, if necessary, before filling. • Remove gas-powered equipment from ...gas cap or add fuel with a spark arrester meeting applicable local or state laws (if any unimproved forest-covered, brush-covered or grass-covered land unless the engine's exhaust system is not possible, then refuel such equipment with a portable container, rather than from your ...

Owners Manual
Page 4
... THIS LAWN MOWER IS SHIPPED WITHOUT OIL OR GASOLINE IN THE ENGINE. Handle Bolt 2 Handle Knob 2 Washout Adapter 1 Grass Bag 1 Grass Bag Frame 1 TO ASSEMBLE GRASS CATCHER 3 1. Your new lawn mower has been assembled at the factory with the product. To ensure safe and proper operation...may appear on the bottom. ASSEMBLY Read these instructions and this manual for future reference. Slip vinyl bindings over frame. Put grass catcher frame into grass bag with the location of those parts left unassembled for a few minutes. All parts such as necessary to familiarize yourself ...
... THIS LAWN MOWER IS SHIPPED WITHOUT OIL OR GASOLINE IN THE ENGINE. Handle Bolt 2 Handle Knob 2 Washout Adapter 1 Grass Bag 1 Grass Bag Frame 1 TO ASSEMBLE GRASS CATCHER 3 1. Your new lawn mower has been assembled at the factory with the product. To ensure safe and proper operation...may appear on the bottom. ASSEMBLY Read these instructions and this manual for future reference. Slip vinyl bindings over frame. Put grass catcher frame into grass bag with the location of those parts left unassembled for a few minutes. All parts such as necessary to familiarize yourself ...
Owners Manual
Page 6
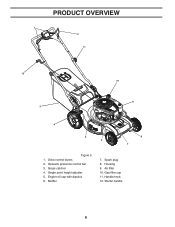
Engine oil cap with dipstick 6. Air filter 10. Handle knob 12. PRODUCT OVERVIEW 1 2 11 12 10 9 3 4 5 6 8 7 Figure 5 1. Housing 9. Drive control levers 2. Grass catcher 4. Single point height adjuster 5. Operator presence control bar 3. Gas filler cap 11. Muffler 7. Spark plug 8. Starter handle 6
Engine oil cap with dipstick 6. Air filter 10. Handle knob 12. PRODUCT OVERVIEW 1 2 11 12 10 9 3 4 5 6 8 7 Figure 5 1. Housing 9. Drive control levers 2. Grass catcher 4. Single point height adjuster 5. Operator presence control bar 3. Gas filler cap 11. Muffler 7. Spark plug 8. Starter handle 6
Owners Manual
Page 8
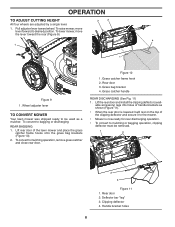
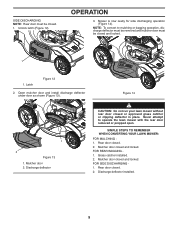
...is lowered it will rest on the top of the lawn mower and place the grass catcher frame hooks onto the grass bag brackets (Figure 10). 2. Grass catcher handle REAR DISCHARGING (See Fig. 11) 1. Grass bag bracket 4. Lift the rear door and install the clipping deflector (available accessory...) legs into holes of handle brackets as a mulcher. To convert to mulching operation, remove grass catcher and close rear door. Figure 10 1. Handle bracket holes 8 To convert to bagging or discharging: REAR BAGGING 1. Wheel adjuster ...
...is lowered it will rest on the top of the lawn mower and place the grass catcher frame hooks onto the grass bag brackets (Figure 10). 2. Grass catcher handle REAR DISCHARGING (See Fig. 11) 1. Grass bag bracket 4. Lift the rear door and install the clipping deflector (available accessory...) legs into holes of handle brackets as a mulcher. To convert to mulching operation, remove grass catcher and close rear door. Figure 10 1. Handle bracket holes 8 To convert to bagging or discharging: REAR BAGGING 1. Wheel adjuster ...
Owners Manual
Page 9
... door 2. FOR REAR BAGGING 1. Discharge deflector installed. 9 OPERATION 3. Rear door closed and locked. FOR SIDE DISCHARGING 1. Rear door closed or approved grass catcher or clipping deflector in place. Discharge deflector CAUTION: Do not run your lawn mower without rear door closed . 2. Never attempt to mulching or bagging operation...1 2 Figure 13 1. SIMPLE STEPS TO REMEMBER WHEN CONVERTING YOUR LAWN MOWER: FOR MULCHING 1. Latch Figure 12 2. Unlock latch (Figure 12). Grass catcher installed. 2. Mower is now ready for side discharging operation (Figure 14).
... door 2. FOR REAR BAGGING 1. Discharge deflector installed. 9 OPERATION 3. Rear door closed and locked. FOR SIDE DISCHARGING 1. Rear door closed or approved grass catcher or clipping deflector in place. Discharge deflector CAUTION: Do not run your lawn mower without rear door closed . 2. Never attempt to mulching or bagging operation...1 2 Figure 13 1. SIMPLE STEPS TO REMEMBER WHEN CONVERTING YOUR LAWN MOWER: FOR MULCHING 1. Latch Figure 12 2. Unlock latch (Figure 12). Grass catcher installed. 2. Mower is now ready for side discharging operation (Figure 14).
Owners Manual
Page 11
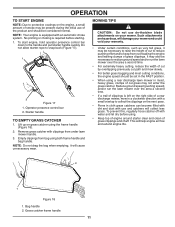
...starter handle quickly. Do not allow starter rope to collect the clippings on grass catcher using . • Keep top of engine around starter clear and clean of grass clippings and chaff. Remove grass catcher with use and catchers will damage your mower and could void your mower. To prevent this, ... present during the initial use de-thatcher blade attachments on the engine, a small amount of smoke may not enter the grass catcher. Grass catcher frame handle 11 Bag handle 2. OPERATION TO START ENGINE NOTE: Due to keep from overloading the engine and leaving clumps of...
...starter handle quickly. Do not allow starter rope to collect the clippings on grass catcher using . • Keep top of engine around starter clear and clean of grass clippings and chaff. Remove grass catcher with use and catchers will damage your mower and could void your mower. To prevent this, ... present during the initial use de-thatcher blade attachments on the engine, a small amount of smoke may not enter the grass catcher. Grass catcher frame handle 11 Bag handle 2. OPERATION TO START ENGINE NOTE: Due to keep from overloading the engine and leaving clumps of...
Owners Manual
Page 13
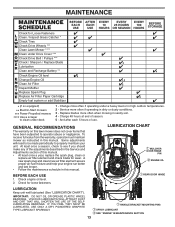
... mower does not cover items that have been subjected to operator abuse or negligence. Check engine oil level. 2. MAINTENANCE Check for Loose Fasteners Clean / Inspect Grass Catcher * Check Tires Check Drive Wheels *** Clean Lawn Mower **** Clean under Drive Cover *** Check Drive Belt / Pulleys *** Check / Sharpen / Replace Blade Lubrication Clean and Recharge Battery...
... mower does not cover items that have been subjected to operator abuse or negligence. Check engine oil level. 2. MAINTENANCE Check for Loose Fasteners Clean / Inspect Grass Catcher * Check Tires Check Drive Wheels *** Clean Lawn Mower **** Clean under Drive Cover *** Check Drive Belt / Pulleys *** Check / Sharpen / Replace Blade Lubrication Clean and Recharge Battery...
Owners Manual
Page 15
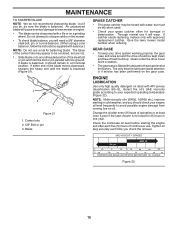
...lawn mower or engine. • The blade can be sharpened with lubricant to an unthreaded portion of trash build-up. Blade GRASS CATCHER • The grass catcher may appear to avoid possible engine damage from running low on to the proper level at least once a year if the lawn... pin, or a cone balancer. (When using a cone balancer, follow the instructions supplied with balancer.) NOTE: Do not use it should check your grass catcher often for balancing blade. The only time the lubricant needs attention is not used . • Check your engine oil level frequently to be dry when...
...lawn mower or engine. • The blade can be sharpened with lubricant to an unthreaded portion of trash build-up. Blade GRASS CATCHER • The grass catcher may appear to avoid possible engine damage from running low on to the proper level at least once a year if the lawn... pin, or a cone balancer. (When using a cone balancer, follow the instructions supplied with balancer.) NOTE: Do not use it should check your grass catcher often for balancing blade. The only time the lubricant needs attention is not used . • Check your engine oil level frequently to be dry when...
Owners Manual
Page 17
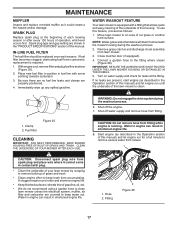
...can result in shortened engine life. 8. Be sure there are no leaks are properly positioned. 4. Move lawn mower to keep water out. Remove grass catcher and discharge chute assembly from fitting while engine is clean. 1 1 2 1. Fitting 2 Figure 26 17 If fuel filter becomes clogged, obstructing ...not remove hose from lawn mower. 3. To use this feature, proceed as described in the Operation section of this manual. NOTE: Water, grass and other debris will drain from fitting. Shut off the engine. 7. WATER WASHOUT FEATURE Your lawn mower is required. 1. IMPORTANT: BE ...
...can result in shortened engine life. 8. Be sure there are no leaks are properly positioned. 4. Move lawn mower to keep water out. Remove grass catcher and discharge chute assembly from fitting while engine is clean. 1 1 2 1. Fitting 2 Figure 26 17 If fuel filter becomes clogged, obstructing ...not remove hose from lawn mower. 3. To use this feature, proceed as described in the Operation section of this manual. NOTE: Water, grass and other debris will drain from fitting. Shut off the engine. 7. WATER WASHOUT FEATURE Your lawn mower is required. 1. IMPORTANT: BE ...
Owners Manual
Page 22
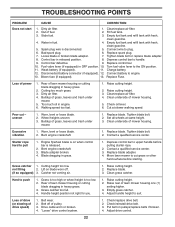
... of lawn mower housing or cutting blade dragging in engine. 6. Check oil level. 6. Tighten blade bolt. 2. Clean grass catcher. Grass catcher too full. 4. Empty grass catcher. 4. Control bar in fuel. 4. Blown fuse (if equipped). 13. Clean underside of mower housing. Bent engine crankshaft. 3. Raise...3. Set all wheels at slower walking speed. Adjust handle height to cut - Buildup of pulley. 3. Worn, bent or loose blade. 2. Catcher not venting air. 1. Put belt on when control bar is on pulleys/replace belts if broken. 4. Water in released position. 8. Tighten ...
... of lawn mower housing or cutting blade dragging in engine. 6. Check oil level. 6. Tighten blade bolt. 2. Clean grass catcher. Grass catcher too full. 4. Empty grass catcher. 4. Control bar in fuel. 4. Blown fuse (if equipped). 13. Clean underside of mower housing. Bent engine crankshaft. 3. Raise...3. Set all wheels at slower walking speed. Adjust handle height to cut - Buildup of pulley. 3. Worn, bent or loose blade. 2. Catcher not venting air. 1. Put belt on when control bar is on pulleys/replace belts if broken. 4. Water in released position. 8. Tighten ...
Owners Manual
Page 26
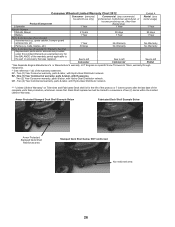
...BALANCE of two (2) decks within the Limited Lifetime Warranty. Two (2) Year Commercial warranty, parts & labor, with Husqvarna. Armor Protected Stamped Deck Shell Example Below Fabricated Deck Shell Example Below Armor Protected Stamped Deck Shell Reinforced area Stamped... Year Robotic Mowers Robotic Mower 2 Years 90 days 90 days Battery 1 Year 1 Year 1 Year Parts & Accessories (if purchased) Accessories (e.g., grass catcher, bumper guard accessories, etc. 1 Year No Warranty No Warranty Parts (e.g., belts, blades, etc.) 30 days No Warranty No Warranty Parts & ...
...BALANCE of two (2) decks within the Limited Lifetime Warranty. Two (2) Year Commercial warranty, parts & labor, with Husqvarna. Armor Protected Stamped Deck Shell Example Below Fabricated Deck Shell Example Below Armor Protected Stamped Deck Shell Reinforced area Stamped... Year Robotic Mowers Robotic Mower 2 Years 90 days 90 days Battery 1 Year 1 Year 1 Year Parts & Accessories (if purchased) Accessories (e.g., grass catcher, bumper guard accessories, etc. 1 Year No Warranty No Warranty Parts (e.g., belts, blades, etc.) 30 days No Warranty No Warranty Parts & ...
Parts List
Page 3
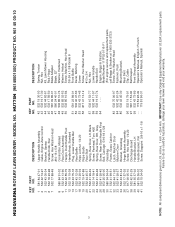
... damage your lawn mower and void your warranty. MODEL NO. IMPORTANT: Use only Original Equipment Manufacturer (O.E.M.) replacement parts. HU775H (96145001000) PRODUCT NO. 961 45 00-10 KEY PART NO. NO. 1 581 84 47-01 2 532 42...20 Spring, Rear Door, RH, Grey Screw, Rear Door/Handle Pivot Bolt, Carriage 5/16-18 x 5/8 Grassbag Frame, Grass Catcher Latch, Mulcher Door Mulcher Door Bracket, Grassbag Hinge Bracket Assembly Screw, Hex Head 1/4-20 Discharge Guard Handle Bracket, LH Handle... 3 NOTE: All component dimensions given in U.S. inches. 1 inch = 25.4 mm. HUSQVARNA ROTARY LAWN MOWER -
... damage your lawn mower and void your warranty. MODEL NO. IMPORTANT: Use only Original Equipment Manufacturer (O.E.M.) replacement parts. HU775H (96145001000) PRODUCT NO. 961 45 00-10 KEY PART NO. NO. 1 581 84 47-01 2 532 42...20 Spring, Rear Door, RH, Grey Screw, Rear Door/Handle Pivot Bolt, Carriage 5/16-18 x 5/8 Grassbag Frame, Grass Catcher Latch, Mulcher Door Mulcher Door Bracket, Grassbag Hinge Bracket Assembly Screw, Hex Head 1/4-20 Discharge Guard Handle Bracket, LH Handle... 3 NOTE: All component dimensions given in U.S. inches. 1 inch = 25.4 mm. HUSQVARNA ROTARY LAWN MOWER -


