
Parts List
Page 3
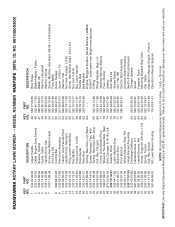
.... 1 inch = 25.4 mm IMPORTANT: Use only Original Equipment Manufacturer (O.E.M.) replacement parts. Failure to do so could be hazardous, damage your lawn mower and void your warranty. HUSQVARNA ROTARY LAWN MOWER - - MODEL NUMBER HU675FE (MFG. NO. 96143009300) 3 KEY PART NO. ID. NO. 45 532 17 56-50 46 532 42 17-82 47 580 24...
.... 1 inch = 25.4 mm IMPORTANT: Use only Original Equipment Manufacturer (O.E.M.) replacement parts. Failure to do so could be hazardous, damage your lawn mower and void your warranty. HUSQVARNA ROTARY LAWN MOWER - - MODEL NUMBER HU675FE (MFG. NO. 96143009300) 3 KEY PART NO. ID. NO. 45 532 17 56-50 46 532 42 17-82 47 580 24...

Parts List
Page 5
...: All component dimensions given in U.S. inches. 1 inch = 25.4 mm IMPORTANT: Use only Original Equipment Manufacturer (O.E.M.) replacement parts. MODEL NUMBER HU675FE (MFG. ID. Failure to do so could be hazardous, damage your lawn mower and void your warranty. NO. 1 579 70 89-17 9 532 43 16-49 10 532 43 27-90 11... Assembly, Front E-Ring Pinion Dust Cover Pawl, Drive Washer, Flat 3/8 Selector Knob Screw Belt Guide Bracket Screw, Hi-Lo Thread #12 x 5/8 Screw KEY PART NO. HUSQVARNA ROTARY LAWN MOWER - -
...: All component dimensions given in U.S. inches. 1 inch = 25.4 mm IMPORTANT: Use only Original Equipment Manufacturer (O.E.M.) replacement parts. MODEL NUMBER HU675FE (MFG. ID. Failure to do so could be hazardous, damage your lawn mower and void your warranty. NO. 1 579 70 89-17 9 532 43 16-49 10 532 43 27-90 11... Assembly, Front E-Ring Pinion Dust Cover Pawl, Drive Washer, Flat 3/8 Selector Knob Screw Belt Guide Bracket Screw, Hi-Lo Thread #12 x 5/8 Screw KEY PART NO. HUSQVARNA ROTARY LAWN MOWER - -
Operation Manual
Page 2
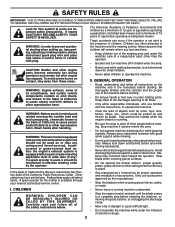
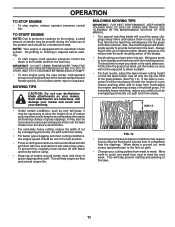
...covered land unless the engine's exhaust system is clear of children. WARNING: In order to a complete stop before operating a riding lawn mower. Be thoroughly familiar with a spark arrester meeting applicable local or state laws (if any). I. Always wear substantial footwear with plug. Material... center. Avoid discharging material against a wall or obstruction. Stop blade when crossing gravel surfaces. • Do not operate the mower without proper guards, plates, grass catcher or other engine parts become extremely hot during operation and remain hot after handling. Only ...
...covered land unless the engine's exhaust system is clear of children. WARNING: In order to a complete stop before operating a riding lawn mower. Be thoroughly familiar with a spark arrester meeting applicable local or state laws (if any). I. Always wear substantial footwear with plug. Material... center. Avoid discharging material against a wall or obstruction. Stop blade when crossing gravel surfaces. • Do not operate the mower without proper guards, plates, grass catcher or other engine parts become extremely hot during operation and remain hot after handling. Only ...

Operation Manual
Page 3
... machine, including (at all nuts and bolts tight to wear, damage, and deterioration, which can result in contact with manufacturer's recommended parts, when necessary. • Mower blades are outside mowing. Frequently check components and replace with the rim of trouble. • Always wear eye protection when operating machine. • Use extra...
... machine, including (at all nuts and bolts tight to wear, damage, and deterioration, which can result in contact with manufacturer's recommended parts, when necessary. • Mower blades are outside mowing. Frequently check components and replace with the rim of trouble. • Always wear eye protection when operating machine. • Use extra...
Operation Manual
Page 4
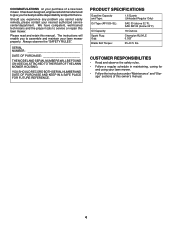
... give you the best possible dependability and performance. lbs. The instructions will enable you cannot easily remedy, please contact your lawn mower properly. CUSTOMER RESPONSIBILITIES • Read and observe the safety rules. • Follow a regular schedule in maintaining, caring for... to assemble and maintain your nearest authorized service center/department. CONGRATULATIONS on your lawn mower. • Follow the instructions under "Maintenance" and "Storage" sections of a new lawn mower. Always observe the "SAFETY RULES". YOU SHOULD RECORD BOTH SERIAL NUMBER AND DATE ...
... give you the best possible dependability and performance. lbs. The instructions will enable you cannot easily remedy, please contact your lawn mower properly. CUSTOMER RESPONSIBILITIES • Read and observe the safety rules. • Follow a regular schedule in maintaining, caring for... to assemble and maintain your nearest authorized service center/department. CONGRATULATIONS on your lawn mower. • Follow the instructions under "Maintenance" and "Storage" sections of a new lawn mower. Always observe the "SAFETY RULES". YOU SHOULD RECORD BOTH SERIAL NUMBER AND DATE ...

Operation Manual
Page 5
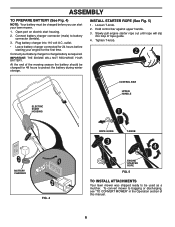
...comfort. Remove protective padding, raise upper handle section into grass bag with knob. 3. ASSEMBLY Read these instructions and this manual. Roll lawn mower out of the bag top. 2. OPERATOR PRESENCE CONTROL BAR LIFT UP MOWING POSITION LIFT UP UPPER HANDLE HANDLE KNOB LOWER HANDLE FIG. 1... TO ASSEMBLE GRASS CATCHER (See Fig. 3) 1. Your handles may be tightened securely. IMPORTANT: THIS LAWN MOWER IS SHIPPED WITHOUT OIL OR GASOLINE IN THE ENGINE. Use the correct tools as nuts, washers, bolts, etc., necessary to operating position and ...
...comfort. Remove protective padding, raise upper handle section into grass bag with knob. 3. ASSEMBLY Read these instructions and this manual. Roll lawn mower out of the bag top. 2. OPERATOR PRESENCE CONTROL BAR LIFT UP MOWING POSITION LIFT UP UPPER HANDLE HANDLE KNOB LOWER HANDLE FIG. 1... TO ASSEMBLE GRASS CATCHER (See Fig. 3) 1. Your handles may be tightened securely. IMPORTANT: THIS LAWN MOWER IS SHIPPED WITHOUT OIL OR GASOLINE IN THE ENGINE. Use the correct tools as nuts, washers, bolts, etc., necessary to operating position and ...
Operation Manual
Page 6
... 5) 1. Slowly pull engine starter rope out until rope will slip into 110 volt A.C. Tighten T-knob. Open port on electric start your lawn mower. 1. outlet. • Leave battery charger connected for 24 hours before you can start housing. 2. Hold control bar against upper handle. 3. Plug... loop of the mowing season the battery should be charged before starting your battery charger to charge battery as a mulcher. To convert mower to be used as required. CONTROL BAR UPPER HANDLE ELECTRIC START HOUSING ROPE GUIDE T-KNOB BATTERY CHARGER FIG. 4 ENGINE STARTER ROPE ...
... 5) 1. Slowly pull engine starter rope out until rope will slip into 110 volt A.C. Tighten T-knob. Open port on electric start your lawn mower. 1. outlet. • Leave battery charger connected for 24 hours before you can start housing. 2. Hold control bar against upper handle. 3. Plug... loop of the mowing season the battery should be charged before starting your battery charger to charge battery as a mulcher. To convert mower to be used as required. CONTROL BAR UPPER HANDLE ELECTRIC START HOUSING ROPE GUIDE T-KNOB BATTERY CHARGER FIG. 4 ENGINE STARTER ROPE ...

Operation Manual
Page 7
...OIL CAP WITH DIPSTICK GRASS CATCHER WHEEL HEIGHT ADJUSTER (ON EACH WHEEL) MUFFLER GASOLINE FILLER CAP AIR FILTER HOUSING IMPORTANT: This lawn mower is shipped WITHOUT OIL OR GASOLINE in literature supplied with the product. Release to engage powerpropelled forward motion lawn...void the product warranty. must be held STARTER BUTTON - used to stop the engine. These symbols may appear on your lawn mower to familiarize yourself with your lawn mower or in the engine. The use in this machine. OPERATOR PRESENCE CONTROL BAR - Compare the illustrations with the location of the...
...OIL CAP WITH DIPSTICK GRASS CATCHER WHEEL HEIGHT ADJUSTER (ON EACH WHEEL) MUFFLER GASOLINE FILLER CAP AIR FILTER HOUSING IMPORTANT: This lawn mower is shipped WITHOUT OIL OR GASOLINE in literature supplied with the product. Release to engage powerpropelled forward motion lawn...void the product warranty. must be held STARTER BUTTON - used to stop the engine. These symbols may appear on your lawn mower to familiarize yourself with your lawn mower or in the engine. The use in this machine. OPERATOR PRESENCE CONTROL BAR - Compare the illustrations with the location of the...

Operation Manual
Page 8
... the drive control system may become "loose", resulting in the same setting. Proceed as re- Turn unit off the ground while turning lawn mower. Operate mower to defeat the function of the operator control. Readjust as follows: 1. quired. 4. ADJUSTMENT TURNBUCKLE FIG. 7 TO ADJUST CUTTING HEIGHT (See... engine, release a drive control lever only. Use ear protectors to avoid damage to improve after releasing the drive control the mower will stop forward motion without self-propelling. If condition fails to hearing. We recommend standard safety glasses or a wide vision ...
... the drive control system may become "loose", resulting in the same setting. Proceed as re- Turn unit off the ground while turning lawn mower. Operate mower to defeat the function of the operator control. Readjust as follows: 1. quired. 4. ADJUSTMENT TURNBUCKLE FIG. 7 TO ADJUST CUTTING HEIGHT (See... engine, release a drive control lever only. Use ear protectors to avoid damage to improve after releasing the drive control the mower will stop forward motion without self-propelling. If condition fails to hearing. We recommend standard safety glasses or a wide vision ...

Operation Manual
Page 9
...and close rear door. Mulcher door closed . 2. To convert to bagging or discharging: REAR BAGGING (See Fig. 9) • Lift rear door of the lawn mower and place the grass catcher frame hooks onto the grass bag brackets. • To convert to operate the lawn... HOOK FIG. 9 UNLOCK LATCH OPEN MULCHER DOOR INSTALL DISCHARGE DEFLECTOR SIMPLE STEPS TO REMEMBER WHEN CONVERTING YOUR LAWN MOWER FOR MULCHING 1. Rear door closed and locked. CAUTION: Do not run your lawn mower without rear door closed . 2. Discharge deflector installed. Rear door closed or approved grass catcher in ...
...and close rear door. Mulcher door closed . 2. To convert to bagging or discharging: REAR BAGGING (See Fig. 9) • Lift rear door of the lawn mower and place the grass catcher frame hooks onto the grass bag brackets. • To convert to operate the lawn... HOOK FIG. 9 UNLOCK LATCH OPEN MULCHER DOOR INSTALL DISCHARGE DEFLECTOR SIMPLE STEPS TO REMEMBER WHEN CONVERTING YOUR LAWN MOWER FOR MULCHING 1. Rear door closed and locked. CAUTION: Do not run your lawn mower without rear door closed . 2. Discharge deflector installed. Rear door closed or approved grass catcher in ...

Operation Manual
Page 10
..., spill or use engine or carburetor cleaner products in the fuel tank or permanent damage may need to change the oil more often under lawn mower handle. 3. Empty the gas tank, start the engine and let it will smoke heavily from oil fill spout. 3. For type and grade of oil...
..., spill or use engine or carburetor cleaner products in the fuel tank or permanent damage may need to change the oil more often under lawn mower handle. 3. Empty the gas tank, start the engine and let it will smoke heavily from oil fill spout. 3. For type and grade of oil...
Operation Manual
Page 11
...early afternoon. Do not allow starter rope to the first cut path and mow slowly. MULCHING MOWING TIPS IMPORTANT: FOR BEST PERFORMANCE, KEEP MOWER HOUSING FREE OF BUILT-UP GRASS AND TRASH. SEE "CLEANING" IN THE MAINTENANCE SECTION OF THIS MANUAL. • The special mulching blade will ...biodegrade quickly to reduce ground speed and/or run the lawn mower over the area a second time. • For extremely heavy cutting, reduce the width of grass clippings and chaff. pings many times and reduce...
...early afternoon. Do not allow starter rope to the first cut path and mow slowly. MULCHING MOWING TIPS IMPORTANT: FOR BEST PERFORMANCE, KEEP MOWER HOUSING FREE OF BUILT-UP GRASS AND TRASH. SEE "CLEANING" IN THE MAINTENANCE SECTION OF THIS MANUAL. • The special mulching blade will ...biodegrade quickly to reduce ground speed and/or run the lawn mower over the area a second time. • For extremely heavy cutting, reduce the width of grass clippings and chaff. pings many times and reduce...
Operation Manual
Page 12
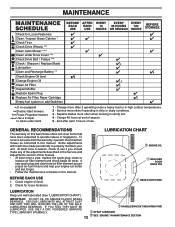
...25 HOURS 100 OR SEASON HOURS BEFORE STORAGE Check for Loose Fasteners Clean / Inspect Grass Catcher * Check Tires Check Drive Wheels *** Clean Lawn Mower **** Clean under Drive Cover *** Check Drive Belt / Pulleys *** Check / Sharpen / Replace Blade Lubrication Clean and Recharge Battery ** Check ...Inspect Muffler Replace Spark Plug Replace Air Filter Paper Cartridge Empty fuel system or add Stabilizer * (if so equipped) ** Electric-Start mowers *** Power-Propelled mowers **** Use a scraper to clean under a heavy load or in high outdoor temperatures. 2 - Some adjustments will need to be ...
...25 HOURS 100 OR SEASON HOURS BEFORE STORAGE Check for Loose Fasteners Clean / Inspect Grass Catcher * Check Tires Check Drive Wheels *** Clean Lawn Mower **** Clean under Drive Cover *** Check Drive Belt / Pulleys *** Check / Sharpen / Replace Blade Lubrication Clean and Recharge Battery ** Check ...Inspect Muffler Replace Spark Plug Replace Air Filter Paper Cartridge Empty fuel system or add Stabilizer * (if so equipped) ** Electric-Start mowers *** Power-Propelled mowers **** Use a scraper to clean under a heavy load or in high outdoor temperatures. 2 - Some adjustments will need to be ...
Operation Manual
Page 13
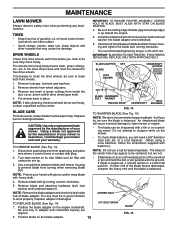
..., REPLACE ONLY WITH APPROVED BOLT. BLADE ADAPTER BLADE LOCK WASHER KEY CRANKSHAFT KEYWAY 1. Remove wheels from inside hub of wood between blade and mower housing to sharpen while on the engine crankshaft. Put wheels back in adapter and crankshaft keyway are not. • Slide blade on a grinding... (See Fig. 14) 1. The lobes of the steel bolt or pin and hold the bolt or pin parallel with plug. 2. MAINTENANCE LAWN MOWER Always observe safety rules when performing any trash or grass cuttings from wheel adjusters. 3. Using a blade not approved by the manufacturer of blade ...
..., REPLACE ONLY WITH APPROVED BOLT. BLADE ADAPTER BLADE LOCK WASHER KEY CRANKSHAFT KEYWAY 1. Remove wheels from inside hub of wood between blade and mower housing to sharpen while on the engine crankshaft. Put wheels back in adapter and crankshaft keyway are not. • Slide blade on a grinding... (See Fig. 14) 1. The lobes of the steel bolt or pin and hold the bolt or pin parallel with plug. 2. MAINTENANCE LAWN MOWER Always observe safety rules when performing any trash or grass cuttings from wheel adjusters. 3. Using a blade not approved by the manufacturer of blade ...
Operation Manual
Page 14
...oil, rechecking the dipstick until fuel tank is empty. 1. LIP BACK PLATE TO CHANGE ENGINE OIL (See Fig. 16) NOTE: Before tipping lawn mower to drain oil, empty fuel tank by using a dirty air filter. Check the crankcase oil level before starting engine. 9. Carefully remove cartridge.... spout, stopping every few ounces to retighten oil dipstick before starting in cold weather, these multi-viscosity oils will smoke heavily from lawn mower or side of operation or every season, whichever occurs first. Always be sure to check the oil level with plug. 2. ...
...oil, rechecking the dipstick until fuel tank is empty. 1. LIP BACK PLATE TO CHANGE ENGINE OIL (See Fig. 16) NOTE: Before tipping lawn mower to drain oil, empty fuel tank by using a dirty air filter. Check the crankcase oil level before starting engine. 9. Carefully remove cartridge.... spout, stopping every few ounces to retighten oil dipstick before starting in cold weather, these multi-viscosity oils will smoke heavily from lawn mower or side of operation or every season, whichever occurs first. Always be sure to check the oil level with plug. 2. ...

Operation Manual
Page 15
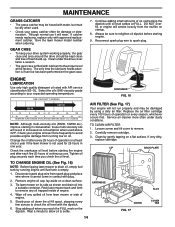
... 15 To use pressurized air to the fitting where shown. Scrape underside of cover with plug. • Clean the underside of your lawn mower unless the electrical system, muffler, air filter and carburetor are present, start engine (as follows: 1. Do not use this manual...Do not remove hose from fitting. Shut off water supply and remove hose from fitting while engine is clean. Move lawn mower to remove excess water from accumulating. SPARK PLUG Replace spark plug at the beginning of each mowing season or after every 100 hours of...
... 15 To use pressurized air to the fitting where shown. Scrape underside of cover with plug. • Clean the underside of your lawn mower unless the electrical system, muffler, air filter and carburetor are present, start engine (as follows: 1. Do not use this manual...Do not remove hose from fitting. Shut off water supply and remove hose from fitting while engine is clean. Move lawn mower to remove excess water from accumulating. SPARK PLUG Replace spark plug at the beginning of each mowing season or after every 100 hours of...
Operation Manual
Page 16
... drive belt on gearcase pulley. 6. Release control bar and stop engine. 2. REAR DEFLECTOR The rear deflector, attached between the rear wheels of the mower into the operator's mowing position. Remove belt from engine pulley. The recommended tightening torque is provided to upright position. 5. Return... plug wire from spark plug and place where it should be thrown out of the rear of your mower, is 35-40 ft. TO REMOVE DRIVE BELT (See Figs. 19 and 20) 1. Turn lawn mower on its side with plug. Route the other end of this manual. lbs. 4. Remove drive cover and...
... drive belt on gearcase pulley. 6. Release control bar and stop engine. 2. REAR DEFLECTOR The rear deflector, attached between the rear wheels of the mower into the operator's mowing position. Remove belt from engine pulley. The recommended tightening torque is provided to upright position. 5. Return... plug wire from spark plug and place where it should be thrown out of the rear of your mower, is 35-40 ft. TO REMOVE DRIVE BELT (See Figs. 19 and 20) 1. Turn lawn mower on its side with plug. Route the other end of this manual. lbs. 4. Remove drive cover and...

Operation Manual
Page 17
...period of handle with same positioning hole and secure with desired hole in handle bracket and reassemble bolt and knob and tighten securely. 3. LAWN MOWER When lawn mower is not adjustable. Be sure that suits you. 1. Store in the Maintenance section of the season or if the unit will require manually locking...TO FOLD THE HANDLE AS SHOWN OR YOU MAY DAMAGE THE CONTROL CABLES. 17 HANDLE (See Figs. 22 and 23) You can fold your mower for 30 days or more. While holding handle assembly, remove knob and carriage bolt from the storage position, the lower handle will not be stored...
...period of handle with same positioning hole and secure with desired hole in handle bracket and reassemble bolt and knob and tighten securely. 3. LAWN MOWER When lawn mower is not adjustable. Be sure that suits you. 1. Store in the Maintenance section of the season or if the unit will require manually locking...TO FOLD THE HANDLE AS SHOWN OR YOU MAY DAMAGE THE CONTROL CABLES. 17 HANDLE (See Figs. 22 and 23) You can fold your mower for 30 days or more. While holding handle assembly, remove knob and carriage bolt from the storage position, the lower handle will not be stored...
Operation Manual
Page 18
... STORAGE MOWING POSITION UPPER HANDLE • Empty the fuel tank by starting the engine and letting it to distribute oil. 4. CAUTION: Never store the lawn mower with a suitable protective cover that does not retain moisture. NOTE: Fuel stabilizer is an acceptable alternative in the Maintenance section of this manual). Run engine... to reach the carburetor. Pull starter handle slowly a few times to give protection from the engine connector and charge battery 48 hours. IMPORTANT: NEVER COVER MOWER WHILE ENGINE AND EXHAUST AREAS ARE STILL WARM.
... STORAGE MOWING POSITION UPPER HANDLE • Empty the fuel tank by starting the engine and letting it to distribute oil. 4. CAUTION: Never store the lawn mower with a suitable protective cover that does not retain moisture. NOTE: Fuel stabilizer is an acceptable alternative in the Maintenance section of this manual). Run engine... to reach the carburetor. Pull starter handle slowly a few times to give protection from the engine connector and charge battery 48 hours. IMPORTANT: NEVER COVER MOWER WHILE ENGINE AND EXHAUST AREAS ARE STILL WARM.

Operation Manual
Page 19
...not start 1. Connect wire to engine. Depress control bar to push 1. Replace control bar. 10. Charge battery. 12. Rear of lawn mower housing or cutting blade dragging in released position. 8. Buildup of pulley. 3. Replace blade. Bent engine crankshaft. 3. Lift on blade worn.... 3. Out of power 1. Control bar defective. 9. Turn fuel valve lever to cut - Check oil level. 6. uneven 1. Buildup of lawn mower housing one (1) setting higher. 3. Depress control bar to upper handle before starting. Stale fuel. 3. Empty fuel tank and refill tank ...
...not start 1. Connect wire to engine. Depress control bar to push 1. Replace control bar. 10. Charge battery. 12. Rear of lawn mower housing or cutting blade dragging in released position. 8. Buildup of pulley. 3. Replace blade. Bent engine crankshaft. 3. Lift on blade worn.... 3. Out of power 1. Control bar defective. 9. Turn fuel valve lever to cut - Check oil level. 6. uneven 1. Buildup of lawn mower housing one (1) setting higher. 3. Depress control bar to upper handle before starting. Stale fuel. 3. Empty fuel tank and refill tank ...


