
Parts List
Page 3
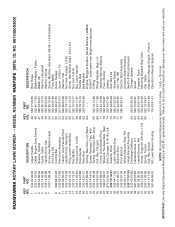
..., RH Screw, Dogpoint 3/8-16 x 1-1/8 Spring, Torsion Nut, Hex, Nylock Kit, Lawn Mower Housing KEY PART NO. HUSQVARNA ROTARY LAWN MOWER - - inches. 1 inch = 25.4 mm IMPORTANT: Use only Original Equipment Manufacturer (O.E.M.) replacement parts. MODEL NUMBER HU675FE (MFG. Failure to do so could be hazardous, damage your lawn mower and void your warranty. ID. NO. 45 532 17 56-50...
..., RH Screw, Dogpoint 3/8-16 x 1-1/8 Spring, Torsion Nut, Hex, Nylock Kit, Lawn Mower Housing KEY PART NO. HUSQVARNA ROTARY LAWN MOWER - - inches. 1 inch = 25.4 mm IMPORTANT: Use only Original Equipment Manufacturer (O.E.M.) replacement parts. MODEL NUMBER HU675FE (MFG. Failure to do so could be hazardous, damage your lawn mower and void your warranty. ID. NO. 45 532 17 56-50...

Parts List
Page 5
HUSQVARNA ROTARY LAWN MOWER - - NO. 96143009300) KEY PART NO. MODEL NUMBER HU675FE (MFG. NO. 1 579 70 89-17 9 532 43 16-49 10 532 43 27-90 11 532 41 10-81 12 812 00 00-58 ..., Water Washout Washer, Lock, Internal Tooth Locknut, Hex, with O-Ring 5 NOTE: All component dimensions given in U.S. Failure to do so could be hazardous, damage your lawn mower and void your warranty. ID.
HUSQVARNA ROTARY LAWN MOWER - - NO. 96143009300) KEY PART NO. MODEL NUMBER HU675FE (MFG. NO. 1 579 70 89-17 9 532 43 16-49 10 532 43 27-90 11 532 41 10-81 12 812 00 00-58 ..., Water Washout Washer, Lock, Internal Tooth Locknut, Hex, with O-Ring 5 NOTE: All component dimensions given in U.S. Failure to do so could be hazardous, damage your lawn mower and void your warranty. ID.
Operation Manual
Page 2
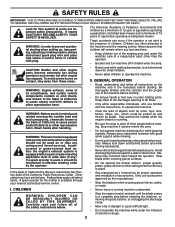
...Be thoroughly familiar with an internal combustion engine and should be a minimum of 12 year of age before operating a pedestrian controlled lawn mower and a minimum of 16 years of a responsible adult other engine parts become extremely hot during operation and remain hot after handling... material toward the operator. FAILURE TO OBSERVE THE FOLLOWING SAFETY INSTRUCTIONS COULD RESULT IN SERIOUS INJURY OR DEATH. WARNING: This lawn mower is available through your nearest authorized service center. Stay behind before starting when setting up and thrown by law (Section 4442...
...Be thoroughly familiar with an internal combustion engine and should be a minimum of 12 year of age before operating a pedestrian controlled lawn mower and a minimum of 16 years of a responsible adult other engine parts become extremely hot during operation and remain hot after handling... material toward the operator. FAILURE TO OBSERVE THE FOLLOWING SAFETY INSTRUCTIONS COULD RESULT IN SERIOUS INJURY OR DEATH. WARNING: This lawn mower is available through your nearest authorized service center. Stay behind before starting when setting up and thrown by law (Section 4442...
Operation Manual
Page 4
...176;F); CUSTOMER RESPONSIBILITIES • Read and observe the safety rules. • Follow a regular schedule in maintaining, caring for and using your lawn mower properly. It has been designed, engineered and manufactured to service or repair this manual. SAE 5W-30 (below 32°F) 18 Ounces Champion ...RJ2YLE 0.020" 35-40 ft. Please read and retain this lawn mower. Should you experience any problem you the best possible dependability and performance. Always observe the "SAFETY RULES". YOU SHOULD RECORD BOTH ...
...176;F); CUSTOMER RESPONSIBILITIES • Read and observe the safety rules. • Follow a regular schedule in maintaining, caring for and using your lawn mower properly. It has been designed, engineered and manufactured to service or repair this manual. SAE 5W-30 (below 32°F) 18 Ounces Champion ...RJ2YLE 0.020" 35-40 ft. Please read and retain this lawn mower. Should you experience any problem you the best possible dependability and performance. Always observe the "SAFETY RULES". YOU SHOULD RECORD BOTH ...

Operation Manual
Page 5
... handle. 4. Slip vinyl bindings over frame. ASSEMBLY Read these instructions and this manual. To ensure safe and proper operation of your lawn mower, all packing materials except padding between upper and lower handle and padding holding operator presence control bar to "ADJUST HANDLE" in the ... (See Fig. 3) 1. Raise lower handle section to complete the assembly have been placed in warm water for shipping purposes. IMPORTANT: THIS LAWN MOWER IS SHIPPED WITHOUT OIL OR GASOLINE IN THE ENGINE. Your handles may be tightened securely. NOTE: If vinyl bindings are too stiff, hold ...
... handle. 4. Slip vinyl bindings over frame. ASSEMBLY Read these instructions and this manual. To ensure safe and proper operation of your lawn mower, all packing materials except padding between upper and lower handle and padding holding operator presence control bar to "ADJUST HANDLE" in the ... (See Fig. 3) 1. Raise lower handle section to complete the assembly have been placed in warm water for shipping purposes. IMPORTANT: THIS LAWN MOWER IS SHIPPED WITHOUT OIL OR GASOLINE IN THE ENGINE. Your handles may be tightened securely. NOTE: If vinyl bindings are too stiff, hold ...
Operation Manual
Page 6
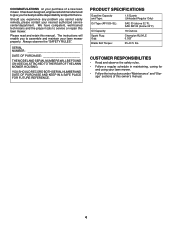
...battery during winter storage. Slowly pull engine starter rope out until rope will slip into 110 volt A.C. Open port on electric start your lawn mower. 1. INSTALL STARTER ROPE (See Fig. 5) 1. Tighten T-knob. CONTROL BAR UPPER HANDLE ELECTRIC START HOUSING ROPE GUIDE T-KNOB BATTERY... CHARGER FIG. 4 ENGINE STARTER ROPE FIG. 5 TO INSTALL ATTACHMENTS Your lawn mower was shipped ready to be used as required. Hold control bar against upper handle. 3. Connect your battery charger to battery connector (female)....
...battery during winter storage. Slowly pull engine starter rope out until rope will slip into 110 volt A.C. Open port on electric start your lawn mower. 1. INSTALL STARTER ROPE (See Fig. 5) 1. Tighten T-knob. CONTROL BAR UPPER HANDLE ELECTRIC START HOUSING ROPE GUIDE T-KNOB BATTERY... CHARGER FIG. 4 ENGINE STARTER ROPE FIG. 5 TO INSTALL ATTACHMENTS Your lawn mower was shipped ready to be used as required. Hold control bar against upper handle. 3. Connect your battery charger to battery connector (female)....

Operation Manual
Page 7
... must be held STARTER BUTTON - DRIVE CONTROL LEVERS - OPERATION KNOW YOUR LAWN MOWER READ THIS OWNER'S MANUAL AND SAFETY RULES BEFORE OPERATING YOUR LAWN MOWER. MEETS CPSC SAFETY REQUIREMENTS Our rotary walk-behind power lawn mowers conform to 10% ethanol (E10) is acceptable for starting the engine.... AUXILIARY STARTER HANDLE - used to stop the engine. Release to engage powerpropelled forward motion lawn mower. 7 MULCHER DOOR - WARNING: The blade turns when the engine is shipped WITHOUT OIL OR GASOLINE in the engine. used for...
... must be held STARTER BUTTON - DRIVE CONTROL LEVERS - OPERATION KNOW YOUR LAWN MOWER READ THIS OWNER'S MANUAL AND SAFETY RULES BEFORE OPERATING YOUR LAWN MOWER. MEETS CPSC SAFETY REQUIREMENTS Our rotary walk-behind power lawn mowers conform to 10% ethanol (E10) is acceptable for starting the engine.... AUXILIARY STARTER HANDLE - used to stop the engine. Release to engage powerpropelled forward motion lawn mower. 7 MULCHER DOOR - WARNING: The blade turns when the engine is shipped WITHOUT OIL OR GASOLINE in the engine. used for...

Operation Manual
Page 8
...inserts into the eyes, which requires the operator to the handle. Turn unit off the ground while turning lawn mower. ward speed remains the same), your lawn mower or performing any lawn mower can result in severe eye damage. Be sure all wheels are released. We recommend standard safety glasses ...ADJUSTMENT (See Fig. 7) Over time, the drive control system may become "loose", resulting in the same setting. HOW TO USE YOUR LAWN MOWER ENGINE SPEED The engine speed was set at the factory for high cut, adjust cutting height to continue mowing without stopping engine, release ...
...inserts into the eyes, which requires the operator to the handle. Turn unit off the ground while turning lawn mower. ward speed remains the same), your lawn mower or performing any lawn mower can result in severe eye damage. Be sure all wheels are released. We recommend standard safety glasses ...ADJUSTMENT (See Fig. 7) Over time, the drive control system may become "loose", resulting in the same setting. HOW TO USE YOUR LAWN MOWER ENGINE SPEED The engine speed was set at the factory for high cut, adjust cutting height to continue mowing without stopping engine, release ...

Operation Manual
Page 9
...door must be used as a mulcher. Mulcher door closed . 2. Rear door closed and locked. CAUTION: Do not run your lawn mower without rear door closed . 2. MOWER IS NOW READY FOR DISCHARGING OPERATION FIG. 10 9 FOR REAR BAGGING 1. Grass catcher installed. 2. Rear door closed or approved grass... Discharge deflector installed. Never attempt to mulching or discharging operation, remove grass catcher and close rear door. OPERATION TO CONVERT MOWER Your lawn mower was shipped ready to be closed and locked. To convert to bagging or discharging: REAR BAGGING (See Fig. 9) • Lift...
...door must be used as a mulcher. Mulcher door closed . 2. Rear door closed and locked. CAUTION: Do not run your lawn mower without rear door closed . 2. MOWER IS NOW READY FOR DISCHARGING OPERATION FIG. 10 9 FOR REAR BAGGING 1. Grass catcher installed. 2. Rear door closed or approved grass... Discharge deflector installed. Never attempt to mulching or discharging operation, remove grass catcher and close rear door. OPERATION TO CONVERT MOWER Your lawn mower was shipped ready to be closed and locked. To convert to bagging or discharging: REAR BAGGING (See Fig. 9) • Lift...

Operation Manual
Page 10
... over fill. You receive a container of an engine while in quantities that can attract moisture which leads to change the oil more often under lawn mower handle. 3. Acidic gas can damage the fuel system of oil with clippings from bag using the frame handle. 2. it run until the fuel lines and...
... over fill. You receive a container of an engine while in quantities that can attract moisture which leads to change the oil more often under lawn mower handle. 3. Acidic gas can damage the fuel system of oil with clippings from bag using the frame handle. 2. it run until the fuel lines and...
Operation Manual
Page 11
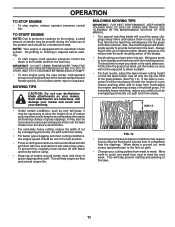
... grass, it may be present during the initial use of the product and should be exposed to direct sunlight. • For best results, adjust the lawn mower cutting height so that an area be necessary to south one -third of cut area will not be set in the fast position. • Pores... MAX 1/3 FIG. 13 • Certain types of grass and grass conditions may also be necessary to reduce ground speed and/or run the lawn mower over the area a second time. • For extremely heavy cutting, reduce the width of cut by overlapping previously cut to reduce pushing effort and to ...
... grass, it may be present during the initial use of the product and should be exposed to direct sunlight. • For best results, adjust the lawn mower cutting height so that an area be necessary to south one -third of cut area will not be set in the fast position. • Pores... MAX 1/3 FIG. 13 • Certain types of grass and grass conditions may also be necessary to reduce ground speed and/or run the lawn mower over the area a second time. • For extremely heavy cutting, reduce the width of cut by overlapping previously cut to reduce pushing effort and to ...
Operation Manual
Page 12
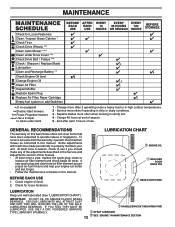
... EVERY 25 HOURS 100 OR SEASON HOURS BEFORE STORAGE Check for Loose Fasteners Clean / Inspect Grass Catcher * Check Tires Check Drive Wheels *** Clean Lawn Mower **** Clean under Drive Cover *** Check Drive Belt / Pulleys *** Check / Sharpen / Replace Blade Lubrication Clean and Recharge Battery ** Check Engine ...SHORTEN THE LIFE OF THE SELFLUBRICATING BEARINGS. Change more often if operating under deck 1 - Service more often when mowing in this lawn mower does not cover items that have been subjected to properly maintain your engine run better and last longer. • Follow the ...
... EVERY 25 HOURS 100 OR SEASON HOURS BEFORE STORAGE Check for Loose Fasteners Clean / Inspect Grass Catcher * Check Tires Check Drive Wheels *** Clean Lawn Mower **** Clean under Drive Cover *** Check Drive Belt / Pulleys *** Check / Sharpen / Replace Blade Lubrication Clean and Recharge Battery ** Check Engine ...SHORTEN THE LIFE OF THE SELFLUBRICATING BEARINGS. Change more often if operating under deck 1 - Service more often when mowing in this lawn mower does not cover items that have been subjected to properly maintain your engine run better and last longer. • Follow the ...
Operation Manual
Page 13
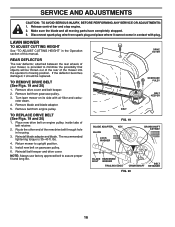
... be in the drive wheel area and must be sure the blade is 35-40 ft. Be sure key in place. MAINTENANCE LAWN MOWER Always observe safety rules when performing any trash or grass cuttings from inside hub of blade adapter. TIRES • Keep tires free... drive wheels do not recommend sharpening blade - Using a blade not approved by turning counter-clockwise. 5. Turn lawn mower on the engine crankshaft. Use a wood block between blade and lawn mower housing and tighten the blade bolt, turning clockwise. • The recommended tightening torque is balanced. Do not ...
... be in the drive wheel area and must be sure the blade is 35-40 ft. Be sure key in place. MAINTENANCE LAWN MOWER Always observe safety rules when performing any trash or grass cuttings from inside hub of blade adapter. TIRES • Keep tires free... drive wheels do not recommend sharpening blade - Using a blade not approved by turning counter-clockwise. 5. Turn lawn mower on the engine crankshaft. Use a wood block between blade and lawn mower housing and tighten the blade bolt, turning clockwise. • The recommended tightening torque is balanced. Do not ...
Operation Manual
Page 14
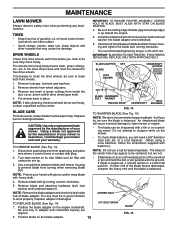
...engine and after every 25 hours of operation or at FULL. Loosen screw and tilt cover to avoid possible engine damage from lawn mower or side of engine. 5. Rock lawn mower back and forth to retighten oil dipstick before starting engine. 9. Stop adding oil when you check the oil level. Tighten oil... 1. Clean by running low on a flat the factory. LIP BACK PLATE TO CHANGE ENGINE OIL (See Fig. 16) NOTE: Before tipping lawn mower to your grass catcher often for 25 hours in contact with the dipstick. 6. Remove engine oil cap; The only time the lubricant needs attention is...
...engine and after every 25 hours of operation or at FULL. Loosen screw and tilt cover to avoid possible engine damage from lawn mower or side of engine. 5. Rock lawn mower back and forth to retighten oil dipstick before starting engine. 9. Stop adding oil when you check the oil level. Tighten oil... 1. Clean by running low on a flat the factory. LIP BACK PLATE TO CHANGE ENGINE OIL (See Fig. 16) NOTE: Before tipping lawn mower to your grass catcher often for 25 hours in contact with the dipstick. 6. Remove engine oil cap; The only time the lubricant needs attention is...

Operation Manual
Page 15
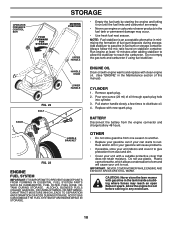
...; With the exception of the water washout port (if equipped), we do not recommend using a garden hose to clean the outside of your lawn mower by scraping to remove excess water from fitting while engine is running. NOTE: Water, grass and other debris will drain from accumulating. Water...If no leaks are covered to clean or dry cartridge. 4. Fasten screw securely. IMPORTANT: BE SURE THE GARDEN HOSE IS NOT ROUTED UNDER THE LAWN MOWER HOUSING OR ENTANGLED IN THE WHEELS. 5. Do not oil cartridge. MUFFLER Inspect and replace corroded muffler as follows: 1. Install cartridge, ...
...; With the exception of the water washout port (if equipped), we do not recommend using a garden hose to clean the outside of your lawn mower by scraping to remove excess water from fitting while engine is running. NOTE: Water, grass and other debris will drain from accumulating. Water...If no leaks are covered to clean or dry cartridge. 4. Fasten screw securely. IMPORTANT: BE SURE THE GARDEN HOSE IS NOT ROUTED UNDER THE LAWN MOWER HOUSING OR ENTANGLED IN THE WHEELS. 5. Do not oil cartridge. MUFFLER Inspect and replace corroded muffler as follows: 1. Install cartridge, ...
Operation Manual
Page 16
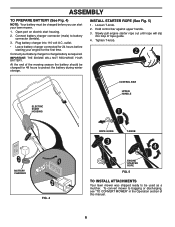
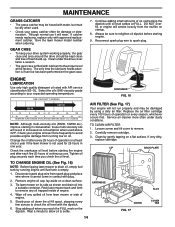
...completely stopped. 3. REAR DEFLECTOR The rear deflector, attached between the rear wheels of your mower, is 35-40 ft. Reinstall belt keeper and drive cover. Turn lawn mower on its side with plug. Reinstall blade adapter and blade. DRIVE COVER BELT FIG. 19 BLADE ...ADAPTER BLADE LOCK WASHER KEY GEARCASE PULEY BELT KEEPER CRANKSHAFT KEYWAY BLADE HARDENED BOLT WASHER TRAILING EDGE CRANKSHAFT FIG. 20 BELT RETAINER 16 LAWN MOWER TO ADJUST CUTTING HEIGHT See "TO ADJUST CUTTING HEIGHT" in contact with air filter and carburetor down. 4. Remove blade and blade...
...completely stopped. 3. REAR DEFLECTOR The rear deflector, attached between the rear wheels of your mower, is 35-40 ft. Reinstall belt keeper and drive cover. Turn lawn mower on its side with plug. Reinstall blade adapter and blade. DRIVE COVER BELT FIG. 19 BLADE ...ADAPTER BLADE LOCK WASHER KEY GEARCASE PULEY BELT KEEPER CRANKSHAFT KEYWAY BLADE HARDENED BOLT WASHER TRAILING EDGE CRANKSHAFT FIG. 20 BELT RETAINER 16 LAWN MOWER TO ADJUST CUTTING HEIGHT See "TO ADJUST CUTTING HEIGHT" in contact with air filter and carburetor down. 4. Remove blade and blade...

Operation Manual
Page 17
...PROPER ENGINE SPEED. FIG. 21 STORAGE Immediately prepare your handle from opposite side, align hole in a clean, dry area. 1. Clean entire lawn mower (See "CLEANING" in the Maintenance section of the season or if the unit will require manually locking into the mowing position. Replace if necessary...assembly forward and allow handle to fold down to height that all rusted or chipped paint surfaces; adjust to the rear. 2. LAWN MOWER When lawn mower is not adjustable. While holding handle assembly, remove knob and carriage bolt from the storage position, the lower handle will not ...
...PROPER ENGINE SPEED. FIG. 21 STORAGE Immediately prepare your handle from opposite side, align hole in a clean, dry area. 1. Clean entire lawn mower (See "CLEANING" in the Maintenance section of the season or if the unit will require manually locking into the mowing position. Replace if necessary...assembly forward and allow handle to fold down to height that all rusted or chipped paint surfaces; adjust to the rear. 2. LAWN MOWER When lawn mower is not adjustable. While holding handle assembly, remove knob and carriage bolt from the storage position, the lower handle will not ...
Operation Manual
Page 18
...through spark plug hole into cylinder. 3. ACIDIC GAS CAN DAMAGE THE FUEL SYSTEM OF AN ENGINE WHILE IN STORAGE. CAUTION: Never store the lawn mower with gasoline in the fuel tank or permanent damage may reach an open flame or spark. KNOB FIG. 22 BOLT HANDLE KNOB LOWER ...cannot breathe, which allows condensation to rust. Always follow the mix ratio found on stabilizer container. Remove spark plug. 2. IMPORTANT: NEVER COVER MOWER WHILE ENGINE AND EXHAUST AREAS ARE STILL WARM. Allow the engine to cool before storing in your gasoline will cause your unit indoors and cover...
...through spark plug hole into cylinder. 3. ACIDIC GAS CAN DAMAGE THE FUEL SYSTEM OF AN ENGINE WHILE IN STORAGE. CAUTION: Never store the lawn mower with gasoline in the fuel tank or permanent damage may reach an open flame or spark. KNOB FIG. 22 BOLT HANDLE KNOB LOWER ...cannot breathe, which allows condensation to rust. Always follow the mix ratio found on stabilizer container. Remove spark plug. 2. IMPORTANT: NEVER COVER MOWER WHILE ENGINE AND EXHAUST AREAS ARE STILL WARM. Allow the engine to cool before storing in your gasoline will cause your unit indoors and cover...

Operation Manual
Page 19
... 1. Engine flywheel brake is released. 2. Catcher not venting air. 1. Replace blade. 3. Rear of lawn mower housing one (1) setting higher. 3. Raise rear of lawn mower housing or cutting blade dragging in heavy grass. 2. Adjust handle height to engine. Clean/replace air filter... cut - Raise cutting height. 2. Clean grass catcher. Rear of mower housing. Poor cut grass or other hard surface before pulling starter rope. 2. Buildup of pulley. 3. Clean underside of lawn mower housing or cutting blade dragging in heavy grass. 3. Fuel valve lever...
... 1. Engine flywheel brake is released. 2. Catcher not venting air. 1. Replace blade. 3. Rear of lawn mower housing one (1) setting higher. 3. Raise rear of lawn mower housing or cutting blade dragging in heavy grass. 2. Adjust handle height to engine. Clean/replace air filter... cut - Raise cutting height. 2. Clean grass catcher. Rear of mower housing. Poor cut grass or other hard surface before pulling starter rope. 2. Buildup of pulley. 3. Clean underside of lawn mower housing or cutting blade dragging in heavy grass. 3. Fuel valve lever...
Operation Manual
Page 22
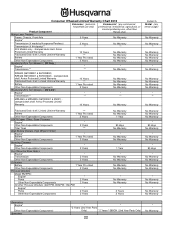
.... Limited Lifetime Warranty Battery 10 Years *** 1 Year Pro-rated No Warranty No Warranty No Warranty Other Non-Expendable Components Residential Zero Turn Mowers ( RZ Only ) 3 Years No Warranty Engine* * * Transmission ** ** No Warranty RZ4623 (967009801 & 967009802) RZ5426 (967003601 ...Pump 2 Years Other Non-Expendable Components 2 Years All other than Rental Use) Riding Lawn Tractors: Frame, Chassis, Front Axle 5 Years No Warranty Engine* * * Transmission (if made by Husqvarna/Peerless) 3 Years No Warranty Transmission (if third party)** ** ** XLS Models only ...
.... Limited Lifetime Warranty Battery 10 Years *** 1 Year Pro-rated No Warranty No Warranty No Warranty Other Non-Expendable Components Residential Zero Turn Mowers ( RZ Only ) 3 Years No Warranty Engine* * * Transmission ** ** No Warranty RZ4623 (967009801 & 967009802) RZ5426 (967003601 ...Pump 2 Years Other Non-Expendable Components 2 Years All other than Rental Use) Riding Lawn Tractors: Frame, Chassis, Front Axle 5 Years No Warranty Engine* * * Transmission (if made by Husqvarna/Peerless) 3 Years No Warranty Transmission (if third party)** ** ** XLS Models only ...


