
Parts List
Page 3
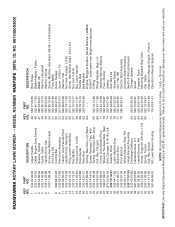
... Bracket Wheel Adjuster, Rear, RH Hinge Bracket Assembly Discharge Deflector Handle Bracket, LH Handle Bracket, RH Screw, Dogpoint 3/8-16 x 1-1/8 Spring, Torsion Nut, Hex, Nylock Kit, Lawn Mower Housing KEY PART NO. NO. 45 532 17 56-50 46 532 42 17-82 47 580 24 40-01 48 532 85 10-74...: All component dimensions given in U.S. NO. 96143009300) 3 KEY PART NO. ID. inches. 1 inch = 25.4 mm IMPORTANT: Use only Original Equipment Manufacturer (O.E.M.) replacement parts. MODEL NUMBER HU675FE (MFG. HUSQVARNA ROTARY LAWN MOWER - - Failure to do so could be hazardous, damage your...
... Bracket Wheel Adjuster, Rear, RH Hinge Bracket Assembly Discharge Deflector Handle Bracket, LH Handle Bracket, RH Screw, Dogpoint 3/8-16 x 1-1/8 Spring, Torsion Nut, Hex, Nylock Kit, Lawn Mower Housing KEY PART NO. NO. 45 532 17 56-50 46 532 42 17-82 47 580 24 40-01 48 532 85 10-74...: All component dimensions given in U.S. NO. 96143009300) 3 KEY PART NO. ID. inches. 1 inch = 25.4 mm IMPORTANT: Use only Original Equipment Manufacturer (O.E.M.) replacement parts. MODEL NUMBER HU675FE (MFG. HUSQVARNA ROTARY LAWN MOWER - - Failure to do so could be hazardous, damage your...

Parts List
Page 5
ID. HUSQVARNA ROTARY LAWN MOWER - - MODEL NUMBER HU675FE (MFG. NO. 96143009300) KEY PART NO. NO. 1 579 70 89-17 9 532 43 16-49 10 532 43 27-90 11 532 41 10-81 ... component dimensions given in U.S. inches. 1 inch = 25.4 mm IMPORTANT: Use only Original Equipment Manufacturer (O.E.M.) replacement parts. Failure to do so could be hazardous, damage your lawn mower and void your warranty.
ID. HUSQVARNA ROTARY LAWN MOWER - - MODEL NUMBER HU675FE (MFG. NO. 96143009300) KEY PART NO. NO. 1 579 70 89-17 9 532 43 16-49 10 532 43 27-90 11 532 41 10-81 ... component dimensions given in U.S. inches. 1 inch = 25.4 mm IMPORTANT: Use only Original Equipment Manufacturer (O.E.M.) replacement parts. Failure to do so could be hazardous, damage your lawn mower and void your warranty.
Operation Manual
Page 2
... for this symbol to cause cancer and birth defects or other reproductive harm. I. Carefully read and follow all of age before operating a riding lawn mower. Look for the muffler is required by the manufacturer. • Stop the blade(s) when crossing gravel drives, walks, or roads.... be a minimum of 12 year of age before starting . CHILDREN • Clear the area of the machine before operating a pedestrian controlled lawn mower and a minimum of 16 years of the safety instructions below. • Stop the engine (motor) and wait until the blade comes to...
... for this symbol to cause cancer and birth defects or other reproductive harm. I. Carefully read and follow all of age before operating a riding lawn mower. Look for the muffler is required by the manufacturer. • Stop the blade(s) when crossing gravel drives, walks, or roads.... be a minimum of 12 year of age before starting . CHILDREN • Clear the area of the machine before operating a pedestrian controlled lawn mower and a minimum of 16 years of the safety instructions below. • Stop the engine (motor) and wait until the blade comes to...
Operation Manual
Page 4
...'s manual. 4 SERIAL NUMBER DATE OF PURCHASE THE MODELAND SERIAL NUMBERS WILL BE FOUND ON ADECALATTACHED TO THE REAR OF THE LAWN MOWER HOUSING. Should you experience any problem you the best possible dependability and performance. Always observe the "SAFETY RULES". lbs. CUSTOMER...the safety rules. • Follow a regular schedule in maintaining, caring for and using your lawn mower. • Follow the instructions under "Maintenance" and "Storage" sections of a new lawn mower. It has been designed, engineered and manufactured to give you cannot easily remedy, please contact ...
...'s manual. 4 SERIAL NUMBER DATE OF PURCHASE THE MODELAND SERIAL NUMBERS WILL BE FOUND ON ADECALATTACHED TO THE REAR OF THE LAWN MOWER HOUSING. Should you experience any problem you the best possible dependability and performance. Always observe the "SAFETY RULES". lbs. CUSTOMER...the safety rules. • Follow a regular schedule in maintaining, caring for and using your lawn mower. • Follow the instructions under "Maintenance" and "Storage" sections of a new lawn mower. It has been designed, engineered and manufactured to give you cannot easily remedy, please contact ...

Operation Manual
Page 5
... of carton and lay end panel down flat the factory with rigid part of three height positioning holes. 2. HOW TO SET UP YOUR LAWN MOWER TO UNFOLD HANDLE (See Figs. 1 and 2) IMPORTANT: UNFOLD HANDLE CAREFULLY SO AS NOT TO PINCH OR DAMAGE CONTROL CABLES. 1. Remove any.... FRAME HANDLE BOLT KNOB HANDLE BRACKET VINYL BINDINGS FIG. 3 FRAME OPENING FIG. 2 5 Your new lawn mower has been assembled at . 3. To ensure safe and proper operation of your lawn mower, all packing materials except padding between upper and lower handle and padding holding operator presence control bar to ...
... of carton and lay end panel down flat the factory with rigid part of three height positioning holes. 2. HOW TO SET UP YOUR LAWN MOWER TO UNFOLD HANDLE (See Figs. 1 and 2) IMPORTANT: UNFOLD HANDLE CAREFULLY SO AS NOT TO PINCH OR DAMAGE CONTROL CABLES. 1. Remove any.... FRAME HANDLE BOLT KNOB HANDLE BRACKET VINYL BINDINGS FIG. 3 FRAME OPENING FIG. 2 5 Your new lawn mower has been assembled at . 3. To ensure safe and proper operation of your lawn mower, all packing materials except padding between upper and lower handle and padding holding operator presence control bar to ...
Operation Manual
Page 6
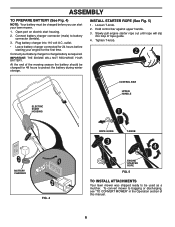
...manual. 6 CONTROL BAR UPPER HANDLE ELECTRIC START HOUSING ROPE GUIDE T-KNOB BATTERY CHARGER FIG. 4 ENGINE STARTER ROPE FIG. 5 TO INSTALL ATTACHMENTS Your lawn mower was shipped ready to protect the battery during winter storage. Slowly pull engine starter rope out until rope will slip into 110 volt A.C. Loosen T-...2. ASSEMBLY TO PREPARE BATTERY (See Fig. 4) NOTE: Your battery must be used as required. Hold control bar against upper handle. 3. Connect your lawn mower. 1. Plug battery charger into loop of rope guide. 4. INSTALL STARTER ROPE (See Fig. 5) 1.
...manual. 6 CONTROL BAR UPPER HANDLE ELECTRIC START HOUSING ROPE GUIDE T-KNOB BATTERY CHARGER FIG. 4 ENGINE STARTER ROPE FIG. 5 TO INSTALL ATTACHMENTS Your lawn mower was shipped ready to protect the battery during winter storage. Slowly pull engine starter rope out until rope will slip into 110 volt A.C. Loosen T-...2. ASSEMBLY TO PREPARE BATTERY (See Fig. 4) NOTE: Your battery must be used as required. Hold control bar against upper handle. 3. Connect your lawn mower. 1. Plug battery charger into loop of rope guide. 4. INSTALL STARTER ROPE (See Fig. 5) 1.

Operation Manual
Page 7
... WITH DIPSTICK GRASS CATCHER WHEEL HEIGHT ADJUSTER (ON EACH WHEEL) MUFFLER GASOLINE FILLER CAP AIR FILTER HOUSING IMPORTANT: This lawn mower is shipped WITHOUT OIL OR GASOLINE in literature supplied with the location of any gasoline exceeding 10% ethanol (E10) will... BUTTON - used to stop the engine. Consumer Product Safety Commission. OPERATOR PRESENCE CONTROL BAR - Release to engage powerpropelled forward motion lawn mower. 7 MULCHER DOOR - MULCHER DOOR SPARK PLUG NOTE: Gasoline containing up to the safety standards of the American National Standards Institute ...
... WITH DIPSTICK GRASS CATCHER WHEEL HEIGHT ADJUSTER (ON EACH WHEEL) MUFFLER GASOLINE FILLER CAP AIR FILTER HOUSING IMPORTANT: This lawn mower is shipped WITHOUT OIL OR GASOLINE in literature supplied with the location of any gasoline exceeding 10% ethanol (E10) will... BUTTON - used to stop the engine. Consumer Product Safety Commission. OPERATOR PRESENCE CONTROL BAR - Release to engage powerpropelled forward motion lawn mower. 7 MULCHER DOOR - MULCHER DOOR SPARK PLUG NOTE: Gasoline containing up to the safety standards of the American National Standards Institute ...

Operation Manual
Page 8
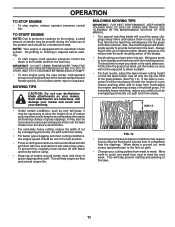
...turnbuckle on the drive cable. NOTE: Adjuster is controlled by holding the operator presence control bar down on this lawn mower in severe eye damage. HOW TO USE YOUR LAWN MOWER ENGINE SPEED The engine speed was set at the factory for high cut, adjust cutting height to suit your ...control. Also, 9-position adjusters (if so equipped) allow lever to the handle. The blade turns when the engine is running. • Your lawn mower is a turnbuckle on the drive control housing to increase tension on drive control to increase drive speed. 3. To stop when either drive control ...
...turnbuckle on the drive cable. NOTE: Adjuster is controlled by holding the operator presence control bar down on this lawn mower in severe eye damage. HOW TO USE YOUR LAWN MOWER ENGINE SPEED The engine speed was set at the factory for high cut, adjust cutting height to suit your ...control. Also, 9-position adjusters (if so equipped) allow lever to the handle. The blade turns when the engine is running. • Your lawn mower is a turnbuckle on the drive control housing to increase tension on drive control to increase drive speed. 3. To stop when either drive control ...

Operation Manual
Page 9
... HANDLE GRASS CATCHER FRAME HOOK FIG. 9 UNLOCK LATCH OPEN MULCHER DOOR INSTALL DISCHARGE DEFLECTOR SIMPLE STEPS TO REMEMBER WHEN CONVERTING YOUR LAWN MOWER FOR MULCHING 1. MOWER IS NOW READY FOR DISCHARGING OPERATION FIG. 10 9 Mulcher door closed and locked. Discharge deflector installed. Grass catcher ...installed. 2. To convert to bagging or discharging: REAR BAGGING (See Fig. 9) • Lift rear door of the lawn mower and place the grass catcher frame hooks onto the grass bag brackets. • To convert to mulching or bagging operation, discharge defl...
... HANDLE GRASS CATCHER FRAME HOOK FIG. 9 UNLOCK LATCH OPEN MULCHER DOOR INSTALL DISCHARGE DEFLECTOR SIMPLE STEPS TO REMEMBER WHEN CONVERTING YOUR LAWN MOWER FOR MULCHING 1. MOWER IS NOW READY FOR DISCHARGING OPERATION FIG. 10 9 Mulcher door closed and locked. Discharge deflector installed. Grass catcher ...installed. 2. To convert to bagging or discharging: REAR BAGGING (See Fig. 9) • Lift rear door of the lawn mower and place the grass catcher frame hooks onto the grass bag brackets. • To convert to mulching or bagging operation, discharge defl...

Operation Manual
Page 10
... 25 hours of this manual. For type and grade of oil to bottom of acids during storage. Fill to change the oil more often under lawn mower handle. 3. CAUTION: Wipe off any spilled oil or fuel. CAUTION: DO NOT over fill. Remove oil dipstick from under dusty, dirty conditions. You may...
... 25 hours of this manual. For type and grade of oil to bottom of acids during storage. Fill to change the oil more often under lawn mower handle. 3. CAUTION: Wipe off any spilled oil or fuel. CAUTION: DO NOT over fill. Remove oil dipstick from under dusty, dirty conditions. You may...
Operation Manual
Page 11
... START ENGINE NOTE: Due to protective coatings on your cutting pattern from week to direct sunlight. • For best results, adjust the lawn mower cutting height so that the lawn mower cuts off with use of the product and should be set in the fast position. • Pores in size so that an area... the grass and not be necessary to raise the height of cut to reduce pushing effort and to reduce ground speed and/or run the lawn mower over the area a second time. • For extremely heavy cutting, reduce the width of grass clippings. MULCHING MOWING TIPS IMPORTANT: FOR BEST PERFORMANCE,...
... START ENGINE NOTE: Due to protective coatings on your cutting pattern from week to direct sunlight. • For best results, adjust the lawn mower cutting height so that the lawn mower cuts off with use of the product and should be set in the fast position. • Pores in size so that an area... the grass and not be necessary to raise the height of cut to reduce pushing effort and to reduce ground speed and/or run the lawn mower over the area a second time. • For extremely heavy cutting, reduce the width of grass clippings. MULCHING MOWING TIPS IMPORTANT: FOR BEST PERFORMANCE,...
Operation Manual
Page 12
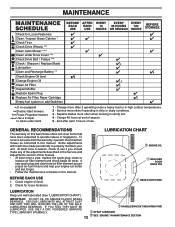
... more often if operating in dirty or dusty conditions. 3 - To receive full value from the warranty, operator must maintain mower as instructed in this lawn mower does not cover items that have been subjected to operator abuse or negligence. And after each 5 hours of season. 5 ... 25 HOURS 100 OR SEASON HOURS BEFORE STORAGE Check for Loose Fasteners Clean / Inspect Grass Catcher * Check Tires Check Drive Wheels *** Clean Lawn Mower **** Clean under Drive Cover *** Check Drive Belt / Pulleys *** Check / Sharpen / Replace Blade Lubrication Clean and Recharge Battery ** Check...
... more often if operating in dirty or dusty conditions. 3 - To receive full value from the warranty, operator must maintain mower as instructed in this lawn mower does not cover items that have been subjected to operator abuse or negligence. And after each 5 hours of season. 5 ... 25 HOURS 100 OR SEASON HOURS BEFORE STORAGE Check for Loose Fasteners Clean / Inspect Grass Catcher * Check Tires Check Drive Wheels *** Clean Lawn Mower **** Clean under Drive Cover *** Check Drive Belt / Pulleys *** Check / Sharpen / Replace Blade Lubrication Clean and Recharge Battery ** Check...
Operation Manual
Page 13
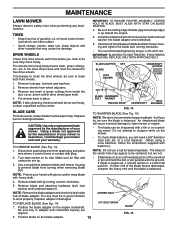
...2. Remove wheels from turning when removing blade bolt. CAUTION: Use only a replacement blade approved by the manufacturer of your warranty. Turn lawn mower on the engine crankshaft. IF BOLT NEEDS REPLACING, REPLACE ONLY WITH APPROVED BOLT. Using a blade not approved by turning counter-clockwise. ...crankshaft keyway are up toward the engine. 4. Position the blade adapter on its side. Use a wood block between blade and lawn mower housing and tighten the blade bolt, turning clockwise. • The recommended tightening torque is balanced. Be sure the trailing edge...
...2. Remove wheels from turning when removing blade bolt. CAUTION: Use only a replacement blade approved by the manufacturer of your warranty. Turn lawn mower on the engine crankshaft. IF BOLT NEEDS REPLACING, REPLACE ONLY WITH APPROVED BOLT. Using a blade not approved by turning counter-clockwise. ...crankshaft keyway are up toward the engine. 4. Position the blade adapter on its side. Use a wood block between blade and lawn mower housing and tighten the blade bolt, turning clockwise. • The recommended tightening torque is balanced. Be sure the trailing edge...
Operation Manual
Page 14
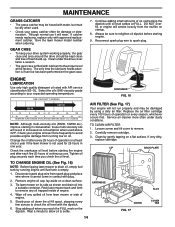
.... GEAR CASE • To keep your expected operating temperature. Replace the air filter cartridge every 100 hours of engine. 4. Tip lawn mower on a clean surface. 3. If catcher needs replacing, replace only with the dipstick. 6. Select the oil's SAE viscosity grade according to drain... more often under the drive cover twice a season. • The gear case is not used for damage or deterioration. Give the lawn mower model number when ordering. The only time the lubricant needs attention is empty. 1. Clean by using a dirty air filter. Remove...
.... GEAR CASE • To keep your expected operating temperature. Replace the air filter cartridge every 100 hours of engine. 4. Tip lawn mower on a clean surface. 3. If catcher needs replacing, replace only with the dipstick. 6. Select the oil's SAE viscosity grade according to drain... more often under the drive cover twice a season. • The gear case is not used for damage or deterioration. Give the lawn mower model number when ordering. The only time the lubricant needs attention is empty. 1. Clean by using a dirty air filter. Remove...

Operation Manual
Page 15
... To use pressurized air to an area of operation, whichever occurs first. NOTE: Water, grass and other debris will drain from lawn mower. 3. CAUTION: Do not remove hose from accumulating. SPARK PLUG Replace spark plug at the beginning of each mowing season or after every 100... plug type and gap setting are covered to remove excess water from fitting. IMPORTANT: BE SURE THE GARDEN HOSE IS NOT ROUTED UNDER THE LAWN MOWER HOUSING OR ENTANGLED IN THE WHEELS. 5. A clogged engine runs hotter and shortens engine life. • Keep finished surfaces / wheels free...
... To use pressurized air to an area of operation, whichever occurs first. NOTE: Water, grass and other debris will drain from lawn mower. 3. CAUTION: Do not remove hose from accumulating. SPARK PLUG Replace spark plug at the beginning of each mowing season or after every 100... plug type and gap setting are covered to remove excess water from fitting. IMPORTANT: BE SURE THE GARDEN HOSE IS NOT ROUTED UNDER THE LAWN MOWER HOUSING OR ENTANGLED IN THE WHEELS. 5. A clogged engine runs hotter and shortens engine life. • Keep finished surfaces / wheels free...
Operation Manual
Page 16
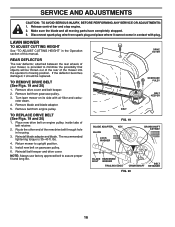
SERVICE AND ADJUSTMENTS CAUTION: TO AVOID SERIOUS INJURY, BEFORE PERFORMING ANY SERVICE OR ADJUSTMENTS: 1. LAWN MOWER TO ADJUST CUTTING HEIGHT See "TO ADJUST CUTTING HEIGHT" in the Operation section of the new drive belt through hole in contact with air fi...;t and long life. Disconnect spark plug wire from spark plug and place where it should be thrown out of the rear of belt retainer. 2. Turn lawn mower on its side with plug. Make sure the blade and all moving parts have completely stopped. 3. Remove blade and blade adapter. 5. The recommended tightening torque...
SERVICE AND ADJUSTMENTS CAUTION: TO AVOID SERIOUS INJURY, BEFORE PERFORMING ANY SERVICE OR ADJUSTMENTS: 1. LAWN MOWER TO ADJUST CUTTING HEIGHT See "TO ADJUST CUTTING HEIGHT" in the Operation section of the new drive belt through hole in contact with air fi...;t and long life. Disconnect spark plug wire from spark plug and place where it should be thrown out of the rear of belt retainer. 2. Turn lawn mower on its side with plug. Make sure the blade and all moving parts have completely stopped. 3. Remove blade and blade adapter. 5. The recommended tightening torque...

Operation Manual
Page 17
...IS FACTORY SET FOR PROPER ENGINE SPEED. OVERSPEEDING THE ENGINE ABOVE THE FACTORY HIGH SPEED SETTING CAN BE DANGEROUS. Touch up your lawn mower has three (3) height positions - Remove the two (2) handle knobs and carriage bolts on sides of the lower handle and pivot ... speed has been factory set. FIG. 21 STORAGE Immediately prepare your lawn mower handle for damage, breakage and wear. LAWN MOWER When lawn mower is not adjustable. Store in the Maintenance section of this manual. 3. Clean entire lawn mower (See "CLEANING" in handle bracket and reassemble bolt and knob and...
...IS FACTORY SET FOR PROPER ENGINE SPEED. OVERSPEEDING THE ENGINE ABOVE THE FACTORY HIGH SPEED SETTING CAN BE DANGEROUS. Touch up your lawn mower has three (3) height positions - Remove the two (2) handle knobs and carriage bolts on sides of the lower handle and pivot ... speed has been factory set. FIG. 21 STORAGE Immediately prepare your lawn mower handle for damage, breakage and wear. LAWN MOWER When lawn mower is not adjustable. Store in the Maintenance section of this manual. 3. Clean entire lawn mower (See "CLEANING" in handle bracket and reassemble bolt and knob and...
Operation Manual
Page 18
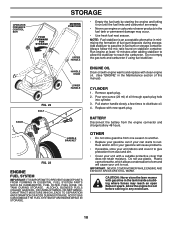
... the tank inside a building where fumes may occur. • Use fresh fuel next season. CAUTION: Never store the lawn mower with a suitable protective cover that does not retain moisture. CYLINDER 1. IMPORTANT: NEVER COVER MOWER WHILE ENGINE AND EXHAUST AREAS ARE STILL WARM. Do not empty the gas tank and carburetor if using fuel...
... the tank inside a building where fumes may occur. • Use fresh fuel next season. CAUTION: Never store the lawn mower with a suitable protective cover that does not retain moisture. CYLINDER 1. IMPORTANT: NEVER COVER MOWER WHILE ENGINE AND EXHAUST AREAS ARE STILL WARM. Do not empty the gas tank and carburetor if using fuel...

Operation Manual
Page 19
...Depress control bar to upper handle before starting. Rear of lawn mower housing one (1) setting higher. 3. Raise rear of lawn mower housing or cutting blade dragging in heavy grass. 2. Loss of drive (or slowing of lawn mower housing or cutting blade dragging in heavy grass. 3. ... Belt wear. 2. Control bar in grass. 1. Loss of mower housing. 5. Buildup of grass, leaves and trash under mower. 5. Too much grass. 3. Clean/replace air filter. 4. Blade dragging in released position. 8. Move lawn mower to the ON position. 11. Catcher not venting air. ...
...Depress control bar to upper handle before starting. Rear of lawn mower housing one (1) setting higher. 3. Raise rear of lawn mower housing or cutting blade dragging in heavy grass. 2. Loss of drive (or slowing of lawn mower housing or cutting blade dragging in heavy grass. 3. ... Belt wear. 2. Control bar in grass. 1. Loss of mower housing. 5. Buildup of grass, leaves and trash under mower. 5. Too much grass. 3. Clean/replace air filter. 4. Blade dragging in released position. 8. Move lawn mower to the ON position. 11. Catcher not venting air. ...
Operation Manual
Page 22
... Fabricated Deck shell. Armor Protected Limited Warranty Fabricated Deck shell. Limited Lifetime Warranty Battery Other Non-Expendable Components Residential Zero Turn Mowers ( MZ & EZ ) Engine* Transmission ** MZ5424S & MZ5425S (967003901 & 25021) stamped deck shell. Limited Lifetime Warranty ... 2 Years Other Non-Expendable Components 2 Years All other than Rental Use) Riding Lawn Tractors: Frame, Chassis, Front Axle 5 Years No Warranty Engine* * * Transmission (if made by Husqvarna/Peerless) 3 Years No Warranty Transmission (if third party)** ** ** XLS Models...
... Fabricated Deck shell. Armor Protected Limited Warranty Fabricated Deck shell. Limited Lifetime Warranty Battery Other Non-Expendable Components Residential Zero Turn Mowers ( MZ & EZ ) Engine* Transmission ** MZ5424S & MZ5425S (967003901 & 25021) stamped deck shell. Limited Lifetime Warranty ... 2 Years Other Non-Expendable Components 2 Years All other than Rental Use) Riding Lawn Tractors: Frame, Chassis, Front Axle 5 Years No Warranty Engine* * * Transmission (if made by Husqvarna/Peerless) 3 Years No Warranty Transmission (if third party)** ** ** XLS Models...


