
Operation Manual
Page 6
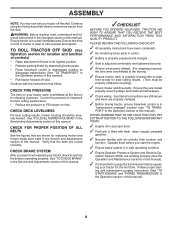
...belts are routed properly around pulleys and inside all connections are still secure and wires are properly inflated. (For shipping purposes, the tires were overinflated at the factory for best cutting performance. • Reduce tire pressure to PSI shown on your tractor were overinflated at the factory). ✓ Ensure mower deck...tractor forward off the skid. Operate them before operating your tractor for leveling). ✓ Check mower and drive belts. WARNING: Before starting and transmission purging instructions (See "TO START ENGINE" and "PURGE TRANSMISSION" in safe ...
...belts are routed properly around pulleys and inside all connections are still secure and wires are properly inflated. (For shipping purposes, the tires were overinflated at the factory for best cutting performance. • Reduce tire pressure to PSI shown on your tractor were overinflated at the factory). ✓ Ensure mower deck...tractor forward off the skid. Operate them before operating your tractor for leveling). ✓ Check mower and drive belts. WARNING: Before starting and transmission purging instructions (See "TO START ENGINE" and "PURGE TRANSMISSION" in safe ...
Operation Manual
Page 21
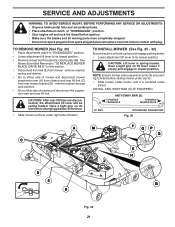
...mower and disconnect the suspension arm and rear lift link. remove retainer springs and washers. • Go to its lowest position. • Remove mower belt from electric clutch pulley (M). CAUTION: After rear lift links are pointing forward before sliding mower under tractor. • Slide mower under tractor until it ...this section. • Disconnect front link (E) from rear mower bracket (D) - INSTALL ANTI-SWAY BAR (S) (IF EQUIPPED) ANTI-SWAY BAR (S) TOWARDS TRANSAXLE TOWARDS MOWER DECK 90° END INTEGRATED WASHER END Fig. 26 A M F OP Q C E H D S B D Fig. 25 21
...mower and disconnect the suspension arm and rear lift link. remove retainer springs and washers. • Go to its lowest position. • Remove mower belt from electric clutch pulley (M). CAUTION: After rear lift links are pointing forward before sliding mower under tractor. • Slide mower under tractor until it ...this section. • Disconnect front link (E) from rear mower bracket (D) - INSTALL ANTI-SWAY BAR (S) (IF EQUIPPED) ANTI-SWAY BAR (S) TOWARDS TRANSAXLE TOWARDS MOWER DECK 90° END INTEGRATED WASHER END Fig. 26 A M F OP Q C E H D S B D Fig. 25 21
Operation Manual
Page 22
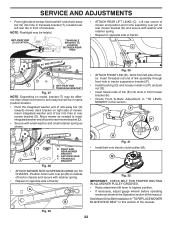
.... Fig. 29 22 TRANSAXLE BRACKET Fig. 27 NOTE: Depending on opposite side of the manual. TS D D. M Fig. 32 IMPORTANT: CHECK BELT FOR PROPER ROUTING IN ALL MOWER PULLEY GROOVES. • Raise attachment lift lever to insert integrated washer end of bar into hole in front of...on right side of tractor. ANTI-SWAY BAR T. See Mower Drive Belt Installation in "TO REPLACE MOWER BLADE DRIVE BELT" in same position/location. • Pivot the integrated washer end of anti-sway bar (S) towards mower deck bracket on outside of tractor chassis and secure with small washer and ...
.... Fig. 29 22 TRANSAXLE BRACKET Fig. 27 NOTE: Depending on opposite side of the manual. TS D D. M Fig. 32 IMPORTANT: CHECK BELT FOR PROPER ROUTING IN ALL MOWER PULLEY GROOVES. • Raise attachment lift lever to insert integrated washer end of bar into hole in front of...on right side of tractor. ANTI-SWAY BAR T. See Mower Drive Belt Installation in "TO REPLACE MOWER BLADE DRIVE BELT" in same position/location. • Pivot the integrated washer end of anti-sway bar (S) towards mower deck bracket on outside of tractor chassis and secure with small washer and ...
Operation Manual
Page 24
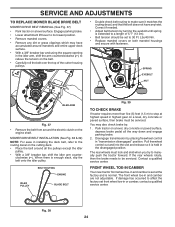
...arm counter- Fig. 38 24 MOWER DRIVE BELT INSTALLATION (See Fig. 38 & 39) NOTE: For ease in installing the deck belt, refer to the routing decal on the belt. • Carefully roll the belt over the top of 5.1" (13 cm). • Belt tension should be serviced. You may have any... adjustable. clockwise ( ). If the rear wheels rotate, then the brake needs to relieve the tension on the cutting deck. • Place the belt around mandrels and entire upper deck surface. • With a 3/8" breaker bar and using the square opening in the disengaged position. Contact a qualified ...
...arm counter- Fig. 38 24 MOWER DRIVE BELT INSTALLATION (See Fig. 38 & 39) NOTE: For ease in installing the deck belt, refer to the routing decal on the belt. • Carefully roll the belt over the top of 5.1" (13 cm). • Belt tension should be serviced. You may have any... adjustable. clockwise ( ). If the rear wheels rotate, then the brake needs to relieve the tension on the cutting deck. • Place the belt around mandrels and entire upper deck surface. • With a 3/8" breaker bar and using the square opening in the disengaged position. Contact a qualified ...
Operation Manual
Page 30
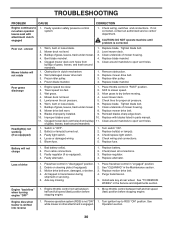
... listed in transmission during shipment or servicing. 5. Mower deck not level. 4. Loose or damaged wiring. 5. Check/replace light switch. 4. Replace fuse. Battery will not rotate 1. Motion drive belt worn, damaged, or broken. 4. Place freewheel control in..., contact an authorized service center/ department. Bent blade mandrel. 5. Frozen idler pulley. 4. Replace blade. Replace mower drive belt. 3. Travel speed too fast. 2. Level mower deck. 5. Worn, bent or loose blade. 6. Tighten blade bolt. 7. Improper blades used. 10. of mower housing. 8....
... listed in transmission during shipment or servicing. 5. Mower deck not level. 4. Loose or damaged wiring. 5. Check/replace light switch. 4. Replace fuse. Battery will not rotate 1. Motion drive belt worn, damaged, or broken. 4. Place freewheel control in..., contact an authorized service center/ department. Bent blade mandrel. 5. Frozen idler pulley. 4. Replace blade. Replace mower drive belt. 3. Travel speed too fast. 2. Level mower deck. 5. Worn, bent or loose blade. 6. Tighten blade bolt. 7. Improper blades used. 10. of mower housing. 8....


