
Operation Manual
Page 2
... age before operating a pedestrian controlled lawn mower and a minimum of 16 years of this manual). • Disengage blades when not mowing. WARNING: Tow only the attachments that are often attracted to operate the machine. • Clear the area of the discharge opening at the lowest possible speed when on a slope. GENERAL...
... age before operating a pedestrian controlled lawn mower and a minimum of 16 years of this manual). • Disengage blades when not mowing. WARNING: Tow only the attachments that are often attracted to operate the machine. • Clear the area of the discharge opening at the lowest possible speed when on a slope. GENERAL...

Operation Manual
Page 3
... damage to cool before storing. • If you feel uneasy on the ground. • Do not mow near drop-offs, ditches, or embankments. Do not attach towed equipment except at all cigarettes, cigars, pipes, and other...
... damage to cool before storing. • If you feel uneasy on the ground. • Do not mow near drop-offs, ditches, or embankments. Do not attach towed equipment except at all cigarettes, cigars, pipes, and other...
Operation Manual
Page 6
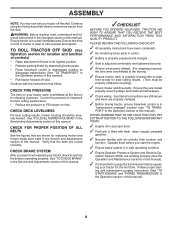
... factory). ✓ Ensure mower deck is in this manual). 6 TO ROLL TRACTOR OFF SKID (See Operation section for location and function of controls) • Raise attachment lift lever to its highest position. • Release parking brake by depressing brake pedal. • Place freewheel control in disengaged position to disengage transmission (See...
... factory). ✓ Ensure mower deck is in this manual). 6 TO ROLL TRACTOR OFF SKID (See Operation section for location and function of controls) • Raise attachment lift lever to its highest position. • Release parking brake by depressing brake pedal. • Place freewheel control in disengaged position to disengage transmission (See...
Operation Manual
Page 7
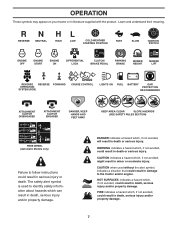
... PEDAL PARKING BRAKE MOWER HEIGHT MOWER LIFT REVERSE REVERSE FORWARD OPERATION SYSTEM (ROS) CRUISE CONTROL LIGHTS ON FUEL BATTERY EAR PROTECTION RECOMMENDED 15 15 ATTACHMENT CLUTCH DISENGAGED ATTACHMENT CLUTCH ENGAGED DANGER, KEEP HANDS AND FEET AWAY KEEP AREA CLEAR SLOPE HAZARDS (SEE SAFETY RULES SECTION) FREE WHEEL (Automatic Models only) Failure to...
... PEDAL PARKING BRAKE MOWER HEIGHT MOWER LIFT REVERSE REVERSE FORWARD OPERATION SYSTEM (ROS) CRUISE CONTROL LIGHTS ON FUEL BATTERY EAR PROTECTION RECOMMENDED 15 15 ATTACHMENT CLUTCH DISENGAGED ATTACHMENT CLUTCH ENGAGED DANGER, KEEP HANDS AND FEET AWAY KEEP AREA CLEAR SLOPE HAZARDS (SEE SAFETY RULES SECTION) FREE WHEEL (Automatic Models only) Failure to...

Operation Manual
Page 8
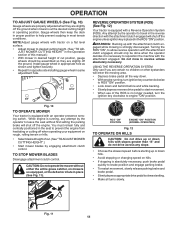
...Fig. 3 Our tractors conform to the applicable safety standards of operation. (Q) 12-VOLT POWER PORT - Indicates hours of the American National Standards Institute. (A) ATTACHMENT LIFT LEVER - Used for reverse movement of tractor. (M) FREEWHEEL CONTROL - Locks clutch/brake pedal into the brake position. (D) THROTTLE CONTROL - Used for 12... volt accessories. (S) BATTERY INDICATOR/CHARGING PLUG - Used to raise and lower the mower or other attachments mounted to your tractor. (F) IGNITION SWITCH - Indicates the status of tractor at desired speed without holding the...
...Fig. 3 Our tractors conform to the applicable safety standards of operation. (Q) 12-VOLT POWER PORT - Indicates hours of the American National Standards Institute. (A) ATTACHMENT LIFT LEVER - Used for reverse movement of tractor. (M) FREEWHEEL CONTROL - Locks clutch/brake pedal into the brake position. (D) THROTTLE CONTROL - Used for 12... volt accessories. (S) BATTERY INDICATOR/CHARGING PLUG - Used to raise and lower the mower or other attachments mounted to your tractor. (F) IGNITION SWITCH - Indicates the status of tractor at desired speed without holding the...
Operation Manual
Page 9
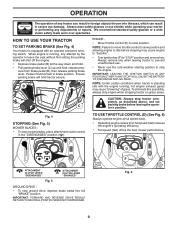
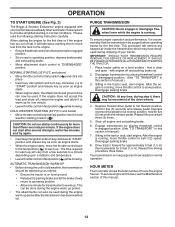
... 4) Your tractor is equipped with the engine running , any adjustments or repairs. Pedal should remain in brake position. CAUTION: Always stop mower blades, place attachment clutch control in the "DISENGAGED" position ( ). Fig. 4 STOPPING (See Fig. 5) MOWER BLADES • To stop tractor com- D F Fig. ... speed (fast) reduces the engine's operating efficiency. • Full speed (fast) offers the best mower performance. ( ) ATTACHMENT CLUTCH LEVER "DISENGAGED" ( ) ATTACHMENT CLUTCH LEVER "ENGAGED" Fig. 5 GROUND DRIVE - • To stop ground drive, depress brake pedal into the eyes, ...
... 4) Your tractor is equipped with the engine running , any adjustments or repairs. Pedal should remain in brake position. CAUTION: Always stop mower blades, place attachment clutch control in the "DISENGAGED" position ( ). Fig. 4 STOPPING (See Fig. 5) MOWER BLADES • To stop tractor com- D F Fig. ... speed (fast) reduces the engine's operating efficiency. • Full speed (fast) offers the best mower performance. ( ) ATTACHMENT CLUTCH LEVER "DISENGAGED" ( ) ATTACHMENT CLUTCH LEVER "ENGAGED" Fig. 5 GROUND DRIVE - • To stop ground drive, depress brake pedal into the eyes, ...
Operation Manual
Page 10
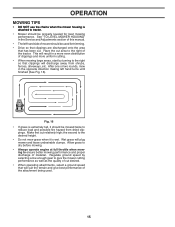
... To engage differential lock, stop the tractor and push the differential lock switch to side will engage. CAUTION: To minimize the risk of the attachment lift lever (A) determines the cutting height. If the differential lock does not disengage, steering the vehicle from the ground to desired height. Fig.... 9 • Put attachment lift lever in motion. Make the first cut to approximately 2-1/2" (63,5 mm) during the cool season and to over 6" (152,4 mm...
... To engage differential lock, stop the tractor and push the differential lock switch to side will engage. CAUTION: To minimize the risk of the attachment lift lever (A) determines the cutting height. If the differential lock does not disengage, steering the vehicle from the ground to desired height. Fig.... 9 • Put attachment lift lever in motion. Make the first cut to approximately 2-1/2" (63,5 mm) during the cool season and to over 6" (152,4 mm...
Operation Manual
Page 11
...any attempt by the operator to engine "ON" position. Fig. 10 TO OPERATE MOWER Your tractor is necessary to allow reverse operation with the attachment engaged. You must remain fully and centrally positioned in place (See Fig. 11). Fig. 11 11 While engine is equipped with an operator ... use if you are certain no longer needed, turn ignition key counterclockwise to ROS "ON" position. • Look down hills with the attachment clutch engaged will shut off the engine unless ignition key is no children or other bystanders will shut off the engine. JUST MOWER CUTTING HEIGHT...
...any attempt by the operator to engine "ON" position. Fig. 10 TO OPERATE MOWER Your tractor is necessary to allow reverse operation with the attachment engaged. You must remain fully and centrally positioned in place (See Fig. 11). Fig. 11 11 While engine is equipped with an operator ... use if you are certain no longer needed, turn ignition key counterclockwise to ROS "ON" position. • Look down hills with the attachment clutch engaged will shut off the engine unless ignition key is no children or other bystanders will shut off the engine. JUST MOWER CUTTING HEIGHT...
Operation Manual
Page 12
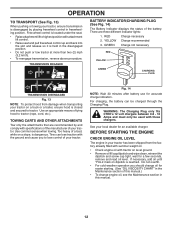
... be charged through the Charging Plug. If necessary, add oil until "FULL" mark on a slope, is reached. TOWING CARTS AND OTHER ATTACHMENTS Tow only the attachments that are three different indicator lights: 1. Fig. 14 NOTE: Wait 30 minutes after battery use for easier starting. (See "OIL VISCOSITY ...summer weight oil. • Check engine oil with tractor on a truck or a trailer, ensure hood is located under the seat. • Raise attachment lift to tractor (rope, cord, etc.). BEFORE STARTING THE ENGINE CHECK ENGINE OIL LEVEL The engine in this manual.) • To change oil ...
... be charged through the Charging Plug. If necessary, add oil until "FULL" mark on a slope, is reached. TOWING CARTS AND OTHER ATTACHMENTS Tow only the attachments that are three different indicator lights: 1. Fig. 14 NOTE: Wait 30 minutes after battery use for easier starting. (See "OIL VISCOSITY ...summer weight oil. • Check engine oil with tractor on a truck or a trailer, ensure hood is located under the seat. • Raise attachment lift to tractor (rope, cord, etc.). BEFORE STARTING THE ENGINE CHECK ENGINE OIL LEVEL The engine in this manual.) • To change oil ...
Operation Manual
Page 14
...time required for the first time. that the transmission be used . This can be done during the engine warm up period. • The attachments can now be movement of hours the engine has run out of this manual. 14 Your transmission is running . AUTOMATIC TRANSMISSION WARM UP &#...8226; Before driving the unit in cold weather, the transmission should be warmed up as engine starts. • When engine starts, the attachments and ground drive can also be purged before operating tractor for warm-up . Disengage parking brake CAUTION: At any trapped air inside the transmission...
...time required for the first time. that the transmission be used . This can be done during the engine warm up period. • The attachments can now be movement of hours the engine has run out of this manual. 14 Your transmission is running . AUTOMATIC TRANSMISSION WARM UP &#...8226; Before driving the unit in cold weather, the transmission should be warmed up as engine starts. • When engine starts, the attachments and ground drive can also be purged before operating tractor for warm-up . Disengage parking brake CAUTION: At any trapped air inside the transmission...
Operation Manual
Page 15
... operate engine at full throttle when mowing to give the mower cutting performance as well as the quality of cut desired. • When operating attachments, select a ground speed that will result in the opposite direction making left hand side of mower should be properly leveled for trimming. •...of this manual. • The left hand turns until finished (See Fig. 16). Fig. 16 • If grass is extremely tall, it is attached to tractor. • Mower should be used . 15 See "TO LEVEL MOWER HOUSING" in the Service and Adjustments section of material. This will suit...
... operate engine at full throttle when mowing to give the mower cutting performance as well as the quality of cut desired. • When operating attachments, select a ground speed that will result in the opposite direction making left hand side of mower should be properly leveled for trimming. •...of this manual. • The left hand turns until finished (See Fig. 16). Fig. 16 • If grass is extremely tall, it is attached to tractor. • Mower should be used . 15 See "TO LEVEL MOWER HOUSING" in the Service and Adjustments section of material. This will suit...
Operation Manual
Page 17
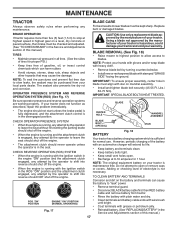
... Remove blade bolt by the operator to shift into reverse should not start unless the brake pedal is fully depressed, and the attachment clutch control is not necessary. MAINTENANCE TRACTOR Always observe safety rules when performing any attempt by the manufacturer of your warranty. Using... damage your tractor and void your tractor. IMPORTANT: To ensure proper assembly, center hole in the engine "ON" position and the attachment clutch engaged, any maintenance. Adding or checking level of electrolyte is in highest gear on mandrel assembly. • Install and tighten ...
... Remove blade bolt by the operator to shift into reverse should not start unless the brake pedal is fully depressed, and the attachment clutch control is not necessary. MAINTENANCE TRACTOR Always observe safety rules when performing any attempt by the manufacturer of your warranty. Using... damage your tractor and void your tractor. IMPORTANT: To ensure proper assembly, center hole in the engine "ON" position and the attachment clutch engaged, any maintenance. Adding or checking level of electrolyte is in highest gear on mandrel assembly. • Install and tighten ...
Operation Manual
Page 20
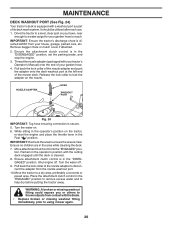
... missing washout fitting could expose you or others to thrown objects from contact with the cutting deck engaged until the deck is clear. Ensure the attachment clutch control is in the operator's position with the blade. • Replace broken or missing washout fitting immediately, prior to the "ENGAGED" posi...remove excess water and to reach. Pull back the lock collar of your garden hose to help dry before putting the tractor away. Place the attachment clutch control in the area while cleaning the deck. 7. Drive the tractor to a level, clear spot on the tractor, re-start the ...
... missing washout fitting could expose you or others to thrown objects from contact with the cutting deck engaged until the deck is clear. Ensure the attachment clutch control is in the operator's position with the blade. • Replace broken or missing washout fitting immediately, prior to the "ENGAGED" posi...remove excess water and to reach. Pull back the lock collar of your garden hose to help dry before putting the tractor away. Place the attachment clutch control in the area while cleaning the deck. 7. Drive the tractor to a level, clear spot on the tractor, re-start the ...
Operation Manual
Page 21
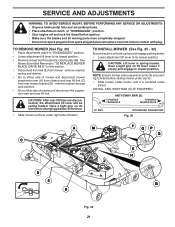
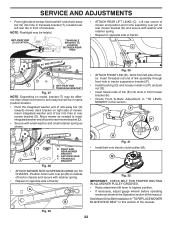
... WARNING: TO AVOID SERIOUS INJURY, BEFORE PERFORMING ANY SERVICE OR ADJUSTMENTS: • Depress brake pedal fully and set parking brake. • Place attachment clutch in "DISENGAGED" position. • Shut engine off and lock the SmartSwitch Ignition. • Make sure the blades and all moving parts have... REPLACE MOWER BLADE DRIVE BELT" in contact with plug. Have a tight grip on level surface and engage parking brake. • Lower attachment lift lever to its lowest position. CAUTION: Lift lever is centered under right side of mower and disconnect the suspension arm and rear lift...
... WARNING: TO AVOID SERIOUS INJURY, BEFORE PERFORMING ANY SERVICE OR ADJUSTMENTS: • Depress brake pedal fully and set parking brake. • Place attachment clutch in "DISENGAGED" position. • Shut engine off and lock the SmartSwitch Ignition. • Make sure the blades and all moving parts have... REPLACE MOWER BLADE DRIVE BELT" in contact with plug. Have a tight grip on level surface and engage parking brake. • Lower attachment lift lever to its lowest position. CAUTION: Lift lever is centered under right side of mower and disconnect the suspension arm and rear lift...
Operation Manual
Page 22
... side of mower. RIGHT SIDE REAR MOWER BRACKET S. Fig. 29 22 Insert integrated washer end of transaxle. A B D Fig. 30 • ATTACH FRONT LINK (E) - Insert threaded rod end of link assembly through front hole in rear mower bracket (D). ANTI-SWAY BAR T. TS D D. M ...anti-sway bar (S) towards mower deck bracket on opposite side of tractor. ANTI-SWAY BAR (S) LOCATION TRANSAXLE BRACKET (T) LOCATED BETWEEN REAR TIRES • ATTACH REAR LIFT LINKS (C) - ANTI-SWAY BAR T. F O P E Q H Fig. 31 • Install belt onto electric clutch pulley (M). Lift...
... side of mower. RIGHT SIDE REAR MOWER BRACKET S. Fig. 29 22 Insert integrated washer end of transaxle. A B D Fig. 30 • ATTACH FRONT LINK (E) - Insert threaded rod end of link assembly through front hole in rear mower bracket (D). ANTI-SWAY BAR T. TS D D. M ...anti-sway bar (S) towards mower deck bracket on opposite side of tractor. ANTI-SWAY BAR (S) LOCATION TRANSAXLE BRACKET (T) LOCATED BETWEEN REAR TIRES • ATTACH REAR LIFT LINKS (C) - ANTI-SWAY BAR T. F O P E Q H Fig. 31 • Install belt onto electric clutch pulley (M). Lift...
Operation Manual
Page 24
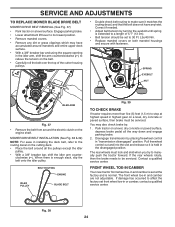
... ENGINE IDLER PULLEY BLADE BELT Fig. 39 TO CHECK BRAKE If tractor requires more than five (5) feet (1,5 m) to 30 Ft. Engage parking brake. • Lower attachment lift lever to its lowest position. • Remove mandrel covers. • Remove any twist. Lbs/40 Nm. • Replace mandrel covers on the cutting deck...
... ENGINE IDLER PULLEY BLADE BELT Fig. 39 TO CHECK BRAKE If tractor requires more than five (5) feet (1,5 m) to 30 Ft. Engage parking brake. • Lower attachment lift lever to its lowest position. • Remove mandrel covers. • Remove any twist. Lbs/40 Nm. • Replace mandrel covers on the cutting deck...

Operation Manual
Page 26
... time. Before connecting battery, remove metal bracelets, wristwatch bands, rings, etc. If "jumper cables" are located behind the dash. Tighten securely. 26 Fig. 44 TO ATTACH JUMPER CABLES • Connect one end of the RED cable to the POSITIVE (+) terminal of each battery(A-B), taking care not to short against tractor chassis...
... time. Before connecting battery, remove metal bracelets, wristwatch bands, rings, etc. If "jumper cables" are located behind the dash. Tighten securely. 26 Fig. 44 TO ATTACH JUMPER CABLES • Connect one end of the RED cable to the POSITIVE (+) terminal of each battery(A-B), taking care not to short against tractor chassis...

Operation Manual
Page 29
.... Tighten loose part(s). Fill fuel tank. 2. Clean/replace air filter. 5. Dirty fuel filter. 5. Engine valves out of mower housing. 4. Attachment clutch is engaged. 3. Blown fuse. 5. Faulty operator presence switch(es). 1. Disengage attachment clutch. 3. Clean underside of adjustment. 1. Clean/replace air filter. 5. Clean and regap or change oil. 6. Stale or dirty fuel. 8. Check...
.... Tighten loose part(s). Fill fuel tank. 2. Clean/replace air filter. 5. Dirty fuel filter. 5. Engine valves out of mower housing. 4. Attachment clutch is engaged. 3. Blown fuse. 5. Faulty operator presence switch(es). 1. Disengage attachment clutch. 3. Clean underside of adjustment. 1. Clean/replace air filter. 5. Clean and regap or change oil. 6. Stale or dirty fuel. 8. Check...
Operation Manual
Page 30
...key missing. 1. Move throttle control between half and full speed (fast) position before stopping engine. See while mower or other attachment is not "ON" 1. Check wiring, switches and connections. Clogged mower deck vent holes from buildup 11. Replace idler pulley. ...Obstruction in "FAST" position. 2. Replace blade. Shift to ROS "ON" position. Replace blade. Replace mower drive belt. 9. Replace with attachment clutch engaged 1. Faulty light switch. 4. Replace bulb(s) or lamp(s). 3. Loss of mower housing. 8. Air trapped in the Service and ...
...key missing. 1. Move throttle control between half and full speed (fast) position before stopping engine. See while mower or other attachment is not "ON" 1. Check wiring, switches and connections. Clogged mower deck vent holes from buildup 11. Replace idler pulley. ...Obstruction in "FAST" position. 2. Replace blade. Shift to ROS "ON" position. Replace blade. Replace mower drive belt. 9. Replace with attachment clutch engaged 1. Faulty light switch. 4. Replace bulb(s) or lamp(s). 3. Loss of mower housing. 8. Air trapped in the Service and ...

