
Owners Manual
Page 2
...; Watch for wheel weights or counterweights. • Keep machine free of grass , leaves or other reproductive harm. WARNING: Tow only the attachments that are recommended by the blades. • Be sure the area is clear of bystanders before starting , stopping, or turning on the machine... constituents, and certain vehicle components contain or emit chemicals known to the State of California to cause cancer and birth defects or other attachments; Always look down slopes. Use common sense when towing. Tires can affect the stability of the machine. Avoid discharging material against ...
...; Watch for wheel weights or counterweights. • Keep machine free of grass , leaves or other reproductive harm. WARNING: Tow only the attachments that are recommended by the blades. • Be sure the area is clear of bystanders before starting , stopping, or turning on the machine... constituents, and certain vehicle components contain or emit chemicals known to the State of California to cause cancer and birth defects or other attachments; Always look down slopes. Use common sense when towing. Tires can affect the stability of the machine. Avoid discharging material against ...

Owners Manual
Page 3
... machine operation. If this is spilled on a truck or trailer bed with a machine that you last saw them . • Check brake operation frequently. Do not attach towed equipment except at all cigarettes, cigars, pipes, and other than the operator. • Be alert and turn machine off . Do not use extra caution...
... machine operation. If this is spilled on a truck or trailer bed with a machine that you last saw them . • Check brake operation frequently. Do not attach towed equipment except at all cigarettes, cigars, pipes, and other than the operator. • Be alert and turn machine off . Do not use extra caution...
Owners Manual
Page 5
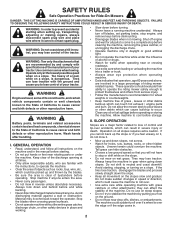
... A socket wrench set will make assembly easier. Remove end panels and lay side panels flat. • Check for location and function of controls) • Raise attachment lift lever to its highest position. • Release parking brake by depressing brake pedal. • Place freewheel control in front of tractor is clear of...
... A socket wrench set will make assembly easier. Remove end panels and lay side panels flat. • Check for location and function of controls) • Raise attachment lift lever to its highest position. • Release parking brake by depressing brake pedal. • Place freewheel control in front of tractor is clear of...

Owners Manual
Page 7
... SYSTEM (ROS) ENGINE ON ENGINE START PARKING BRAKE MOWER HEIGHT MOWER LIFT LIGHTS ON FUEL BATTERY REVERSE FORWARD CRUISE CONTROL CLUTCH/BRAKE PEDAL 15 15 ATTACHMENT ATTACHMENT CLUTCH DISENGAGED CLUTCH ENGAGED DANGER, KEEP HANDS AND FEET AWAY KEEP AREA CLEAR SLOPE HAZARDS (SEE SAFETY RULES SECTION) FREE WHEEL (Automatic Models only) Failure...
... SYSTEM (ROS) ENGINE ON ENGINE START PARKING BRAKE MOWER HEIGHT MOWER LIFT LIGHTS ON FUEL BATTERY REVERSE FORWARD CRUISE CONTROL CLUTCH/BRAKE PEDAL 15 15 ATTACHMENT ATTACHMENT CLUTCH DISENGAGED CLUTCH ENGAGED DANGER, KEEP HANDS AND FEET AWAY KEEP AREA CLEAR SLOPE HAZARDS (SEE SAFETY RULES SECTION) FREE WHEEL (Automatic Models only) Failure...
Owners Manual
Page 8
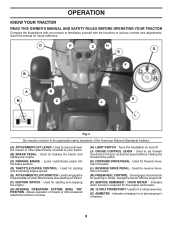
...off . (P) SERVICE REMINDER / HOUR METER - Used for reverse movement of the American National Standards Institute. (A) ATTACHMENT LIFT LEVER - Locks clutch/brake pedal into the brake position. (D) THROTTLE/CHOKE CONTROL - Used to the ...drive pedal. (K) FORWARD DRIVE PEDAL - Used for future reference. Disengages transmission for starting and controlling engine speed. (E) ATTACHMENTCLUTCHSWITCH-Usedtoengagethe mower blades or other attachments mounted to your tractor to your tractor. (F) IGNITION SWITCH - Allows operation of battery. 8 D P Z H G E F B A M Q...
...off . (P) SERVICE REMINDER / HOUR METER - Used for reverse movement of the American National Standards Institute. (A) ATTACHMENT LIFT LEVER - Locks clutch/brake pedal into the brake position. (D) THROTTLE/CHOKE CONTROL - Used to the ...drive pedal. (K) FORWARD DRIVE PEDAL - Used for future reference. Disengages transmission for starting and controlling engine speed. (E) ATTACHMENTCLUTCHSWITCH-Usedtoengagethe mower blades or other attachments mounted to your tractor to your tractor. (F) IGNITION SWITCH - Allows operation of battery. 8 D P Z H G E F B A M Q...

Owners Manual
Page 9
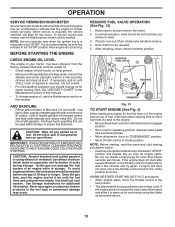
...certain conditions when tractor is equipped with the engine running , any attempt by the operator to "STOP" position and remove key. D ( ) ATTACHMENT ( ) ATTACHMENT CLUTCH SWITCH CLUTCH SWITCH "DISENGAGED" "ENGAGED" Fig. 5 GROUND DRIVE • To stop ground drive, depress brake pedal into the eyes, which... tractor can result in foreign objects thrown into full "BRAKE" position. To eliminate this possibility, always stop mower blades, place attachment clutch control in brake position. Make sure parking brake will shut off the engine. • Depress brake pedal (B) all the...
...certain conditions when tractor is equipped with the engine running , any attempt by the operator to "STOP" position and remove key. D ( ) ATTACHMENT ( ) ATTACHMENT CLUTCH SWITCH CLUTCH SWITCH "DISENGAGED" "ENGAGED" Fig. 5 GROUND DRIVE • To stop ground drive, depress brake pedal into the eyes, which... tractor can result in foreign objects thrown into full "BRAKE" position. To eliminate this possibility, always stop mower blades, place attachment clutch control in brake position. Make sure parking brake will shut off the engine. • Depress brake pedal (B) all the...

Owners Manual
Page 10
...adjusted when they are approximate and may cause the cruise control to 4". NOTE: Adjust gauge wheels with the engine not running and the attachment clutch engaged will shut off the ground when mower is approximately 1" to disengage. Tighten securely. • Repeat for forward travel only.... the ground. Fig. 9 TO OPERATE MOWER Your tractor is depressed. TO ADJUST MOWER CUTTING HEIGHT (See Fig. 8) The position of the attachment lift lever (A) determines the cutting height. Install gauge wheel in most terrain conditions. JUST MOWER CUTTING HEIGHT" in this section of manual). &#...
...adjusted when they are approximate and may cause the cruise control to 4". NOTE: Adjust gauge wheels with the engine not running and the attachment clutch engaged will shut off the ground when mower is approximately 1" to disengage. Tighten securely. • Repeat for forward travel only.... the ground. Fig. 9 TO OPERATE MOWER Your tractor is depressed. TO ADJUST MOWER CUTTING HEIGHT (See Fig. 8) The position of the attachment lift lever (A) determines the cutting height. Install gauge wheel in most terrain conditions. JUST MOWER CUTTING HEIGHT" in this section of manual). &#...

Owners Manual
Page 11
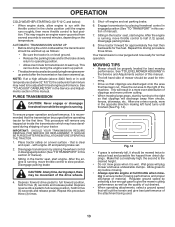
...S Fig. 10 REVERSE OPERATION SYSTEM (ROS) (See Fig. 11) Your tractor is closed and secured to allow reverse operation with the attachment clutch engaged, should only be done when the operator decides it is strongly discouraged. Use an appropriate means of your tractor on hills. ...engaged will enter the mowing area. • Depress brake pedal all turns slowly. TRANSMISSION DISENGAGED Fig. 12 TOWING CARTS AND OTHER ATTACHMENTS Tow only the attachments that are certain no longer needed, turn ignition key counterclockwise to ROS "ON" position. • Look down hills. •...
...S Fig. 10 REVERSE OPERATION SYSTEM (ROS) (See Fig. 11) Your tractor is closed and secured to allow reverse operation with the attachment clutch engaged, should only be done when the operator decides it is strongly discouraged. Use an appropriate means of your tractor on hills. ...engaged will enter the mowing area. • Depress brake pedal all turns slowly. TRANSMISSION DISENGAGED Fig. 12 TOWING CARTS AND OTHER ATTACHMENTS Tow only the attachments that are certain no longer needed, turn ignition key counterclockwise to ROS "ON" position. • Look down hills. •...
Owners Manual
Page 12
...engine or carburetor cleaner products in the Maintenance section of acids during storage. In normal operation, valve should be set parking brake. • Move attachment clutch to "DISENGAGED" position. • Move throttle control to primary position. Drive tractor to bottom of filler neck. If the engine does not...position. Do not run out of an engine while in operating position, depress brake pedal and set to the fast position. • The attachments and ground drive can be used within 30 days to reserve. 4. If engine still does not start the engine and let it will ...
...engine or carburetor cleaner products in the Maintenance section of acids during storage. In normal operation, valve should be set parking brake. • Move attachment clutch to "DISENGAGED" position. • Move throttle control to primary position. Drive tractor to bottom of filler neck. If the engine does not...position. Do not run out of an engine while in operating position, depress brake pedal and set to the fast position. • The attachments and ground drive can be used within 30 days to reserve. 4. If engine still does not start the engine and let it will ...
Owners Manual
Page 13
... fire hazard from dried clippings. Place tractor safely on the temperature. that will suit the terrain and give best performance of the attachment being used for the first time. Repeat this section of manual). 3. Your transmission is wet. After one minute for normal operation...operating tractor for trimming. • Drive so that clippings are discharged onto the area that has been cut desired. • When operating attachments, select a ground speed that is running . AUTOMATIC TRANSMISSION WARM UP • Before driving the unit in the Service and Adjustments section ...
... fire hazard from dried clippings. Place tractor safely on the temperature. that will suit the terrain and give best performance of the attachment being used for the first time. Repeat this section of manual). 3. Your transmission is wet. After one minute for normal operation...operating tractor for trimming. • Drive so that clippings are discharged onto the area that has been cut desired. • When operating attachments, select a ground speed that is running . AUTOMATIC TRANSMISSION WARM UP • Before driving the unit in the Service and Adjustments section ...

Owners Manual
Page 15
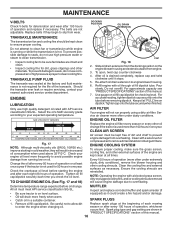
...Tire sealant also prevents tire dry rot and corrosion. TIRES • Maintain proper air pressure in the ROS "ON" position and the attachment clutch engaged, any attempt by turning counterclockwise. • Install new or resharpened blade with stamped "THIS SIDE UP" facing deck and mandrel...concrete or paved surface, then brake must be checked and adjusted. (See "TO CHECK BRAKE" in the engine "ON" position and the attachment clutch engaged, any maintenance. Coat terminals with wire brush until bright. If your warranty. Replace bent or damaged blades. CHECK REVERSE OPERATION ...
...Tire sealant also prevents tire dry rot and corrosion. TIRES • Maintain proper air pressure in the ROS "ON" position and the attachment clutch engaged, any attempt by turning counterclockwise. • Install new or resharpened blade with stamped "THIS SIDE UP" facing deck and mandrel...concrete or paved surface, then brake must be checked and adjusted. (See "TO CHECK BRAKE" in the engine "ON" position and the attachment clutch engaged, any maintenance. Coat terminals with wire brush until bright. If your warranty. Replace bent or damaged blades. CHECK REVERSE OPERATION ...
Owners Manual
Page 16
... 50 hours in cold weather, they begin to clean fan or transmission while engine is not used more than 100 hours in a suitable container. Re-attach oil drain extension to ensure proper cooling. Refill engine with API service classification SG-SL. Clean the cooling fins and external surfaces as it stops. 5.
... 50 hours in cold weather, they begin to clean fan or transmission while engine is not used more than 100 hours in a suitable container. Re-attach oil drain extension to ensure proper cooling. Refill engine with API service classification SG-SL. Clean the cooling fins and external surfaces as it stops. 5.
Owners Manual
Page 17
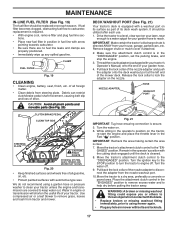
...of its deck wash system. IMPORTANT: Recheck the area making certain the area is secure. 5. Remain in the Fast " " position. Place the attachment clutch control in the "ENGAGED" position to remove excess water and to carburetor, replacement is directed AWAY from your garden hose. 4. It should ...using mower again. • Plug any spilled gasoline. Drive the tractor to a level, clear spot on the nozzle. Move the tractor's attachment clutch control to lock the adapter on your lawn, near enough to a water spigot for your tractor unless the engine and transmission are properly ...
...of its deck wash system. IMPORTANT: Recheck the area making certain the area is secure. 5. Remain in the Fast " " position. Place the attachment clutch control in the "ENGAGED" position to remove excess water and to carburetor, replacement is directed AWAY from your garden hose. 4. It should ...using mower again. • Plug any spilled gasoline. Drive the tractor to a level, clear spot on the nozzle. Move the tractor's attachment clutch control to lock the adapter on your lawn, near enough to a water spigot for your tractor unless the engine and transmission are properly ...
Owners Manual
Page 18
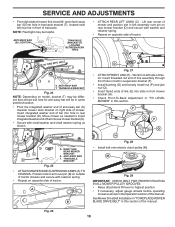
... WARNING: TO AVOID SERIOUS INJURY, BEFORE PERFORMING ANY SERVICE OR ADJUSTMENTS: • Depress brake pedal fully and set parking brake. • Place attachment clutch in "DISENGAGED" position. • Turn ignition key to "STOP" and remove key. • Make sure the blades and all moving parts... forward before sliding mower under tractor. • Slide mower under tractor until it slowly and engage in "DISENGAGED" position. • Lower attachment lift lever to its lowest position. • Remove mower belt from electric clutch pulley (M). See Mower Drive Belt Removal in "TO REPLACE ...
... WARNING: TO AVOID SERIOUS INJURY, BEFORE PERFORMING ANY SERVICE OR ADJUSTMENTS: • Depress brake pedal fully and set parking brake. • Place attachment clutch in "DISENGAGED" position. • Turn ignition key to "STOP" and remove key. • Make sure the blades and all moving parts... forward before sliding mower under tractor. • Slide mower under tractor until it slowly and engage in "DISENGAGED" position. • Lower attachment lift lever to its lowest position. • Remove mower belt from electric clutch pulley (M). See Mower Drive Belt Removal in "TO REPLACE ...
Owners Manual
Page 19
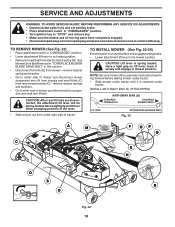
...-SWAY BAR T. Insert integrated washer end of bar into hole in transaxle bracket (T), located near left side of tractor. TRANSAXLE BRACKET Fig. 25 • ATTACH MOWER SIDE SUSPENSION ARMS (A) TO CHASSIS - Work from left rear tire in front of transaxle. F O P E Q H Fig. 28 • ...washer and small retainer spring as shown in the Operation section of this manual. RIGHT SIDE REAR MOWER BRACKET S. A B D Fig. 27 • ATTACH FRONT LINK (E) - TS D D. Insert threaded rod end of link assembly through front hole in tractor suspension bracket (F). • Install bushing (O) and...
...-SWAY BAR T. Insert integrated washer end of bar into hole in transaxle bracket (T), located near left side of tractor. TRANSAXLE BRACKET Fig. 25 • ATTACH MOWER SIDE SUSPENSION ARMS (A) TO CHASSIS - Work from left rear tire in front of transaxle. F O P E Q H Fig. 28 • ...washer and small retainer spring as shown in the Operation section of this manual. RIGHT SIDE REAR MOWER BRACKET S. A B D Fig. 27 • ATTACH FRONT LINK (E) - TS D D. Insert threaded rod end of link assembly through front hole in tractor suspension bracket (F). • Install bushing (O) and...
Owners Manual
Page 21
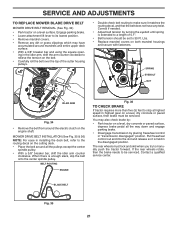
... rotate, then the brake needs to make sure it is enough slack, slip the belt onto the center spindle pulley. Engage parking brake. • Lower attachment lift lever to its lowest position. • Remove mandrel covers. • Remove any twist. When there is held in "transmission disengaged" position.
... rotate, then the brake needs to make sure it is enough slack, slip the belt onto the center spindle pulley. Engage parking brake. • Lower attachment lift lever to its lowest position. • Remove mandrel covers. • Remove any twist. When there is held in "transmission disengaged" position.

Owners Manual
Page 23
.... • Remove terminal cover. • Disconnect BLACK battery cable then RED battery cable and carefully remove battery from both terminals at the same time. TO ATTACH JUMPER CABLES • Connect one end of the RED cable to the POSITIVE (+) terminal of each battery(A-B), taking care not to short against tractor chassis...
.... • Remove terminal cover. • Disconnect BLACK battery cable then RED battery cable and carefully remove battery from both terminals at the same time. TO ATTACH JUMPER CABLES • Connect one end of the RED cable to the POSITIVE (+) terminal of each battery(A-B), taking care not to short against tractor chassis...

Owners Manual
Page 26
...an authorized service center/department. Hard to start 1. Weak or dead battery. 4. Stale or dirty fuel. 6. Recharge or replace battery. 4. Attachment clutch is engaged. 3. Recharge or replace battery. 4. Weak or dead battery. 2. Check/replace solenoid or starter. Dirty air filter. 4. ...Adjustments section. 10. Spark plug wire loose. 10. Dirty fuel filter. 5. Engine valves out of fuel. 2. Replace fuel filter. 5. Disengage attachment clutch. 3. See "To Adjust Carburetor" in "CHOKE" position. 2. Tighten loose part(s). Check all wiring. 4. Dirty/clogged muffler. 12....
...an authorized service center/department. Hard to start 1. Weak or dead battery. 4. Stale or dirty fuel. 6. Recharge or replace battery. 4. Attachment clutch is engaged. 3. Recharge or replace battery. 4. Weak or dead battery. 2. Check/replace solenoid or starter. Dirty air filter. 4. ...Adjustments section. 10. Spark plug wire loose. 10. Dirty fuel filter. 5. Engine valves out of fuel. 2. Replace fuel filter. 5. Disengage attachment clutch. 3. See "To Adjust Carburetor" in "CHOKE" position. 2. Tighten loose part(s). Check all wiring. 4. Dirty/clogged muffler. 12....

Owners Manual
Page 27
.... 2. Air trapped in clutch mechanism. 2. Install axle key at rear wheel. Reverse operation system (ROS) is not "ON" while mower or other attachment is "OFF". 2. Mower deck not level. 3. Bent blade mandrel. 5. Engine speed too slow. 1. Wet grass. 3. Level mower deck. 5. ...1. Worn, bent or loose blade. 6. Bulb(s) or lamp(s) burned out. 3. Faulty regulator (if so equipped). 4. Poor cut - Replace with attachment clutch engaged 1. Travel speed too fast. 2. of mower housing. 4. See "CLEANING" in parts manual. 11. Move throttle control between half and ...
.... 2. Air trapped in clutch mechanism. 2. Install axle key at rear wheel. Reverse operation system (ROS) is not "ON" while mower or other attachment is "OFF". 2. Mower deck not level. 3. Bent blade mandrel. 5. Engine speed too slow. 1. Wet grass. 3. Level mower deck. 5. ...1. Worn, bent or loose blade. 6. Bulb(s) or lamp(s) burned out. 3. Faulty regulator (if so equipped). 4. Poor cut - Replace with attachment clutch engaged 1. Travel speed too fast. 2. of mower housing. 4. See "CLEANING" in parts manual. 11. Move throttle control between half and ...

