
Owners Manual
Page 2
...and birth defects or other debris which can hide obstacles. • Choose a low ground speed so that are familiar with grass catchers or other attachments; Tall grass can cause build-up and thrown by the blades. • Ensure the area is dangerous. If the tires lose traction, disengage ...machine and in the manual before starting. • Do not put hands or feet near drop-offs, ditches, or embankments. WARNING: Tow only the attachments that you may ricochet back toward anyone enters the area. • Never carry passengers. • Do not mow in severe injury or death. ...
...and birth defects or other debris which can hide obstacles. • Choose a low ground speed so that are familiar with grass catchers or other attachments; Tall grass can cause build-up and thrown by the blades. • Ensure the area is dangerous. If the tires lose traction, disengage ...machine and in the manual before starting. • Do not put hands or feet near drop-offs, ditches, or embankments. WARNING: Tow only the attachments that you may ricochet back toward anyone enters the area. • Never carry passengers. • Do not mow in severe injury or death. ...

Owners Manual
Page 3
... the machine and the mowing activity. They may suddenly appear in the mowing area for small children. The American Academy of 15°. Do not attach towed equipment except at all times until fueling is not possible, then refuel such equipment with manufacturer's recommended parts, when necessary. • Mower blades are...
... the machine and the mowing activity. They may suddenly appear in the mowing area for small children. The American Academy of 15°. Do not attach towed equipment except at all times until fueling is not possible, then refuel such equipment with manufacturer's recommended parts, when necessary. • Mower blades are...
Owners Manual
Page 6
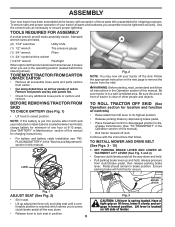
...year indicated on the next page to raised position. Have a tight grip on left unassembled for location and function of controls) • Raise attachment lift lever to its highest position. • Release parking brake by depressing brake pedal. • Place freewheel control in disengaged position to ...brake pedal all the way down and hold. • Pull parking brake lever up and hold tractor secure. SET PARKING BRAKE LEVER AND LOWER ATTACHMENT LIFT LEVER (See Fig. 3 and 4) • Depress clutch/brake pedal all parts and hardware you to disengage transmission (See "TO TRANSPORT"...
...year indicated on the next page to raised position. Have a tight grip on left unassembled for location and function of controls) • Raise attachment lift lever to its highest position. • Release parking brake by depressing brake pedal. • Place freewheel control in disengaged position to ...brake pedal all the way down and hold. • Pull parking brake lever up and hold tractor secure. SET PARKING BRAKE LEVER AND LOWER ATTACHMENT LIFT LEVER (See Fig. 3 and 4) • Depress clutch/brake pedal all parts and hardware you to disengage transmission (See "TO TRANSPORT"...

Owners Manual
Page 8
... bracket (D) and secure with small washer and small retainer spring as - A. LARGE RETAINER SPRING H. FRONT MOWER BRACKET J. HOLE Fig. 13 8 ATTACH FRONT LINK (E) (See Fig. 14) • Turn steering wheel to position wheels straight forward. • From front of tractor, insert rod end...other end of link (E) into hole (U) in tractor lift shaft suspension arm and pivot link down to insert integrated washer end of tractor. TS D D. ATTACH MOWER SIDE SUSPENSION ARMS (A) TO CHASSIS (See Fig. 12) • Position front hole in link as shown. U C S T S. ANTI-SWAY BAR...
... bracket (D) and secure with small washer and small retainer spring as - A. LARGE RETAINER SPRING H. FRONT MOWER BRACKET J. HOLE Fig. 13 8 ATTACH FRONT LINK (E) (See Fig. 14) • Turn steering wheel to position wheels straight forward. • From front of tractor, insert rod end...other end of link (E) into hole (U) in tractor lift shaft suspension arm and pivot link down to insert integrated washer end of tractor. TS D D. ATTACH MOWER SIDE SUSPENSION ARMS (A) TO CHASSIS (See Fig. 12) • Position front hole in link as shown. U C S T S. ANTI-SWAY BAR...
Owners Manual
Page 9
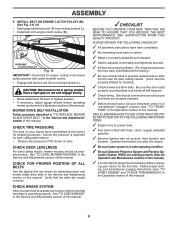
... (See the Operation and Maintenance sections in the Service and Adjustments section of this manual. Have a tight grip on rod and engage slowly. • Raise attachment lift lever to PSI shown on your tractor for leveling). ✓ Check mower and drive belts. PLEASE REVIEW THE FOLLOWING CHECKLIST: ✓ All assembly instructions...
... (See the Operation and Maintenance sections in the Service and Adjustments section of this manual. Have a tight grip on rod and engage slowly. • Raise attachment lift lever to PSI shown on your tractor for leveling). ✓ Check mower and drive belts. PLEASE REVIEW THE FOLLOWING CHECKLIST: ✓ All assembly instructions...

Owners Manual
Page 10
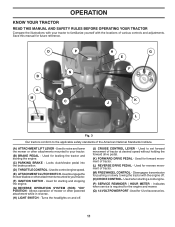
... SYSTEM (ROS) ENGINE ON ENGINE START PARKING BRAKE MOWER HEIGHT MOWER LIFT LIGHTS ON FUEL BATTERY REVERSE FORWARD CRUISE CONTROL CLUTCH/BRAKE PEDAL 15 15 ATTACHMENT ATTACHMENT CLUTCH DISENGAGED CLUTCH ENGAGED DANGER, KEEP HANDS AND FEET AWAY KEEP AREA CLEAR SLOPE HAZARDS (SEE SAFETY RULES SECTION) FREE WHEEL (Automatic Models only) Failure...
... SYSTEM (ROS) ENGINE ON ENGINE START PARKING BRAKE MOWER HEIGHT MOWER LIFT LIGHTS ON FUEL BATTERY REVERSE FORWARD CRUISE CONTROL CLUTCH/BRAKE PEDAL 15 15 ATTACHMENT ATTACHMENT CLUTCH DISENGAGED CLUTCH ENGAGED DANGER, KEEP HANDS AND FEET AWAY KEEP AREA CLEAR SLOPE HAZARDS (SEE SAFETY RULES SECTION) FREE WHEEL (Automatic Models only) Failure...
Owners Manual
Page 11
...the tractor with the locations of tractor. (L) REVERSE DRIVE PEDAL - Used to set forward movement of the American National Standards Institute. (A) ATTACHMENT LIFT LEVER - Used for 12 volt accessories. 11 Used for forward movement of various controls and adjustments. Allows operation of tractor. (M) FREEWHEEL... the engine off . (J) CRUISE CONTROL LEVER - Used to raise and lower the mower or other powered attachment while in reverse. (H) LIGHT SWITCH - Used for future reference. Used to control engine speed. (E) ATTACHMENTCLUTCHSWITCH-Usedtoengagethe mower blades or other...
...the tractor with the locations of tractor. (L) REVERSE DRIVE PEDAL - Used to set forward movement of the American National Standards Institute. (A) ATTACHMENT LIFT LEVER - Used for 12 volt accessories. 11 Used for forward movement of various controls and adjustments. Allows operation of tractor. (M) FREEWHEEL... the engine off . (J) CRUISE CONTROL LEVER - Used to raise and lower the mower or other powered attachment while in reverse. (H) LIGHT SWITCH - Used for future reference. Used to control engine speed. (E) ATTACHMENTCLUTCHSWITCH-Usedtoengagethe mower blades or other...

Owners Manual
Page 12
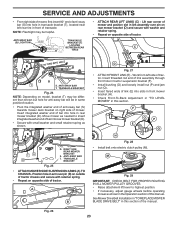
...less than full speed (fast) reduces the engine's operating efficiency. • Full speed (fast) offers the best mower performance. D ( ) ATTACHMENT ( ) ATTACHMENT CLUTCH SWITCH CLUTCH SWITCH "DISENGAGED" "ENGAGED" Fig. 5 GROUND DRIVE • To stop engine when stopping tractor on grass areas. Slowly push ...ANY POSITION OTHER THAN "STOP" WILL CAUSE THE BATTERY TO BE DISCHARGED, (DEAD). CAUTION: Always stop mower blades, place attachment clutch control in to "STOP" position and remove key. Pedal should remain in foreign objects thrown into full "BRAKE" position....
...less than full speed (fast) reduces the engine's operating efficiency. • Full speed (fast) offers the best mower performance. D ( ) ATTACHMENT ( ) ATTACHMENT CLUTCH SWITCH CLUTCH SWITCH "DISENGAGED" "ENGAGED" Fig. 5 GROUND DRIVE • To stop engine when stopping tractor on grass areas. Slowly push ...ANY POSITION OTHER THAN "STOP" WILL CAUSE THE BATTERY TO BE DISCHARGED, (DEAD). CAUTION: Always stop mower blades, place attachment clutch control in to "STOP" position and remove key. Pedal should remain in foreign objects thrown into full "BRAKE" position....
Owners Manual
Page 13
... Other conditions such as trimming at the desired cutting height in proper position to desired cutting height (See "TO AD- A Fig. 8 • Put attachment lift lever in appropriate hole. Gauge wheels then keep the deck in operating position. K J L Fig. 7 TO USE CRUISE CONTROL (J) (See Fig....; Repeat for forward travel only. Make the first cut (see "TO ADJUST MOWER CUTTING HEIGHT") • Start mower blades by engaging attachment clutch control. 13 OPERATION TO MOVE FORWARD AND BACKWARD (See Fig. 7) The direction and speed of movement is controlled by the operator ...
... Other conditions such as trimming at the desired cutting height in proper position to desired cutting height (See "TO AD- A Fig. 8 • Put attachment lift lever in appropriate hole. Gauge wheels then keep the deck in operating position. K J L Fig. 7 TO USE CRUISE CONTROL (J) (See Fig....; Repeat for forward travel only. Make the first cut (see "TO ADJUST MOWER CUTTING HEIGHT") • Start mower blades by engaging attachment clutch control. 13 OPERATION TO MOVE FORWARD AND BACKWARD (See Fig. 7) The direction and speed of movement is controlled by the operator ...

Owners Manual
Page 14
...S Fig. 10 REVERSE OPERATION SYSTEM (ROS) (See Fig. 11) Your tractor is dangerous. Turning the ROS "ON", to allow reverse operation with the attachment clutch engaged, should only be sure to travel in the ROS "ON" position. TO TRANSPORT (See Figs. 3 & 12) When pushing or towing your... tractor. OPERATION TO STOP MOWER BLADES • Disengage attachment clutch control. CAUTION: Do not operate the mower without either the entire grass catcher, on a truck or a trailer, be sure hood is absolutely necessary...
...S Fig. 10 REVERSE OPERATION SYSTEM (ROS) (See Fig. 11) Your tractor is dangerous. Turning the ROS "ON", to allow reverse operation with the attachment clutch engaged, should only be sure to travel in the ROS "ON" position. TO TRANSPORT (See Figs. 3 & 12) When pushing or towing your... tractor. OPERATION TO STOP MOWER BLADES • Disengage attachment clutch control. CAUTION: Do not operate the mower without either the entire grass catcher, on a truck or a trailer, be sure hood is absolutely necessary...
Owners Manual
Page 15
... using ethanol or methanol) can attract moisture which leads to separation and formation of fuel, it to the fast position. • The attachments and ground drive can damage the fuel system of 30 days or longer. Do not store, spill or use engine or carburetor cleaner products... in operating position, depress brake pedal and set parking brake. • Move attachment clutch to "DISENGAGED" position. • Move throttle control to fast position, wait a few seconds, remove and read the warm and cold starting the...
... using ethanol or methanol) can attract moisture which leads to separation and formation of fuel, it to the fast position. • The attachments and ground drive can damage the fuel system of 30 days or longer. Do not store, spill or use engine or carburetor cleaner products... in operating position, depress brake pedal and set parking brake. • Move attachment clutch to "DISENGAGED" position. • Move throttle control to fast position, wait a few seconds, remove and read the warm and cold starting the...
Owners Manual
Page 16
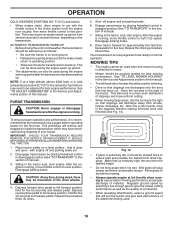
..., hold for normal operation. Repeat this manual. Wet grass will remove any time, during shipping of cut desired. • When operating attachments, select a ground speed that has been cut. Regulate ground speed by placing freewheel control in disengaged position (See "TO TRANSPORT" in...approximately five feet then backwards for five (5) seconds and release pedal. After one minute for transmission to warm up period. • The attachments can also be used when the mower housing is running , move throttle control to several minutes, depending on a level surface - Disengage ...
..., hold for normal operation. Repeat this manual. Wet grass will remove any time, during shipping of cut desired. • When operating attachments, select a ground speed that has been cut. Regulate ground speed by placing freewheel control in disengaged position (See "TO TRANSPORT" in...approximately five feet then backwards for five (5) seconds and release pedal. After one minute for transmission to warm up period. • The attachments can also be used when the mower housing is running , move throttle control to several minutes, depending on a level surface - Disengage ...
Owners Manual
Page 18
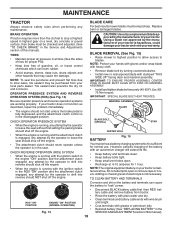
...CHECK REVERSE OPERATION (ROS) SYSTEM • When the engine is running with the ignition switch in the ROS "ON" position and the attachment clutch engaged, any attempt by the manufacturer of this manual). Do not attempt to open . • Recharge at highest speed in highest...8226; • • 18 Disconnect BLACK battery cable first then RED battery cable and remove battery from your tractor is running and the attachment clutch is engaged, any maintenance. MANDREL ASSEMBLY BLADE • The engine should shut off the engine. However, periodic charging of electrolyte is...
...CHECK REVERSE OPERATION (ROS) SYSTEM • When the engine is running with the ignition switch in the ROS "ON" position and the attachment clutch engaged, any attempt by the manufacturer of this manual). Do not attempt to open . • Recharge at highest speed in highest...8226; • • 18 Disconnect BLACK battery cable first then RED battery cable and remove battery from your tractor is running and the attachment clutch is engaged, any maintenance. MANDREL ASSEMBLY BLADE • The engine should shut off the engine. However, periodic charging of electrolyte is...
Owners Manual
Page 21
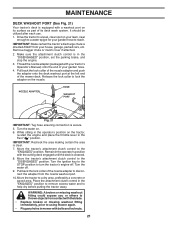
... clear. 7. Remain in mower with your house, garage, parked cars, etc. While sitting in the Fast " " position. Move the tractor's attachment clutch control to the "DISENGAGED" position. WARNING: A broken or missing washout fitting could expose you or others to thrown objects from your tractor's... on the nozzle. Release the lock collar to help dry before putting the tractor away. Remove bagger chute or mulch cover if attached. 2. IMPORTANT: Make certain the tractor's discharge chute is secure. 5. NOZZLE ADAPTER HOSE WASHOUT PORT Fig. 21 IMPORTANT: Tug hose...
... clear. 7. Remain in mower with your house, garage, parked cars, etc. While sitting in the Fast " " position. Move the tractor's attachment clutch control to the "DISENGAGED" position. WARNING: A broken or missing washout fitting could expose you or others to thrown objects from your tractor's... on the nozzle. Release the lock collar to help dry before putting the tractor away. Remove bagger chute or mulch cover if attached. 2. IMPORTANT: Make certain the tractor's discharge chute is secure. 5. NOZZLE ADAPTER HOSE WASHOUT PORT Fig. 21 IMPORTANT: Tug hose...

Owners Manual
Page 22
...: TO AVOID SERIOUS INJURY, BEFORE PERFORMING ANY SERVICE OR ADJUSTMENTS: • Depress brake pedal fully and set parking brake. • Place attachment clutch in "DISENGAGED" position. • Turn ignition key to other side of mower and disconnect the suspension arm and rear lift link. ...(C) from electric clutch pulley (M). See Mower Drive Belt Removal in "TO REPLACE MOWER BLADE DRIVE BELT" in "DISENGAGED" position. • Lower attachment lift lever to either side of tractor. INSTALL ANTI-SWAY BAR (S) (IF EQUIPPED) ANTI-SWAY BAR (S) TOWARDS TRANSAXLE TOWARDS MOWER DECK 90°...
...: TO AVOID SERIOUS INJURY, BEFORE PERFORMING ANY SERVICE OR ADJUSTMENTS: • Depress brake pedal fully and set parking brake. • Place attachment clutch in "DISENGAGED" position. • Turn ignition key to other side of mower and disconnect the suspension arm and rear lift link. ...(C) from electric clutch pulley (M). See Mower Drive Belt Removal in "TO REPLACE MOWER BLADE DRIVE BELT" in "DISENGAGED" position. • Lower attachment lift lever to either side of tractor. INSTALL ANTI-SWAY BAR (S) (IF EQUIPPED) ANTI-SWAY BAR (S) TOWARDS TRANSAXLE TOWARDS MOWER DECK 90°...
Owners Manual
Page 23
... pin on right side of mower. F O P E Q H Fig. 28 • Install belt onto electric clutch pulley (M). A B D Fig. 27 • ATTACH FRONT LINK (E) - RIGHT SIDE REAR MOWER BRACKET S. ANTI-SWAY BAR T. M Fig. 29 IMPORTANT: CHECK BELT FOR PROPER ROUTING IN ALL MOWER PULLEY GROOVES. • ... bracket (H). • Check Front-To-Back Adjustment in "TO LEVEL MOWER" in front of transaxle. TRANSAXLE BRACKET Fig. 25 • ATTACH MOWER SIDE SUSPENSION ARMS (A) TO CHASSIS - NOTE: Flashlight may be different than shown but hole for anti-sway bar will be helpful....
... pin on right side of mower. F O P E Q H Fig. 28 • Install belt onto electric clutch pulley (M). A B D Fig. 27 • ATTACH FRONT LINK (E) - RIGHT SIDE REAR MOWER BRACKET S. ANTI-SWAY BAR T. M Fig. 29 IMPORTANT: CHECK BELT FOR PROPER ROUTING IN ALL MOWER PULLEY GROOVES. • ... bracket (H). • Check Front-To-Back Adjustment in "TO LEVEL MOWER" in front of transaxle. TRANSAXLE BRACKET Fig. 25 • ATTACH MOWER SIDE SUSPENSION ARMS (A) TO CHASSIS - NOTE: Flashlight may be different than shown but hole for anti-sway bar will be helpful....
Owners Manual
Page 25
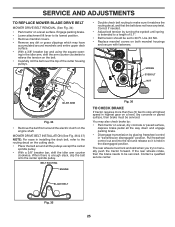
Engage parking brake. • Lower attachment lift lever to its lowest position. • Remove mandrel covers. • Remove any twist. SPRING EYEBOLT NUT IDLER ARM Fig. 34 • Remove the belt ...
Engage parking brake. • Lower attachment lift lever to its lowest position. • Remove mandrel covers. • Remove any twist. SPRING EYEBOLT NUT IDLER ARM Fig. 34 • Remove the belt ...
Owners Manual
Page 27
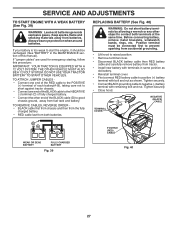
... cable then RED battery cable and carefully remove battery from fuel tank and battery. DO NOT USE YOUR TRACTOR BATTERY TO START OTHER VEHICLES. TO ATTACH JUMPER CABLES • Connect one end of the RED cable to the POSITIVE (+) terminal of each battery(A-B), taking care not to short against tractor chassis...
... cable then RED battery cable and carefully remove battery from fuel tank and battery. DO NOT USE YOUR TRACTOR BATTERY TO START OTHER VEHICLES. TO ATTACH JUMPER CABLES • Connect one end of the RED cable to the POSITIVE (+) terminal of each battery(A-B), taking care not to short against tractor chassis...

Owners Manual
Page 30
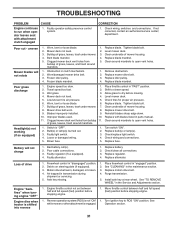
... Dirty fuel filter. 5. Stale or dirty fuel. 6. Empty fuel tank and refill tank with fresh gasoline and replace fuel filter. 8. Attachment clutch is engaged. 3. Depress brake pedal. 2. Recharge or replace battery. 4. Replace fuse. 5. Clean underside of power 1. Check oil...or replace battery. 4. Check all wiring. 9. Engine will not start . 4. Corroded battery terminals. 6. Faulty solenoid or starter. 9. Disengage attachment clutch. 3. Weak or dead battery. 2. Loss of mower housing. 4. Raise cutting height/reduce speed. 2. Clean/replace air filter. 5. ...
... Dirty fuel filter. 5. Stale or dirty fuel. 6. Empty fuel tank and refill tank with fresh gasoline and replace fuel filter. 8. Attachment clutch is engaged. 3. Depress brake pedal. 2. Recharge or replace battery. 4. Replace fuse. 5. Clean underside of power 1. Check oil...or replace battery. 4. Check all wiring. 9. Engine will not start . 4. Corroded battery terminals. 6. Faulty solenoid or starter. 9. Disengage attachment clutch. 3. Weak or dead battery. 2. Loss of mower housing. 4. Raise cutting height/reduce speed. 2. Clean/replace air filter. 5. ...
Owners Manual
Page 31
...level. 4. Buildup of grass, leaves, trash around mandrels to open vent holes. Reinstall blades sharp edge down. 10. Replace with attachment clutch engaged 1. of grass, leaves, trash under mower. 4. Loose or damaged wiring. 5. Replace regulator. 4. Reverse operation system... (ROS) is not "ON" while mower or other attachment is "OFF". 2. Shift to dry before stopping engine. 1. Low/uneven tire air pressure. 5. Mower drive belt worn. 8. Check/replace...
...level. 4. Buildup of grass, leaves, trash around mandrels to open vent holes. Reinstall blades sharp edge down. 10. Replace with attachment clutch engaged 1. of grass, leaves, trash under mower. 4. Loose or damaged wiring. 5. Replace regulator. 4. Reverse operation system... (ROS) is not "ON" while mower or other attachment is "OFF". 2. Shift to dry before stopping engine. 1. Low/uneven tire air pressure. 5. Mower drive belt worn. 8. Check/replace...

