
Owners Manual
Page 2
... for holes, ruts, bumps, rocks, or other attachments; Uneven terrain could be picked up to occur. Tall grass can touch hot exhaust / engine parts and burn. If the tires lose traction, disengage the blades and proceed slowly straight down the slope. • Keep all instructions on a slope. ...unattended. WARNING: Do not coast down a hill in gear when going down before starting. • Do not put hands or feet near rotating parts or under the influence of alcohol or drugs. • Watch for Ride-On Mowers DANGER: THIS CUTTING MACHINE IS CAPABLE OF AMPUTATING HANDS AND ...
... for holes, ruts, bumps, rocks, or other attachments; Uneven terrain could be picked up to occur. Tall grass can touch hot exhaust / engine parts and burn. If the tires lose traction, disengage the blades and proceed slowly straight down the slope. • Keep all instructions on a slope. ...unattended. WARNING: Do not coast down a hill in gear when going down before starting. • Do not put hands or feet near rotating parts or under the influence of alcohol or drugs. • Watch for Ride-On Mowers DANGER: THIS CUTTING MACHINE IS CAPABLE OF AMPUTATING HANDS AND ...
Owners Manual
Page 3
.... Wrap the blade or wear gloves, and use extreme care in the mowing area for small children. • Never carry children, even with manufacturer's recommended parts, when necessary. • Mower blades are sharp. Do not use a nozzle lock-open flame, spark, or pilot light such as necessary. Before and while backing...
.... Wrap the blade or wear gloves, and use extreme care in the mowing area for small children. • Never carry children, even with manufacturer's recommended parts, when necessary. • Mower blades are sharp. Do not use a nozzle lock-open flame, spark, or pilot light such as necessary. Before and while backing...

Owners Manual
Page 5
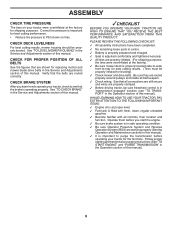
... down. • Release lever to dis- Fig. 1 5 TO REMOVE TRACTOR FROM CARTON UNPACK CARTON • Remove all accessible loose parts and parts cartons from the skid. NOTE: If this battery is put into service after month and year indicated on the next page to raised position... manual). • Roll tractor forward off the skid. Standard wrench sizes are in the operating position (seated behind the steering wheel). UNASSEMBLED PARTS Keys (1) Oil Drain Tube Slope Sheet Battery (2) Hex Bolts *Installed by depressing brake pedal. • Place freewheel control in disengaged position ...
... down. • Release lever to dis- Fig. 1 5 TO REMOVE TRACTOR FROM CARTON UNPACK CARTON • Remove all accessible loose parts and parts cartons from the skid. NOTE: If this battery is put into service after month and year indicated on the next page to raised position... manual). • Roll tractor forward off the skid. Standard wrench sizes are in the operating position (seated behind the steering wheel). UNASSEMBLED PARTS Keys (1) Oil Drain Tube Slope Sheet Battery (2) Hex Bolts *Installed by depressing brake pedal. • Place freewheel control in disengaged position ...
Owners Manual
Page 6
..., mower housing should be properly inflated for shipping purposes. PLEASE REVIEW THE FOLLOWING CHECKLIST: ✓ All assembly instructions have been completed. ✓ No remaining loose parts in this manual). WHILE LEARNING HOW TO USE YOUR TRACTOR, PAY EXTRA ATTENTION TO THE FOLLOWING IMPORTANT ITEMS: ✓ Engine oil is operating properly. See...
..., mower housing should be properly inflated for shipping purposes. PLEASE REVIEW THE FOLLOWING CHECKLIST: ✓ All assembly instructions have been completed. ✓ No remaining loose parts in this manual). WHILE LEARNING HOW TO USE YOUR TRACTOR, PAY EXTRA ATTENTION TO THE FOLLOWING IMPORTANT ITEMS: ✓ Engine oil is operating properly. See...
Owners Manual
Page 16
... caps or covers. Reinstall battery (See "REPLACING BATTERY" in the seat. NOTE: Protect your tractor is in the Service and Adjustments section of your local parts dealer. Clean terminals and battery cable ends with grease or petroleum jelly. Tire sealant also prevents tire dry rot and corrosion. OPERATOR PRESENCE SYSTEM AND...
... caps or covers. Reinstall battery (See "REPLACING BATTERY" in the seat. NOTE: Protect your tractor is in the Service and Adjustments section of your local parts dealer. Clean terminals and battery cable ends with grease or petroleum jelly. Tire sealant also prevents tire dry rot and corrosion. OPERATOR PRESENCE SYSTEM AND...
Owners Manual
Page 18
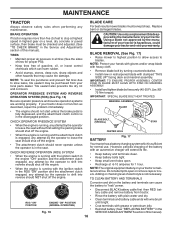
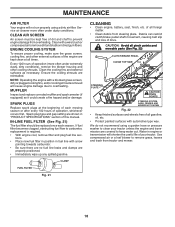
... or after every 100 hours of your tractor unless the engine and transmission are shown in "PRODUCT SPECIFICATIONS" section of all pinch points and movable parts (See Fig. 22) CLUTCH/BRAKE PEDAL CLEAN TOP SIDE STEERING PLATE CAUTION: PINCH POINTS STEERING SYSTEM, DASH, FENDER AND MOWER NOT SHOWN Fig. 22 •...
... or after every 100 hours of your tractor unless the engine and transmission are shown in "PRODUCT SPECIFICATIONS" section of all pinch points and movable parts (See Fig. 22) CLUTCH/BRAKE PEDAL CLEAN TOP SIDE STEERING PLATE CAUTION: PINCH POINTS STEERING SYSTEM, DASH, FENDER AND MOWER NOT SHOWN Fig. 22 •...
Owners Manual
Page 19
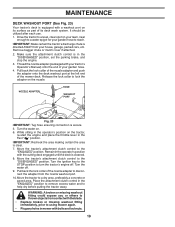
... your lawn, near enough to a water spigot for your garden hose to a level, clear spot on the nozzle. Turn the water on its surface as part of the nozzle adapter to turn the tractor's engine off . 9. Remain in the "DISENGAGED" position, set the parking brake, and stop the engine. 3. Move the...
... your lawn, near enough to a water spigot for your garden hose to a level, clear spot on the nozzle. Turn the water on its surface as part of the nozzle adapter to turn the tractor's engine off . 9. Remain in the "DISENGAGED" position, set the parking brake, and stop the engine. 3. Move the...
Owners Manual
Page 20
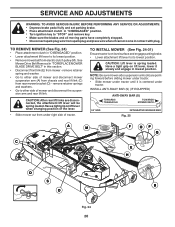
... brake. • Place attachment clutch in "DISENGAGED" position. • Turn ignition key to "STOP" and remove key. • Make sure the blades and all moving parts have completely stopped. • Disconnect spark plug wire from electric clutch pulley (M). See Mower Drive Belt Removal in "TO REPLACE MOWER BLADE DRIVE BELT" in...
... brake. • Place attachment clutch in "DISENGAGED" position. • Turn ignition key to "STOP" and remove key. • Make sure the blades and all moving parts have completely stopped. • Disconnect spark plug wire from electric clutch pulley (M). See Mower Drive Belt Removal in "TO REPLACE MOWER BLADE DRIVE BELT" in...

Owners Manual
Page 24
.... 4. FRONT WHEEL TOE-IN/CAMBER Your new tractor front wheel toe-in axle groove. • Replace axle cover. Carefully remove belt upwards from your local parts dealer. Insert square key. • Replace washers and snap retaining ring securely in and camber is set front wheel toe-in this manual). For assistance...
.... 4. FRONT WHEEL TOE-IN/CAMBER Your new tractor front wheel toe-in axle groove. • Replace axle cover. Carefully remove belt upwards from your local parts dealer. Insert square key. • Replace washers and snap retaining ring securely in and camber is set front wheel toe-in this manual). For assistance...
Owners Manual
Page 27
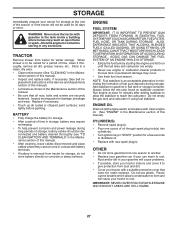
... help prevent corrosion and power leakage during storage. ENGINE FUEL SYSTEM IMPORTANT: IT IS IMPORTANT TO PREVENT GUM DEPOSITS FROM FORMING IN ESSENTIAL FUEL SYSTEM PARTS SUCH AS CARBURETOR, FUEL FILTER, FUEL HOSE, OR TANK DURING STORAGE. Rust and/or dirt in the Maintenance section of this manual). • After cleaning... a clean, dry area. • Clean entire tractor (See "CLEANING" in the tank inside a building where fumes may reach an open flame or spark. Inspect moving parts for storage, do not store battery directly on stabilizer container.
... help prevent corrosion and power leakage during storage. ENGINE FUEL SYSTEM IMPORTANT: IT IS IMPORTANT TO PREVENT GUM DEPOSITS FROM FORMING IN ESSENTIAL FUEL SYSTEM PARTS SUCH AS CARBURETOR, FUEL FILTER, FUEL HOSE, OR TANK DURING STORAGE. Rust and/or dirt in the Maintenance section of this manual). • After cleaning... a clean, dry area. • Clean entire tractor (See "CLEANING" in the tank inside a building where fumes may reach an open flame or spark. Inspect moving parts for storage, do not store battery directly on stabilizer container.

Owners Manual
Page 28
...damaged wiring. 4. Loss of adjustment. 10. Replace fuel filter. 8. Clean/replace muffler. 13. Check all wiring. 9. Replace blade. Replace damaged parts. 28 Out of mower housing. 4. Dirty fuel filter. 7. Water in Service Adjustments section. 8. See "To Adjust Carburetor" in fuel. 8....15. Check oil level/change spark plug. 7. Spark plug wire loose. 10. Connect and tighten spark plug wire. 11. Loose/damaged part(s). 1. Bad spark plug. 5. Dirty air filter. 6. Loose or damaged wiring. 9. Clean/replace air filter. 6. Loose or damaged ...
...damaged wiring. 4. Loss of adjustment. 10. Replace fuel filter. 8. Clean/replace muffler. 13. Check all wiring. 9. Replace blade. Replace damaged parts. 28 Out of mower housing. 4. Dirty fuel filter. 7. Water in Service Adjustments section. 8. See "To Adjust Carburetor" in fuel. 8....15. Check oil level/change spark plug. 7. Spark plug wire loose. 10. Connect and tighten spark plug wire. 11. Loose/damaged part(s). 1. Bad spark plug. 5. Dirty air filter. 6. Loose or damaged wiring. 9. Clean/replace air filter. 6. Loose or damaged ...

Owners Manual
Page 29
... servicing. 5. Clean around mandrels. 1. Level mower deck. 5. Air trapped in "disengaged" position. 2. Low/uneven tire air pressure. 5. Replace with attachment clutch engaged 1. See "CLEANING" in parts manual. 11. Buildup of drive 1. Loss of grass, leaves, trash under mower. 4. Replace mower drive belt. 9. Engine throttle control not set between half and full...
... servicing. 5. Clean around mandrels. 1. Level mower deck. 5. Air trapped in "disengaged" position. 2. Low/uneven tire air pressure. 5. Replace with attachment clutch engaged 1. See "CLEANING" in parts manual. 11. Buildup of drive 1. Loss of grass, leaves, trash under mower. 4. Replace mower drive belt. 9. Engine throttle control not set between half and full...


