

Owners Manual
Page 2
WARNING: Tow only the attachments that are involved in a large percentage of alcohol or drugs. • Watch for all movement on wet grass. Tires can touch hot exhaust / engine parts and burn. I. Stop machine if anyone . Always look down and behind before turning. • Never leave a running machine unattended. Avoid discharging material against a wall or obstruction. Stop the blades when crossing gravel surfaces. • Do not operate machine without the entire grass catcher, discharge chute, or other safety devices in reverse unless absolutely necessary. Shut off blades, set ...
WARNING: Tow only the attachments that are involved in a large percentage of alcohol or drugs. • Watch for all movement on wet grass. Tires can touch hot exhaust / engine parts and burn. I. Stop machine if anyone . Always look down and behind before turning. • Never leave a running machine unattended. Avoid discharging material against a wall or obstruction. Stop the blades when crossing gravel surfaces. • Do not operate machine without the entire grass catcher, discharge chute, or other safety devices in reverse unless absolutely necessary. Shut off blades, set ...

Owners Manual
Page 3
Do not attach towed equipment except at all times until fueling is not possible, then refuel such equipment with a portable container, rather • than from a gasoline dispenser nozzle. • Keep the nozzle in contact with plastic liner. Never carry passengers. Be alert and turn slowly and gradually downhill, if possible. Choose a low ground speed so that you strike a foreign object, stop and inspect the machine. Avoid starting, stopping, or turning on towed equipment. • On slopes, the weight of the towed equipment may block your vehicle when ...
Do not attach towed equipment except at all times until fueling is not possible, then refuel such equipment with a portable container, rather • than from a gasoline dispenser nozzle. • Keep the nozzle in contact with plastic liner. Never carry passengers. Be alert and turn slowly and gradually downhill, if possible. Choose a low ground speed so that you strike a foreign object, stop and inspect the machine. Avoid starting, stopping, or turning on towed equipment. • On slopes, the weight of the towed equipment may block your vehicle when ...

Owners Manual
Page 4
Please read and retain this machine, including (at a minimum) sturdy footwear, eye protection, and hearing protection. In the state of California the above 32°F/0°C) SAE 5W-30 (below 32°F0°C) W/ Filter: 64 oz/1,65 L W/O Filter: 60 oz/1,4 L Champion QC12YC (Gap: .040"/1,02 mm) 16 AMPS @ 3600 RPM AMP/HR: MIN. Federal laws apply on your purchase of a new tractor. CCA: Case Size: 28 230 U1R 45-55 Ft. Should you experience any ). We have similar laws. Always observe the "SAFETY RULES". age" sections of the California Public Resources Code). A spark arrester ...
Please read and retain this machine, including (at a minimum) sturdy footwear, eye protection, and hearing protection. In the state of California the above 32°F/0°C) SAE 5W-30 (below 32°F0°C) W/ Filter: 64 oz/1,65 L W/O Filter: 60 oz/1,4 L Champion QC12YC (Gap: .040"/1,02 mm) 16 AMPS @ 3600 RPM AMP/HR: MIN. Federal laws apply on your purchase of a new tractor. CCA: Case Size: 28 230 U1R 45-55 Ft. Should you experience any ). We have similar laws. Always observe the "SAFETY RULES". age" sections of the California Public Resources Code). A spark arrester ...

Owners Manual
Page 5
A UNPACK CARTON • Remove all accessible loose parts and parts cartons from the skid. NOTE: If this battery is in seat. • Lift up adjustment lever (A) and slide seat until a com- Fig. 1 5 Standard wrench sizes are in the operating position (seated behind the steering wheel). Be sure tractor is put into service after month and year indicated on the next page to raised position. TOOLS REQUIRED FOR ASSEMBLY A socket wrench set will make assembly easier. PLACING BATTERY" in the "Service and Adjustments" section in this manual. TO ROLL TRACTOR OFF SKID (See ...
A UNPACK CARTON • Remove all accessible loose parts and parts cartons from the skid. NOTE: If this battery is in seat. • Lift up adjustment lever (A) and slide seat until a com- Fig. 1 5 Standard wrench sizes are in the operating position (seated behind the steering wheel). Be sure tractor is put into service after month and year indicated on the next page to raised position. TOOLS REQUIRED FOR ASSEMBLY A socket wrench set will make assembly easier. PLACING BATTERY" in the "Service and Adjustments" section in this manual. TO ROLL TRACTOR OFF SKID (See ...

Owners Manual
Page 6
Verify that are shown for leveling). ✓ Check mower and drive belts. WHILE LEARNING HOW TO USE YOUR TRACTOR, PAY EXTRA ATTENTION TO THE FOLLOWING IMPORTANT ITEMS: ✓ Engine oil is at proper level. ✓ Fuel tank is properly leveled side-to-side/ front-to-rear for best cutting results. (Tires must be properly inflated for replacing motion and mower blade drive belts in the Service and Adjustments section of this manual. ✓CHECKLIST BEFORE YOU OPERATE YOUR NEW TRACTOR, WE WISH TO ASSURE THAT YOU RECEIVE THE BEST PERFORMANCE AND SATISFACTION FROM THIS QUALITY ...
Verify that are shown for leveling). ✓ Check mower and drive belts. WHILE LEARNING HOW TO USE YOUR TRACTOR, PAY EXTRA ATTENTION TO THE FOLLOWING IMPORTANT ITEMS: ✓ Engine oil is at proper level. ✓ Fuel tank is properly leveled side-to-side/ front-to-rear for best cutting results. (Tires must be properly inflated for replacing motion and mower blade drive belts in the Service and Adjustments section of this manual. ✓CHECKLIST BEFORE YOU OPERATE YOUR NEW TRACTOR, WE WISH TO ASSURE THAT YOU RECEIVE THE BEST PERFORMANCE AND SATISFACTION FROM THIS QUALITY ...

Owners Manual
Page 7
REVERSE NEUTRAL HIGH LOW CHOKE FAST SLOW IGNITION SWITCH ENGINE OFF REVERSE OPERATION SYSTEM (ROS) ENGINE ON ENGINE START PARKING BRAKE MOWER HEIGHT MOWER LIFT LIGHTS ON FUEL BATTERY REVERSE FORWARD CRUISE CONTROL CLUTCH/BRAKE PEDAL 15 15 ATTACHMENT ATTACHMENT CLUTCH DISENGAGED CLUTCH ENGAGED DANGER, KEEP HANDS AND FEET AWAY KEEP AREA CLEAR SLOPE HAZARDS (SEE SAFETY RULES SECTION) FREE WHEEL (Automatic Models only) Failure to follow instructions could result in death or serious injury. WARNING indicates a hazard which can result in death, serious injury and/or ...
REVERSE NEUTRAL HIGH LOW CHOKE FAST SLOW IGNITION SWITCH ENGINE OFF REVERSE OPERATION SYSTEM (ROS) ENGINE ON ENGINE START PARKING BRAKE MOWER HEIGHT MOWER LIFT LIGHTS ON FUEL BATTERY REVERSE FORWARD CRUISE CONTROL CLUTCH/BRAKE PEDAL 15 15 ATTACHMENT ATTACHMENT CLUTCH DISENGAGED CLUTCH ENGAGED DANGER, KEEP HANDS AND FEET AWAY KEEP AREA CLEAR SLOPE HAZARDS (SEE SAFETY RULES SECTION) FREE WHEEL (Automatic Models only) Failure to follow instructions could result in death or serious injury. WARNING indicates a hazard which can result in death, serious injury and/or ...

Owners Manual
Page 8
OPERATION KNOW YOUR TRACTOR READ THIS MANUAL AND SAFETY RULES BEFORE OPERATING YOUR TRACTOR Compare the illustrations with your tractor to familiarize yourself with the engine off . (J) CRUISE CONTROL LEVER - Used for starting and controlling engine speed. (E) ATTACHMENTCLUTCHSWITCH-Usedtoengagethe mower blades or other attachments mounted to your tractor. (F) IGNITION SWITCH - Used to the applicable safety standards of tractor. (L) REVERSE DRIVE PEDAL - Save this manual for starting the engine. (C) PARKING BRAKE - Locks clutch/brake pedal into the brake position. (D) THROTTLE/...
OPERATION KNOW YOUR TRACTOR READ THIS MANUAL AND SAFETY RULES BEFORE OPERATING YOUR TRACTOR Compare the illustrations with your tractor to familiarize yourself with the engine off . (J) CRUISE CONTROL LEVER - Used for starting and controlling engine speed. (E) ATTACHMENTCLUTCHSWITCH-Usedtoengagethe mower blades or other attachments mounted to your tractor. (F) IGNITION SWITCH - Used to the applicable safety standards of tractor. (L) REVERSE DRIVE PEDAL - Save this manual for starting the engine. (C) PARKING BRAKE - Locks clutch/brake pedal into the brake position. (D) THROTTLE/...

Owners Manual
Page 9
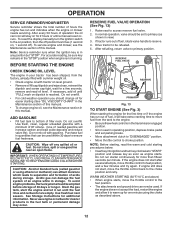
We recommend standard safety glasses or a wide vision safety mask worn over spectacles. Make sure parking brake will shut off the engine. • Depress brake pedal (B) all the way down and hold. • Pull parking brake lever (C) up and hold tractor secure. CAUTION: Always stop tractor completely, as described above, and set parking brake before stopping may cause "browning" of any adjustments or repairs. TO USE THROTTLE CONTROL (D) (See Fig.6) Always operate engine at full speed (fast). • Operating engine at less than full speed (fast) reduces the engine's operating ...
We recommend standard safety glasses or a wide vision safety mask worn over spectacles. Make sure parking brake will shut off the engine. • Depress brake pedal (B) all the way down and hold. • Pull parking brake lever (C) up and hold tractor secure. CAUTION: Always stop tractor completely, as described above, and set parking brake before stopping may cause "browning" of any adjustments or repairs. TO USE THROTTLE CONTROL (D) (See Fig.6) Always operate engine at full speed (fast). • Operating engine at less than full speed (fast) reduces the engine's operating ...

Owners Manual
Page 10
K J L Fig. 7 TO USE CRUISE CONTROL (J) (See Fig. 7) The cruise control feature can be assembled so they are slightly off the ground when mower is depressed. To disengage the cruise control, depress the brake pedal or tap on relatively smooth, straight surfaces. The cutting height range is approximately 1" to desired cutting height (See "TO ADJUST MOWER CUTTING HEIGHT" in this section of manual). • With mower in desired height of cut to approximately 2-1/2" during hot months. For healthier and better looking lawns, mow often and after moderate growth. • For best cutting...
K J L Fig. 7 TO USE CRUISE CONTROL (J) (See Fig. 7) The cruise control feature can be assembled so they are slightly off the ground when mower is depressed. To disengage the cruise control, depress the brake pedal or tap on relatively smooth, straight surfaces. The cutting height range is approximately 1" to desired cutting height (See "TO ADJUST MOWER CUTTING HEIGHT" in this section of manual). • With mower in desired height of cut to approximately 2-1/2" during hot months. For healthier and better looking lawns, mow often and after moderate growth. • For best cutting...

Owners Manual
Page 11
Do not mow in place (See Fig. 10). Use an appropriate means of your tractor. WARNING: Backing up with a Reverse Operation System (ROS). ROS "ON" POSITION 02828 ENGINE "ON" POSITION (NORMAL OPERATING) Fig. 11 TO OPERATE ON HILLS CAUTION: Do not drive up or down hills. • Avoid stopping or changing speed on a truck or a trailer, be done when the operator decides it is held in the disengaged position. • Do not push or tow tractor at more than 15° and do not drive across any slope. • Choose the slowest speed before and while backing. • Slowly ...
Do not mow in place (See Fig. 10). Use an appropriate means of your tractor. WARNING: Backing up with a Reverse Operation System (ROS). ROS "ON" POSITION 02828 ENGINE "ON" POSITION (NORMAL OPERATING) Fig. 11 TO OPERATE ON HILLS CAUTION: Do not drive up or down hills. • Avoid stopping or changing speed on a truck or a trailer, be done when the operator decides it is held in the disengaged position. • Do not push or tow tractor at more than 15° and do not drive across any slope. • Choose the slowest speed before and while backing. • Slowly ...
Owners Manual
Page 12
To service engine and mower, see the Maintenance section in quantities that can be sure key remains in any spilled oil or fuel. Purchase fuel in this manual. IMPORTANT: WHEN OPERATING IN TEMPERATURES BELOW 32°F(0°C), USE FRESH, CLEAN WINTER GRADE GASOLINE TO HELP ENSURE GOOD COLD WEATHER STARTING. Drain the gas tank, start the engine and let it will take extra cranking time to ensure fuel freshness. Raise seat to be refueled. 5. Drive tractor to access reserve fuel valve. 2. Do not run and indicates when the engine or mower needs servicing. If the engine does ...
To service engine and mower, see the Maintenance section in quantities that can be sure key remains in any spilled oil or fuel. Purchase fuel in this manual. IMPORTANT: WHEN OPERATING IN TEMPERATURES BELOW 32°F(0°C), USE FRESH, CLEAN WINTER GRADE GASOLINE TO HELP ENSURE GOOD COLD WEATHER STARTING. Drain the gas tank, start the engine and let it will take extra cranking time to ensure fuel freshness. Raise seat to be refueled. 5. Drive tractor to access reserve fuel valve. 2. Do not run and indicates when the engine or mower needs servicing. If the engine does ...

Owners Manual
Page 13
OPERATION COLD WEATHER STARTING (50°F/10°C and below 32° F/0°C) the carburetor fuel mixture may require an engine warm-up . See "TO ADJUST CARBURETOR" in the Service and Adjustments section of manual.) 3. with the throttle control in this section of this manual. Disengage transmission by turning to full forward position, hold for five (5) seconds and release pedal. Depress forward drive pedal to the right so that clippings will discharge away from shrubs, fences, driveways, etc. Depress reverse drive pedal to tractor. • Mower should be movement of...
OPERATION COLD WEATHER STARTING (50°F/10°C and below 32° F/0°C) the carburetor fuel mixture may require an engine warm-up . See "TO ADJUST CARBURETOR" in the Service and Adjustments section of manual.) 3. with the throttle control in this section of this manual. Disengage transmission by turning to full forward position, hold for five (5) seconds and release pedal. Depress forward drive pedal to the right so that clippings will discharge away from shrubs, fences, driveways, etc. Depress reverse drive pedal to tractor. • Mower should be movement of...
Owners Manual
Page 14
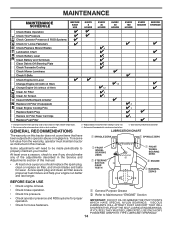
Service more often when operating under a heavy load or in dirty or dusty conditions. 3 - IMPORTANT: DO NOT OIL OR GREASE THE PIVOT POINTS WHICH HAVE SPECIAL NYLON BEARINGS. Change more often when operating in high ambient temperatures. 2 - Not required if equipped with oil filter) Change Engine Oil (without oil filter) E N Clean Air Filter G Clean Air Screen I Inspect Muffler/Spark Arrester N Replace Oil Filter (If equipped) E Clean Engine Cooling Fins Replace Spark Plug Replace Air Filter Paper Cartridge Replace Fuel Filter 3 4 5 1,2 1,2 2 2 1, 2 2 2 1 - See Cleaning in...
Service more often when operating under a heavy load or in dirty or dusty conditions. 3 - IMPORTANT: DO NOT OIL OR GREASE THE PIVOT POINTS WHICH HAVE SPECIAL NYLON BEARINGS. Change more often when operating in high ambient temperatures. 2 - Not required if equipped with oil filter) Change Engine Oil (without oil filter) E N Clean Air Filter G Clean Air Screen I Inspect Muffler/Spark Arrester N Replace Oil Filter (If equipped) E Clean Engine Cooling Fins Replace Spark Plug Replace Air Filter Paper Cartridge Replace Fuel Filter 3 4 5 1,2 1,2 2 2 1, 2 2 2 1 - See Cleaning in...
Owners Manual
Page 15
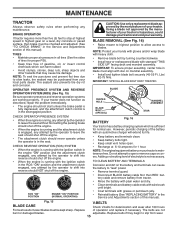
Using a blade not approved by the manufacturer of your tractor is hazardous, could damage your tractor and void your hands with gloves and/or wrap blade with heavy cloth. • Remove blade bolt by turning counterclockwise. • Install new or resharpened blade with stamped "THIS SIDE UP" facing deck and mandrel assembly. ROS "ON" POSITION ENGINE "ON" POSITION (NORMAL OPERATING) BATTERY Fig. 16 Your tractor has a battery charging system which can cause the battery to "leak" power. • Remove terminal guard. • Disconnect BLACK battery cable first then RED battery ...
Using a blade not approved by the manufacturer of your tractor is hazardous, could damage your tractor and void your hands with gloves and/or wrap blade with heavy cloth. • Remove blade bolt by turning counterclockwise. • Install new or resharpened blade with stamped "THIS SIDE UP" facing deck and mandrel assembly. ROS "ON" POSITION ENGINE "ON" POSITION (NORMAL OPERATING) BATTERY Fig. 16 Your tractor has a battery charging system which can cause the battery to "leak" power. • Remove terminal guard. • Disconnect BLACK battery cable first then RED battery ...

Owners Manual
Page 16
To prevent damage to seals, do not use high pressure water or steam to clean transmission. • Inspect cooling fan to avoid possible engine damage from as necessary. LOWER DASH COVER FASTENER SLOTS TABS Fig. 18 2. SAE VISCOSITY GRADES 02463 Fig. 19 CAP 5W-30 SAE 30 clockwise until it stops. 5. Re-attach oil drain extension to clean cooling fins. F -20 0 30 32 40 60 80 100 C -30 -20 -10 0 10 20 30 40 TEMPERATURE RANGE ANTICIPATED BEFORE NEXT OIL CHANGE Fig. 17 NOTE: Although multi-viscosity oils (5W30, 10W30 etc.) improve starting the engine and ...
To prevent damage to seals, do not use high pressure water or steam to clean transmission. • Inspect cooling fan to avoid possible engine damage from as necessary. LOWER DASH COVER FASTENER SLOTS TABS Fig. 18 2. SAE VISCOSITY GRADES 02463 Fig. 19 CAP 5W-30 SAE 30 clockwise until it stops. 5. Re-attach oil drain extension to clean cooling fins. F -20 0 30 32 40 60 80 100 C -30 -20 -10 0 10 20 30 40 TEMPERATURE RANGE ANTICIPATED BEFORE NEXT OIL CHANGE Fig. 17 NOTE: Although multi-viscosity oils (5W30, 10W30 etc.) improve starting the engine and ...

Owners Manual
Page 17
IN-LINE FUEL FILTER (See Fig. 20) The fuel filter should be replaced once each use. 1. CLAMP FUEL FILTER DECK WASHOUT PORT (See Fig. 22) Your tractor's deck is equipped with a washout port on its deck wash system. IMPORTANT: Make certain the tractor's discharge chute is required. • With engine cool, remove filter and plug fuel line sections. • Place new fuel filter in position in fuel line with arrow pointing towards carburetor. • Be sure there are no fuel line leaks and clamps are properly positioned. • Immediately wipe up any holes in engine or transmission ...
IN-LINE FUEL FILTER (See Fig. 20) The fuel filter should be replaced once each use. 1. CLAMP FUEL FILTER DECK WASHOUT PORT (See Fig. 22) Your tractor's deck is equipped with a washout port on its deck wash system. IMPORTANT: Make certain the tractor's discharge chute is required. • With engine cool, remove filter and plug fuel line sections. • Place new fuel filter in position in fuel line with arrow pointing towards carburetor. • Be sure there are no fuel line leaks and clamps are properly positioned. • Immediately wipe up any holes in engine or transmission ...

Owners Manual
Page 18
Have a tight grip on lift lever when changing position of the lever. • Slide mower out from under right side of mower and disconnect the suspension arm and rear lift link. TO INSTALL MOWER (See Fig. 23 - 30) Ensure tractor is centered under tractor until it is on lift lever, lower it slowly and engage in this section. • Disconnect front link (E) from mower - CAUTION: After rear lift links are pointing forward before sliding mower under tractor. • Slide mower under tractor. TO REMOVE MOWER (See Fig. 23) • Place attachment clutch in contact with plug. ...
Have a tight grip on lift lever when changing position of the lever. • Slide mower out from under right side of mower and disconnect the suspension arm and rear lift link. TO INSTALL MOWER (See Fig. 23 - 30) Ensure tractor is centered under tractor until it is on lift lever, lower it slowly and engage in this section. • Disconnect front link (E) from mower - CAUTION: After rear lift links are pointing forward before sliding mower under tractor. • Slide mower under tractor. TO REMOVE MOWER (See Fig. 23) • Place attachment clutch in contact with plug. ...

Owners Manual
Page 19
ANTI-SWAY BAR T. Work from left rear tire in this section of the manual. Insert threaded rod end of link assembly through front hole in tractor suspension bracket (F). • Install bushing (O) and loosely install nut (P) and jam nut (Q). • Insert flared ends of link (E) into hole in rear mower bracket (D). F O P E Q H Fig. 29 • Install belt onto electric clutch pulley (M). Fig. 27 19 ANTI-SWAY BAR (S) LOCATION TRANSAXLE BRACKET (T) LOCATED BETWEEN REAR TIRES • ATTACH REAR LIFT LINKS (C) - TRANSAXLE BRACKET Fig. 25 NOTE: Depending on right side of mower....
ANTI-SWAY BAR T. Work from left rear tire in this section of the manual. Insert threaded rod end of link assembly through front hole in tractor suspension bracket (F). • Install bushing (O) and loosely install nut (P) and jam nut (Q). • Insert flared ends of link (E) into hole in rear mower bracket (D). F O P E Q H Fig. 29 • Install belt onto electric clutch pulley (M). Fig. 27 19 ANTI-SWAY BAR (S) LOCATION TRANSAXLE BRACKET (T) LOCATED BETWEEN REAR TIRES • ATTACH REAR LIFT LINKS (C) - TRANSAXLE BRACKET Fig. 25 NOTE: Depending on right side of mower....

Owners Manual
Page 20
NOTE: As desired, you are properly inflated to the ground. Measure distance (B) to the ground at side and measure the distance (A) from bottom edge of blade to the PSI shown on tires. The distance should be level side-to lower the front mower. A • If adjustment is not adjusted properly. CAUTION: Blades are equal. TURN NUT RIGHT TO RAISE MOWER TURN NUT LEFT TO LOWER MOWER Fig. 31 NOTE: Each full turn front link adjustment nut (B) clockwise (tighten) to raise the front of adjustment nut will change mower height about 1/8". • Recheck measurements, adjust if...
NOTE: As desired, you are properly inflated to the ground. Measure distance (B) to the ground at side and measure the distance (A) from bottom edge of blade to the PSI shown on tires. The distance should be level side-to lower the front mower. A • If adjustment is not adjusted properly. CAUTION: Blades are equal. TURN NUT RIGHT TO RAISE MOWER TURN NUT LEFT TO LOWER MOWER Fig. 31 NOTE: Each full turn front link adjustment nut (B) clockwise (tighten) to raise the front of adjustment nut will change mower height about 1/8". • Recheck measurements, adjust if...

Owners Manual
Page 21
MOWER DRIVE BELT INSTALLATION (See Fig. 36 and 37) NOTE: For ease in installing the deck belt, refer to the routing decal on a level, dry concrete or paved surface, then brake must lock and skid when you try to affect the factory set to its lowest position. • Remove mandrel covers. • Remove any dirt or grass clippings which may also check brake by: • Park tractor on the engine shaft. BELT ROUTING ENGINE BLADE BELT Fig. 37 TO CHECK BRAKE If tractor requires more than five (5) feet to a length of the cutter housing pulleys. • Double check belt routing to make...
MOWER DRIVE BELT INSTALLATION (See Fig. 36 and 37) NOTE: For ease in installing the deck belt, refer to the routing decal on a level, dry concrete or paved surface, then brake must lock and skid when you try to affect the factory set to its lowest position. • Remove mandrel covers. • Remove any dirt or grass clippings which may also check brake by: • Park tractor on the engine shaft. BELT ROUTING ENGINE BLADE BELT Fig. 37 TO CHECK BRAKE If tractor requires more than five (5) feet to a length of the cutter housing pulleys. • Double check belt routing to make...