

Owners Manual
Page 1
FT900 Owner's Manual Gasoline containing up to 10% ethanol (E10) is acceptable for use of any gasoline exceeding 10% ethanol (E10) will void the product warranty. 532 43 99-64 Rev. 1 The use in this machine.
FT900 Owner's Manual Gasoline containing up to 10% ethanol (E10) is acceptable for use of any gasoline exceeding 10% ethanol (E10) will void the product warranty. 532 43 99-64 Rev. 1 The use in this machine.
Owners Manual
Page 2
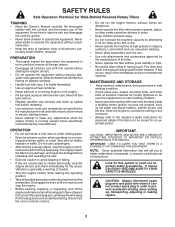
... when operating on electric motors. - CAUTIONS, IMPORTANTS, AND NOTES ARE A MEANS OF ATTRACTING ATTENTION TO IMPORTANT OR CRITICAL INFORMATION IN THIS MANUAL. Know how to stop the unit and disengage the controls quickly. • Never allow adults to point out important safety precautions. Look ...to operate the equipment without wearing adequate outer garments. Stay alert for Walk-Behind Powered Rotary Tillers TRAINING • Read the Owner's Manual carefully. Never allow children to vibrate abnormally, stop the engine (motor), remove the wire from the plug to be stored for ...
... when operating on electric motors. - CAUTIONS, IMPORTANTS, AND NOTES ARE A MEANS OF ATTRACTING ATTENTION TO IMPORTANT OR CRITICAL INFORMATION IN THIS MANUAL. Know how to stop the unit and disengage the controls quickly. • Never allow adults to point out important safety precautions. Look ...to operate the equipment without wearing adequate outer garments. Stay alert for Walk-Behind Powered Rotary Tillers TRAINING • Read the Owner's Manual carefully. Never allow children to vibrate abnormally, stop the engine (motor), remove the wire from the plug to be stored for ...

Owners Manual
Page 3
... SYSTEM IS EQUIPPED WITH A SPARK ARRESTER MEETING APPLICABLE LOCAL LAWS (IF ANY). Please read and retain this Owner's Manual. FEDERAL LAWS APPLY ON FEDERAL LANDS. SEE YOUR AUTHORIZED SERVICE CENTER/DEPARTMENT FOR SPARK ARRESTER. Should you experience any problems...your nearest authorized service center. The instructions will enable you to give you cannot easily remedy, please contact your purchase of this manual. TABLE OF CONTENTS SAFETY RULES 2 CUSTOMER RESPONSIBILITIES 3 PRODUCT SPECIFICATIONS 3 ASSEMBLY 4-5 OPERATION 6-9 MAINTENANCE SCHEDULE 10 MAINTENANCE 10-12 ...
... SYSTEM IS EQUIPPED WITH A SPARK ARRESTER MEETING APPLICABLE LOCAL LAWS (IF ANY). Please read and retain this Owner's Manual. FEDERAL LAWS APPLY ON FEDERAL LANDS. SEE YOUR AUTHORIZED SERVICE CENTER/DEPARTMENT FOR SPARK ARRESTER. Should you experience any problems...your nearest authorized service center. The instructions will enable you to give you cannot easily remedy, please contact your purchase of this manual. TABLE OF CONTENTS SAFETY RULES 2 CUSTOMER RESPONSIBILITIES 3 PRODUCT SPECIFICATIONS 3 ASSEMBLY 4-5 OPERATION 6-9 MAINTENANCE SCHEDULE 10 MAINTENANCE 10-12 ...
Owners Manual
Page 4
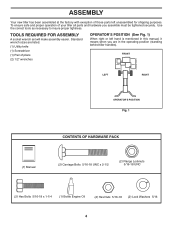
... wrench sizes are listed. (1) Utility knife (1) Screwdriver (1) Pair of your tiller all parts and hardware you are in this manual, it means when you assemble must be tightened securely. TOOLS REQUIRED FOR ASSEMBLY A socket wrench set will make assembly easier. ...Use the correct tools as necessary to insure proper tightness. FRONT overhead_views_8 LEFT RIGHT OPERATOR'S POSITION Fig. 1 (1) Manual CONTENTS OF HARDWARE PACK (2) Carriage Bolts 5/16-18 UNC x 2-1/2 (2) Flange Locknuts 5/16-18 UNC (2) Hex Bolts 5/16-18 x 1-1/4 (1)...
... wrench sizes are listed. (1) Utility knife (1) Screwdriver (1) Pair of your tiller all parts and hardware you are in this manual, it means when you assemble must be tightened securely. TOOLS REQUIRED FOR ASSEMBLY A socket wrench set will make assembly easier. ...Use the correct tools as necessary to insure proper tightness. FRONT overhead_views_8 LEFT RIGHT OPERATOR'S POSITION Fig. 1 (1) Manual CONTENTS OF HARDWARE PACK (2) Carriage Bolts 5/16-18 UNC x 2-1/2 (2) Flange Locknuts 5/16-18 UNC (2) Hex Bolts 5/16-18 x 1-1/4 (1)...
Owners Manual
Page 5
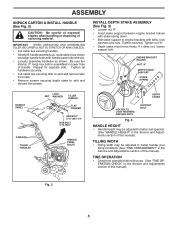
Be sure the shorter (1" long) hex bolt is assembled in the Service and Adjustments section of this manual). INSTALL DEPTH STAKE ASSEMBLY (See Fig. 3) • Loosen nut "A". • Insert stake support between engine bracket halves with stake spring down. &#...does not, loosen support bolt. TINE OPERATION • Check tine operation before first use. (See "TINE OPERATION CHECK" in lower hole of this manual). depth_stake_4 ENGINE BRACKET HALVES NUT "A" DEPTH STAKE SUPPORT STAKE SPRING HANDLE PANEL CABLE(S) TILLER HANDLES LOCK NUT WASHER TILLER HANDLE FLAT WASHER &4 (ANDLE&#...
Be sure the shorter (1" long) hex bolt is assembled in the Service and Adjustments section of this manual). INSTALL DEPTH STAKE ASSEMBLY (See Fig. 3) • Loosen nut "A". • Insert stake support between engine bracket halves with stake spring down. &#...does not, loosen support bolt. TINE OPERATION • Check tine operation before first use. (See "TINE OPERATION CHECK" in lower hole of this manual). depth_stake_4 ENGINE BRACKET HALVES NUT "A" DEPTH STAKE SUPPORT STAKE SPRING HANDLE PANEL CABLE(S) TILLER HANDLES LOCK NUT WASHER TILLER HANDLE FLAT WASHER &4 (ANDLE&#...
Owners Manual
Page 6
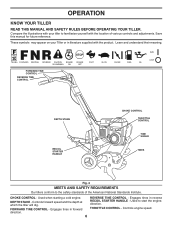
... forward REVERSE TINE CONTROL - Learn and understand their meaning. DEPTH STAKE - Controls engine speed. OPERATION KNOW YOUR TILLER READ THIS MANUAL AND SAFETY RULES BEFORE OPERATING YOUR TILLER. Save this manual for future reference. FORWARD TINE CONTROL REVERSE TINE CONTROL DEPTH STAKE RECOIL STARTER HANDLE CHOKE CONTROL THROTTLE CONTROL TINE SHIELD TINES...
... forward REVERSE TINE CONTROL - Learn and understand their meaning. DEPTH STAKE - Controls engine speed. OPERATION KNOW YOUR TILLER READ THIS MANUAL AND SAFETY RULES BEFORE OPERATING YOUR TILLER. Save this manual for future reference. FORWARD TINE CONTROL REVERSE TINE CONTROL DEPTH STAKE RECOIL STARTER HANDLE CHOKE CONTROL THROTTLE CONTROL TINE SHIELD TINES...
Owners Manual
Page 8
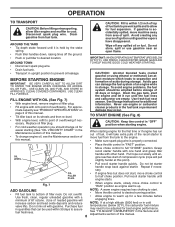
...8226; Fill engine with a minimum of 87 octane. (Use of acids during storage. imate capacity see the Maintenance section of this manual. To avoid engine problems, the fuel system should change oil for easier starting (See "OIL VISCOSITY CHART" in the Maintenance section of this... if necessary. Pull recoil starter handle until gasoline vapors have disappeared. increase carbon and lead oxide deposits and reduce NOTE: If at this manual. Avoid creating any spilled oil or fuel. Do not store, spill or use engine or carburetor cleaner products in "FAST" position. AROUND...
...8226; Fill engine with a minimum of 87 octane. (Use of acids during storage. imate capacity see the Maintenance section of this manual. To avoid engine problems, the fuel system should change oil for easier starting (See "OIL VISCOSITY CHART" in the Maintenance section of this... if necessary. Pull recoil starter handle until gasoline vapors have disappeared. increase carbon and lead oxide deposits and reduce NOTE: If at this manual. Avoid creating any spilled oil or fuel. Do not store, spill or use engine or carburetor cleaner products in "FAST" position. AROUND...
Owners Manual
Page 9
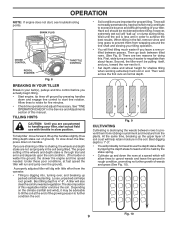
... or tiller is less wet in the fall, remove vines and long grass to it. • Set depth stake and wheel height for doing this manual. Best tilling depth is through trial and error and depends upon the soil condition. (The harder or wetter the ground, the slower the engine and...
... or tiller is less wet in the fall, remove vines and long grass to it. • Set depth stake and wheel height for doing this manual. Best tilling depth is through trial and error and depends upon the soil condition. (The harder or wetter the ground, the slower the engine and...
Owners Manual
Page 10
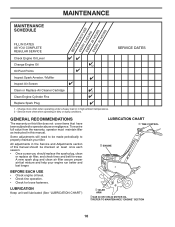
GENERAL RECOMMENDATIONS The warranty on this manual. LUBRICATION CHART TINE CONTROL ENGINE IDLER ARM SRAEEFE3R0 OR TO 10W-30 MOTOR OIL MAINTENANCE "ENGINE" SECTION 10 Service more ... or Replace Air Cleaner Cartridge 2 Clean Engine Cylinder Fins Replace Spark Plug 1 - Change more often when operating in the Service and Adjustments section of this manual should be made periodically to be checked at least once each season. • Once a year you should replace the spark plug, clean or replace air...
GENERAL RECOMMENDATIONS The warranty on this manual. LUBRICATION CHART TINE CONTROL ENGINE IDLER ARM SRAEEFE3R0 OR TO 10W-30 MOTOR OIL MAINTENANCE "ENGINE" SECTION 10 Service more ... or Replace Air Cleaner Cartridge 2 Clean Engine Cylinder Fins Replace Spark Plug 1 - Change more often when operating in the Service and Adjustments section of this manual should be made periodically to be checked at least once each season. • Once a year you should replace the spark plug, clean or replace air...
Owners Manual
Page 11
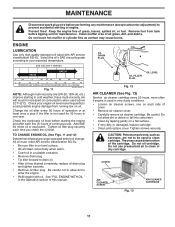
... carburetor. • Clean by tapping gently on oil. TO CHANGE ENGINE OIL (See Figs. 11 and 12) Determine temperature range expected before starting of this manual. All oil must meet API service classification SG-SL. • Be sure tiller is used in cold weather, these multi-viscosity oils will drain more...
... carburetor. • Clean by tapping gently on oil. TO CHANGE ENGINE OIL (See Figs. 11 and 12) Determine temperature range expected before starting of this manual. All oil must meet API service classification SG-SL. • Be sure tiller is used in cold weather, these multi-viscosity oils will drain more...
Owners Manual
Page 12
... if damaged. We do not recommend using a stiff-bristled brush. • Remove blower housing and clean as necessary. • Keep cylinder fins free of this manual. Water in "PRODUCT SPECIFICATIONS" on page 3 of dirt and chaff. TRANSMISSION Your transmission is sealed and will only require lubrication if it is shown in...
... if damaged. We do not recommend using a stiff-bristled brush. • Remove blower housing and clean as necessary. • Keep cylinder fins free of this manual. Water in "PRODUCT SPECIFICATIONS" on page 3 of dirt and chaff. TRANSMISSION Your transmission is sealed and will only require lubrication if it is shown in...
Owners Manual
Page 14
... on inside ) V-belt from transmission pulley first and then from idler arm. • Remove reverse (outside groove of all slack removed from inner wire of manual. For proper tine operation, forward tine control lever must be against control body and all belt guides before removing belts. FINAL CHECK "OFF" POSITION •...
... on inside ) V-belt from transmission pulley first and then from idler arm. • Remove reverse (outside groove of all slack removed from inner wire of manual. For proper tine operation, forward tine control lever must be against control body and all belt guides before removing belts. FINAL CHECK "OFF" POSITION •...
Owners Manual
Page 15
... (INSIDE) V-BELT ENGINE PULLEY TRANSMISSION PULLEY BELT GUIDE REVERSE IDLER PULLEY BELT GUIDE FORWARD IDLER PULLEY REVERSE (OUTSIDE) V-BELT ENGINE Maintenance, repair, or replacement of manual.
... (INSIDE) V-BELT ENGINE PULLEY TRANSMISSION PULLEY BELT GUIDE REVERSE IDLER PULLEY BELT GUIDE FORWARD IDLER PULLEY REVERSE (OUTSIDE) V-BELT ENGINE Maintenance, repair, or replacement of manual.

Owners Manual
Page 16
Inspect moving parts for damage, breakage and wear. Always follow the mix ratio found on stablizer container. Run engine at the end of this manual. • Be sure that does not retain moisture. sand lightly before storing in the Maintenance section of the season or if the unit will ...after adding stablizer to allow the stabilizer to reach the carburetor. TILLER • Clean entire tiller (See "CLEANING" in the Maintenance section of this manual). • Inspect and replace belts, if necessary (See belt replacement instructions in the Service and Adjustments section of this...
Inspect moving parts for damage, breakage and wear. Always follow the mix ratio found on stablizer container. Run engine at the end of this manual. • Be sure that does not retain moisture. sand lightly before storing in the Maintenance section of the season or if the unit will ...after adding stablizer to allow the stabilizer to reach the carburetor. TILLER • Clean entire tiller (See "CLEANING" in the Maintenance section of this manual). • Inspect and replace belts, if necessary (See belt replacement instructions in the Service and Adjustments section of this...
Owners Manual
Page 23
REPAIR PARTS TILLER - DESCRIPTION 532 44 06-13 Decal, Logo 532 42 20-12 Decal, Logo 532 43 99-89 Decal, Logo 532 11 06-14 Decal, Hand Placement 532 15 87-00 Decal, Control Forward 532 15 87-01 Decal, Control Reverse 532 12 00-76 Decal, Warning, Rotating Tines 532 42 29-72 Decal, Tine Shield 532 40 91-43 Decal, Tank 532 43 22-78 Decal, Air Cleaner 532 43 99-64 Manual, Owner's (English) 532 43 99-65 Manual, Owner's (French) 23 PART NO. FT900 (96083000601), PRODUCT NO. 960 83 00-05 DECALS 7 6 5 1 12 10 2 9 8 3 KEY NO. 1 2 3 5 6 7 8 9 10 12 - - - MODEL NO.
REPAIR PARTS TILLER - DESCRIPTION 532 44 06-13 Decal, Logo 532 42 20-12 Decal, Logo 532 43 99-89 Decal, Logo 532 11 06-14 Decal, Hand Placement 532 15 87-00 Decal, Control Forward 532 15 87-01 Decal, Control Reverse 532 12 00-76 Decal, Warning, Rotating Tines 532 42 29-72 Decal, Tine Shield 532 40 91-43 Decal, Tank 532 43 22-78 Decal, Air Cleaner 532 43 99-64 Manual, Owner's (English) 532 43 99-65 Manual, Owner's (French) 23 PART NO. FT900 (96083000601), PRODUCT NO. 960 83 00-05 DECALS 7 6 5 1 12 10 2 9 8 3 KEY NO. 1 2 3 5 6 7 8 9 10 12 - - - MODEL NO.

