

Operation Manual
Page 35
... connector in the centre hole. • Press down the button on how the working area appears. Connect the guide wire to test the installation with the help of the function Test IN (3-2-4), see page 53. 36 - IMPORTANT INFORMATION The function of the guide wire in the lawn. 3. INSTALLATION 9. It is therefore recommended...
... connector in the centre hole. • Press down the button on how the working area appears. Connect the guide wire to test the installation with the help of the function Test IN (3-2-4), see page 53. 36 - IMPORTANT INFORMATION The function of the guide wire in the lawn. 3. INSTALLATION 9. It is therefore recommended...
Operation Manual
Page 41
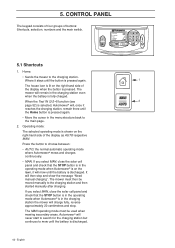
...of buttons: Shortcuts, selection, numbers and the main switch. If you select MAN, close the solar cell panel and check that the STOP button is in the operating mode when Automower® is in the charging station even when the battery is discharged. Where it will charge fully...Installation Settings 5.1 Shortcuts 1. When the Test IN (3-2-4) function (see 2 page 52) is discharged. 42 - If you select MAN, close the solar cell panel and check that the STOP button is in the menu structure back to mow until the battery is selected, Automower® will never start to search...
...of buttons: Shortcuts, selection, numbers and the main switch. If you select MAN, close the solar cell panel and check that the STOP button is in the operating mode when Automower® is in the charging station even when the battery is discharged. Where it will charge fully...Installation Settings 5.1 Shortcuts 1. When the Test IN (3-2-4) function (see 2 page 52) is discharged. 42 - If you select MAN, close the solar cell panel and check that the STOP button is in the menu structure back to mow until the battery is selected, Automower® will never start to search...

Operation Manual
Page 44
... Check loop PIN code Alarm Drive past wire Time lock SMS Follow loop in Corridor Test IN width Phone Periodical SMS number SMS test Test OUT SMS at SIM fault/alarm PIN Boundary Guide 1 Guide 2 delay delay delay ...Boundary Guide 1 Area 2 Area 4 corridor corridor Area 1 Area 3 Area 5 Guide 2 corridor Set time Time format Direction Distance Proportion Set date Date format Right Left Guide 1 Guide 2 Reversing Start End dist. angle 1 angle 1 6. MENU FUNCTIONS 6.2 Automower...
... Check loop PIN code Alarm Drive past wire Time lock SMS Follow loop in Corridor Test IN width Phone Periodical SMS number SMS test Test OUT SMS at SIM fault/alarm PIN Boundary Guide 1 Guide 2 delay delay delay ...Boundary Guide 1 Area 2 Area 4 corridor corridor Area 1 Area 3 Area 5 Guide 2 corridor Set time Time format Direction Distance Proportion Set date Date format Right Left Guide 1 Guide 2 Reversing Start End dist. angle 1 angle 1 6. MENU FUNCTIONS 6.2 Automower...
Operation Manual
Page 48
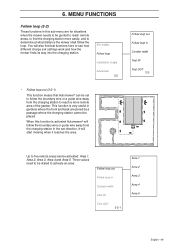
... wire or a guide wire away from the charging station in Corridor width Test IN Test OUT 3-2- It will also find the charging station more remote area of the garden. This function is activated Automower® will follow the boundary wire or guide wire away from the charging... Test OUT 3-2-1 Area 1 Area 2 Area 3 Area 4 Area 5 English - 49 You will start mowing when it reaches the area. Exit angles Follow loop Installation shape Advanced 3-2 • Follow loop out (3-2-1) This function means that Automower® can be stated to follow the loop. When this function is...
... wire or a guide wire away from the charging station in Corridor width Test IN Test OUT 3-2- It will also find the charging station more remote area of the garden. This function is activated Automower® will follow the boundary wire or guide wire away from the charging... Test OUT 3-2-1 Area 1 Area 2 Area 3 Area 4 Area 5 English - 49 You will start mowing when it reaches the area. Exit angles Follow loop Installation shape Advanced 3-2 • Follow loop out (3-2-1) This function means that Automower® can be stated to follow the loop. When this function is...
Operation Manual
Page 49
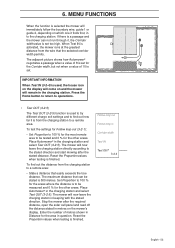
... % is allocated to the selection under Exit angles (3-1). • Follow loop in minutes, and delays searching for its function Exit angles (3-1). Automower® always starts the search for the charging station. This time is set looking from the charging station. When a guide wire is used ... guide 1, guide 2 and the boundary wire. Use the Test OUT (3-2-5) function (see page 53) to find out how far it in the direction to control how Automower® searches for the charging station in Corridor width Test IN Test OUT 3-2-2 Tip! The search can not find the charging ...
... % is allocated to the selection under Exit angles (3-1). • Follow loop in minutes, and delays searching for its function Exit angles (3-1). Automower® always starts the search for the charging station. This time is set looking from the charging station. When a guide wire is used ... guide 1, guide 2 and the boundary wire. Use the Test OUT (3-2-5) function (see page 53) to find out how far it in the direction to control how Automower® searches for the charging station in Corridor width Test IN Test OUT 3-2-2 Tip! The search can not find the charging ...
Operation Manual
Page 50
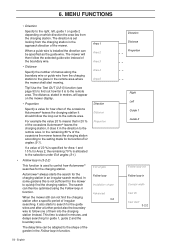
Corridor width Test IN Test OUT 3-2-2 If it is possible for example to the boundary wire respective guide...find the charging station, it has not found one it runs, i.e. The lower the Corridor width value the closer Automower® follows the boundary wire and/or guide wire. Follow loop out Follow loop in the installation to /from ...wire, 99 minutes should be chosen for both the guide wires and the boundary wire, e.g. 5 minutes. With a wide corridor Automower® varies how it reaches first. close to set 4 minutes for Guide 1 delay and Guide 2 delay and 9 minutes ...
Corridor width Test IN Test OUT 3-2-2 If it is possible for example to the boundary wire respective guide...find the charging station, it has not found one it runs, i.e. The lower the Corridor width value the closer Automower® follows the boundary wire and/or guide wire. Follow loop out Follow loop in the installation to /from ...wire, 99 minutes should be chosen for both the guide wires and the boundary wire, e.g. 5 minutes. With a wide corridor Automower® varies how it reaches first. close to set 4 minutes for Guide 1 delay and Guide 2 delay and 9 minutes ...
Operation Manual
Page 51
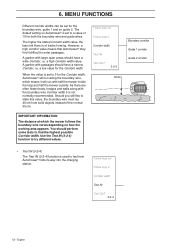
...are often flower beds, hedges and walls along the boundary wire, which the mower follows the boundary wire varies depending on Automower® is set to test how Automower® finds its way into the charging station. You should have a narrow Corridor, i.e. Follow loop out Follow loop ... 0 for the Corridor width. Follow loop out Follow loop in Corridor width Test IN Test OUT 3-2-4 Boundary corridor Guide 1 corridor Guide 2 corridor 52 - a high Corridor width value. a low value for the Corridor width, Automower® will run along with half the mower inside the loop and half...
...are often flower beds, hedges and walls along the boundary wire, which the mower follows the boundary wire varies depending on Automower® is set to test how Automower® finds its way into the charging station. You should have a narrow Corridor, i.e. Follow loop out Follow loop ... 0 for the Corridor width. Follow loop out Follow loop in Corridor width Test IN Test OUT 3-2-4 Boundary corridor Guide 1 corridor Guide 2 corridor 52 - a high Corridor width value. a low value for the Corridor width, Automower® will run along with half the mower inside the loop and half...
Operation Manual
Page 52
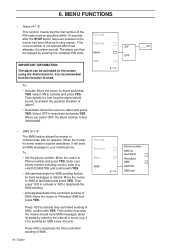
...and to find out the distance from the charging station to the stated direction and start mowing after the required distance, open the solar cell panel and read off the distance stated in to be stated is selected the mower will now leave the charging station directly according...far it , the Corridor width value is set too high. The maximum distance that the selected corridor width permits. Place Automower® in keeping with the stated direction. To test the settings for Follow loop out (3-2-1): • Set Proportion to 100 % for the other areas. Enter the number of...
...and to find out the distance from the charging station to the stated direction and start mowing after the required distance, open the solar cell panel and read off the distance stated in to be stated is selected the mower will now leave the charging station directly according...far it , the Corridor width value is set too high. The maximum distance that the selected corridor width permits. Place Automower® in keeping with the stated direction. To test the settings for Follow loop out (3-2-1): • Set Proportion to 100 % for the other areas. Enter the number of...
Operation Manual
Page 55
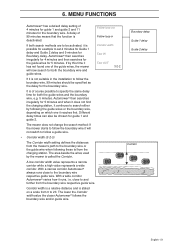
... send SMS messages about its operator. To: • Set the phone number: Move the cursor to SMS at fault/alarm Periodical SMS SIM PIN SMS test English Phone number SMS at fault/alarm and press YES. Enter your mobile phone. Alarm OFF IMPORTANT INFORMATION The alarm can then be specified within...
... send SMS messages about its operator. To: • Set the phone number: Move the cursor to SMS at fault/alarm Periodical SMS SIM PIN SMS test English Phone number SMS at fault/alarm and press YES. Enter your mobile phone. Alarm OFF IMPORTANT INFORMATION The alarm can then be specified within...
Operation Manual
Page 56
... Language Time and date 4-3 Set time Set date Time format Date format 4-3- Language (4-2) Using this function you can change the language selection you made when Automower® was first started . Move the cursor to the required date format: • YY-MM-DD (year-month-day) • MM-DD-YY (...to SIM PIN and press YES. The mower will now send an SMS describing the mower's current status (probably STOPPED) to SMS test and press YES. English - 57 Testing the SMS feature: Move the cursor to a selected mobile phone number. Move the cursor to Date format and press YES. To select...
... Language Time and date 4-3 Set time Set date Time format Date format 4-3- Language (4-2) Using this function you can change the language selection you made when Automower® was first started . Move the cursor to the required date format: • YY-MM-DD (year-month-day) • MM-DD-YY (...to SIM PIN and press YES. The mower will now send an SMS describing the mower's current status (probably STOPPED) to SMS test and press YES. English - 57 Testing the SMS feature: Move the cursor to a selected mobile phone number. Move the cursor to Date format and press YES. To select...
Operation Manual
Page 64
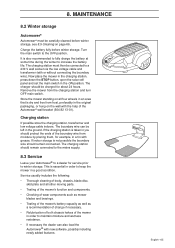
...press down the STOP button, open the solar cell panel and set the main switch in... essential in you should remain connected to the mains supply. 8.3 Service Leave your Automower® to winter storage. The charger should remain connected. Service usually includes the...Testing of the mower's battery capacity as well as a recommendation of change if necessary. • Relubrication of both chassis halves of body, chassis, blade disc, skid plate and all four wheels in a good condition. The charging station must be charged for about 24 hours. The boundary wire can also load the Automower...
...press down the STOP button, open the solar cell panel and set the main switch in... essential in you should remain connected to the mains supply. 8.3 Service Leave your Automower® to winter storage. The charger should remain connected. Service usually includes the...Testing of the mower's battery capacity as well as a recommendation of change if necessary. • Relubrication of both chassis halves of body, chassis, blade disc, skid plate and all four wheels in a good condition. The charging station must be charged for about 24 hours. The boundary wire can also load the Automower...

Operation Manual
Page 65
... mower with water. Solvent must be dismantled. OFF 3. If more thorough cleaning is important to be used when cleaning. Underframe and blade disc 1. Lift Automower® onto its function and components as well as replace wear parts if necessary. Check that the skid plate rotates freely in this can clean... the mower thoroughly, test its side. 4. Set the main switch to the motor support, directly above. If long blades of grass or other objects work their ...
... mower with water. Solvent must be dismantled. OFF 3. If more thorough cleaning is important to be used when cleaning. Underframe and blade disc 1. Lift Automower® onto its function and components as well as replace wear parts if necessary. Check that the skid plate rotates freely in this can clean... the mower thoroughly, test its side. 4. Set the main switch to the motor support, directly above. If long blades of grass or other objects work their ...
