

Operation Manual
Page 2
... 4.8 Adjusting the cutting height 40 5. Garden example 59 8. Presentation 10 2.1 Automower®, what's what 11 2.2 Function of Automower 12 2.3 Search method 15 2.4 More than one Automower® in a garden 16 2.5 One Automower® in the Operator's Manual 7 1.4 Safety instructions 8 2. Menu functions 44 6.1 Main menu 44 6.2 Automower® main menu, menu overview 45 6.3 Commands (1 46 6.4 Timer (2 46...
... 4.8 Adjusting the cutting height 40 5. Garden example 59 8. Presentation 10 2.1 Automower®, what's what 11 2.2 Function of Automower 12 2.3 Search method 15 2.4 More than one Automower® in a garden 16 2.5 One Automower® in the Operator's Manual 7 1.4 Safety instructions 8 2. Menu functions 44 6.1 Main menu 44 6.2 Automower® main menu, menu overview 45 6.3 Commands (1 46 6.4 Timer (2 46...

Operation Manual
Page 3
English This Operator's Manual deals with version 2.6x of products without prior notice. TABLE OF CONTENTS Husqvarna AB has a policy of continuous product development and therefore reserves the right to modify the design and appearance and function of the mower's control program. 4 -
English This Operator's Manual deals with version 2.6x of products without prior notice. TABLE OF CONTENTS Husqvarna AB has a policy of continuous product development and therefore reserves the right to modify the design and appearance and function of the mower's control program. 4 -

Operation Manual
Page 4
To get the best results from your Husqvarna Automower® requires knowledge of an exceptionally high quality product. The following system is used . 1. WARNING Automower® can be dangerous if incorrectly used in the Operator's manual to make this easier: • Text written in italics ...italics refer to the position of the main switch and the different operating modes on your Automower®. Introduction and safety 1.1 Introduction Congratulations on the mower. This Operator's manual contains important information about the mower, how you install it and how you use it...
To get the best results from your Husqvarna Automower® requires knowledge of an exceptionally high quality product. The following system is used . 1. WARNING Automower® can be dangerous if incorrectly used in the Operator's manual to make this easier: • Text written in italics ...italics refer to the position of the main switch and the different operating modes on your Automower®. Introduction and safety 1.1 Introduction Congratulations on the mower. This Operator's manual contains important information about the mower, how you install it and how you use it...

Operation Manual
Page 5
...carefully so you understand their significance. • Read through the Operator's Manual carefully and understand the content before using your Automower®. • The warnings and safety instructions in operation. • Do not ride on Automower® These symbols can only start when the main switch is in this... Operator's Manual must be carried out with the main switch set to OFF. • Keep your hands or feet ...
...carefully so you understand their significance. • Read through the Operator's Manual carefully and understand the content before using your Automower®. • The warnings and safety instructions in operation. • Do not ride on Automower® These symbols can only start when the main switch is in this... Operator's Manual must be carried out with the main switch set to OFF. • Keep your hands or feet ...
Operation Manual
Page 6
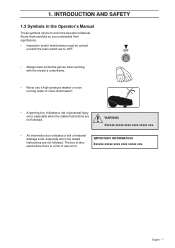
1. INTRODUCTION AND SAFETY 1.3 Symbols in the Operator's Manual These symbols can be carried out with the mower's underframe. • Never use a high-pressure washer or even running water to OFF. The box is ... box indicates a risk of user error. Study them carefully so you understand their significance. • Inspection and/or maintenance must be found in the Operator's Manual. English - 7 IMPORTANT INFORMATION Xxxxxx xxxxx xxxx xxxx xxxxx xxx. OFF • Always wear protective gloves when working with the main switch set to clean...
1. INTRODUCTION AND SAFETY 1.3 Symbols in the Operator's Manual These symbols can be carried out with the mower's underframe. • Never use a high-pressure washer or even running water to OFF. The box is ... box indicates a risk of user error. Study them carefully so you understand their significance. • Inspection and/or maintenance must be found in the Operator's Manual. English - 7 IMPORTANT INFORMATION Xxxxxx xxxxx xxxx xxxx xxxxx xxx. OFF • Always wear protective gloves when working with the main switch set to clean...
Operation Manual
Page 7
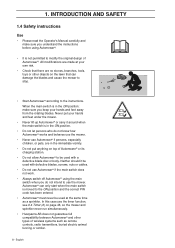
... as a sprinkler. English INTRODUCTION AND SAFETY 1.4 Safety instructions Use • Please read the Operator's Manual carefully and make sure you keep your hands and feet under the mower. • Never lift up Automower® or carry it be used with defective blades, screws, nuts or cables. • Do... is moved to use the timer function, see 6.4 Timer (2) on page 46, so the mower and sprinkler never run simultaneously. • Husqvarna AB does not guarantee full compatibility between Automower® and other objects on the lawn that there are in the ON position; 1.
... as a sprinkler. English INTRODUCTION AND SAFETY 1.4 Safety instructions Use • Please read the Operator's Manual carefully and make sure you keep your hands and feet under the mower. • Never lift up Automower® or carry it be used with defective blades, screws, nuts or cables. • Do... is moved to use the timer function, see 6.4 Timer (2) on page 46, so the mower and sprinkler never run simultaneously. • Husqvarna AB does not guarantee full compatibility between Automower® and other objects on the lawn that there are in the ON position; 1.
Operation Manual
Page 10
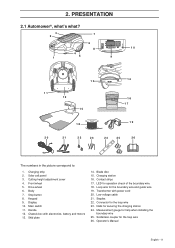
2. PRESENTATION 2.1 Automower®, what's what? 3 7 2 6 8 10 4 1 5 9 13 11 12 15 14 16 17 19 18 20 21 22 23 24 25 26 The numbers in the picture correspond to: 1. Cutting height adjustment cover 4. Handle 12. Low voltage cable 21. Connector for help when installing the boundary wire 25. Operator's Manual English - 11 Solar cell...
2. PRESENTATION 2.1 Automower®, what's what? 3 7 2 6 8 10 4 1 5 9 13 11 12 15 14 16 17 19 18 20 21 22 23 24 25 26 The numbers in the picture correspond to: 1. Cutting height adjustment cover 4. Handle 12. Low voltage cable 21. Connector for help when installing the boundary wire 25. Operator's Manual English - 11 Solar cell...
Operation Manual
Page 12
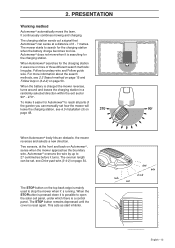
... For more of three different search methods: Irregular, Follow boundary wire and Follow guide wire. The charging station sends out a signal that Automower® can sense at the front and back on page 50. Two sensors, at a distance of the garden you can be set how...it is searching for the charging station when the battery charge becomes too low. When Automower® searches for Automower® to open the solar cell panel, under which there is a control panel. The overrun length can manually set , see Drive past wire (3-4-2) on the top back edge is mainly used to...
... For more of three different search methods: Irregular, Follow boundary wire and Follow guide wire. The charging station sends out a signal that Automower® can sense at the front and back on page 50. Two sensors, at a distance of the garden you can be set how...it is searching for the charging station when the battery charge becomes too low. When Automower® searches for Automower® to open the solar cell panel, under which there is a control panel. The overrun length can manually set , see Drive past wire (3-4-2) on the top back edge is mainly used to...
Operation Manual
Page 16
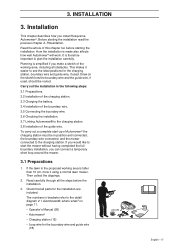
... to the charging station. Then collect the clippings. 2. INSTALLATION 3. Before starting the installation. Draw on page 11. • Operator's Manual (26) • Automower® • Charging station (15) • Loop wire for the charging station, boundary wire and guide wire, if used , .... If you can connect a temporary short loop around the mower. 3.1 Preparations 1. Planning is simplified if you install Husqvarna Automower®. Carry out the installation in position and connected, the boundary wire connected, and the mower connected to the detail diagram...
... to the charging station. Then collect the clippings. 2. INSTALLATION 3. Before starting the installation. Draw on page 11. • Operator's Manual (26) • Automower® • Charging station (15) • Loop wire for the charging station, boundary wire and guide wire, if used , .... If you can connect a temporary short loop around the mower. 3.1 Preparations 1. Planning is simplified if you install Husqvarna Automower®. Carry out the installation in position and connected, the boundary wire connected, and the mower connected to the detail diagram...
Operation Manual
Page 24
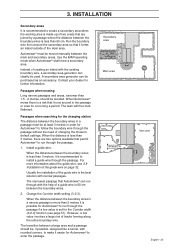
... wire on page 32. For more than 3 metres, it easier for Automower® to enter the passage. The lawn will then look flattened. The transition between a large area and a passage should be moved manually between the boundary wires. 2. Secondary area Main area Secondary area At least... 3 m Main area English - 25 Automower® must be at least 3 metres in order for the Corridor width (3-2-3) function ...
... wire on page 32. For more than 3 metres, it easier for Automower® to enter the passage. The lawn will then look flattened. The transition between a large area and a passage should be moved manually between the boundary wires. 2. Secondary area Main area Secondary area At least... 3 m Main area English - 25 Automower® must be at least 3 metres in order for the Corridor width (3-2-3) function ...
Operation Manual
Page 41
...- The mower must be moved manually to choose between: • AUTO, the normal automatic operating mode where Automower® mows and charges continuously. • MAN. If you select MAN, close the solar cell panel and check that the STOP button is discharged. Automower® will never start to.... It will charge fully, reverse approximately 20 centimetres and stop and show the message "Need manual charging". When the Test IN (3-2-4) function (see 2 page 52) is selected, Automower® will remain in the menu structure back to mow until the battery is in the ...
...- The mower must be moved manually to choose between: • AUTO, the normal automatic operating mode where Automower® mows and charges continuously. • MAN. If you select MAN, close the solar cell panel and check that the STOP button is discharged. Automower® will never start to.... It will charge fully, reverse approximately 20 centimetres and stop and show the message "Need manual charging". When the Test IN (3-2-4) function (see 2 page 52) is selected, Automower® will remain in the menu structure back to mow until the battery is in the ...

Operation Manual
Page 57
Sound 5 beeps over 2 seconds One long beep Short click sound Muffled long beep Short double beep Significance Starting blade disc Blade disc blocked A button on the keypad has been pressed Incorrect input The mower is removed from the charging station manually while charging is placed in progress. A change to indicate what Automower® is currently doing. MENU FUNCTIONS Sounds A number of audio messages are used to the setting has been made The mower is in the charging station manually. 58 - English 6.
Sound 5 beeps over 2 seconds One long beep Short click sound Muffled long beep Short double beep Significance Starting blade disc Blade disc blocked A button on the keypad has been pressed Incorrect input The mower is removed from the charging station manually while charging is placed in progress. A change to indicate what Automower® is currently doing. MENU FUNCTIONS Sounds A number of audio messages are used to the setting has been made The mower is in the charging station manually. 58 - English 6.
Operation Manual
Page 69
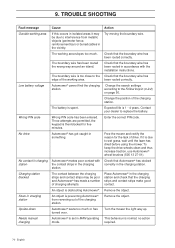
...working area Low battery voltage Wrong PIN code No drive No contact in charging station Charging station blocked Stuck in charging station Upside down Needs manual charging Cause If this occurs in isolated areas it is due to the edge of the working area slopes too much or has turned ... the object. Remove the object. Turn the mower the right way up. The contact between the charging strips and contact strips may be poor and Automower® has made a number of the charging station. Check that the boundary wire has been routed in something. Check that the boundary wire has...
...working area Low battery voltage Wrong PIN code No drive No contact in charging station Charging station blocked Stuck in charging station Upside down Needs manual charging Cause If this occurs in isolated areas it is due to the edge of the working area slopes too much or has turned ... the object. Remove the object. Turn the mower the right way up. The contact between the charging strips and contact strips may be poor and Automower® has made a number of the charging station. Check that the boundary wire has been routed in something. Check that the boundary wire has...


