

Operation Manual
Page 2
...73 English - 3 Control panel 41 5.1 Shortcuts 42 5.2 Select 43 5.3 Numbers 43 5.4 Main switch 43 6. Menu functions 44 6.1 Main menu 44 6.2 Automower® main menu, menu overview 45 6.3 Commands (1 46 6.4 Timer (2 46 6.5 Installation (3 48 6.6 Settings (4 54 7. Environmental information 73 12.... the battery 21 3.4 Installation of the boundary wire 21 3.5 Connecting the boundary wire 29 3.6 Checking the installation 31 3.7 Linking Automower® to the charging station 31 3.8 Installation of the guide wire 32 4. Maintenance 64 8.1 Battery 64 8.2 Winter storage 65...
...73 English - 3 Control panel 41 5.1 Shortcuts 42 5.2 Select 43 5.3 Numbers 43 5.4 Main switch 43 6. Menu functions 44 6.1 Main menu 44 6.2 Automower® main menu, menu overview 45 6.3 Commands (1 46 6.4 Timer (2 46 6.5 Installation (3 48 6.6 Settings (4 54 7. Environmental information 73 12.... the battery 21 3.4 Installation of the boundary wire 21 3.5 Connecting the boundary wire 29 3.6 Checking the installation 31 3.7 Linking Automower® to the charging station 31 3.8 Installation of the guide wire 32 4. Maintenance 64 8.1 Battery 64 8.2 Winter storage 65...

Operation Manual
Page 3
TABLE OF CONTENTS Husqvarna AB has a policy of continuous product development and therefore reserves the right to modify the design and appearance and function of the mower's control program. 4 - This Operator's Manual deals with version 2.6x of products without prior notice. English
TABLE OF CONTENTS Husqvarna AB has a policy of continuous product development and therefore reserves the right to modify the design and appearance and function of the mower's control program. 4 - This Operator's Manual deals with version 2.6x of products without prior notice. English

Operation Manual
Page 4
... the Operator's Manual carefully and understand the content before using your choice of its function. To get the best results from your Husqvarna Automower® requires knowledge of an exceptionally high quality product. This Operator's manual contains important information about the mower, how you install ...: • Text written in the Operator's manual to the position of the main switch and the different operating modes on your Automower®. WARNING Automower® can be dangerous if incorrectly used in italics is a text that is shown on the mower's display or is used ...
... the Operator's Manual carefully and understand the content before using your choice of its function. To get the best results from your Husqvarna Automower® requires knowledge of an exceptionally high quality product. This Operator's manual contains important information about the mower, how you install ...: • Text written in the Operator's manual to the position of the main switch and the different operating modes on your Automower®. WARNING Automower® can be dangerous if incorrectly used in italics is a text that is shown on the mower's display or is used ...

Operation Manual
Page 5
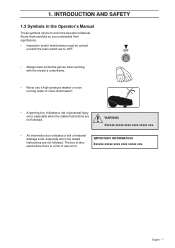
... rotating blades. Study them carefully so you understand their significance. • Read through the Operator's Manual carefully and understand the content before using your Automower®. • The warnings and safety instructions in this Operator's Manual must be found on label. • This product conforms to the ON...This product must be carefully followed if the mower is in chapter Technical data and on the lawn mover. INTRODUCTION AND SAFETY 1.2 Symbols on Automower® These symbols can only start when the main switch is specified in operation. • Do not ride on...
... rotating blades. Study them carefully so you understand their significance. • Read through the Operator's Manual carefully and understand the content before using your Automower®. • The warnings and safety instructions in this Operator's Manual must be found on label. • This product conforms to the ON...This product must be carefully followed if the mower is in chapter Technical data and on the lawn mover. INTRODUCTION AND SAFETY 1.2 Symbols on Automower® These symbols can only start when the main switch is specified in operation. • Do not ride on...
Operation Manual
Page 6
... use a high-pressure washer or even running water to OFF. OFF • Always wear protective gloves when working with the main switch set to clean Automower®. • A warning box indicates a risk of personal injury exist, especially when the stated instructions are not followed. 1.
... use a high-pressure washer or even running water to OFF. OFF • Always wear protective gloves when working with the main switch set to clean Automower®. • A warning box indicates a risk of personal injury exist, especially when the stated instructions are not followed. 1.
Operation Manual
Page 7
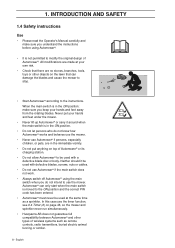
...children, or pets, are in the immediate vicinity. • Do not put your hands and feet under the mower. • Never lift up Automower® or carry it be used with a defective blade disc or body. INTRODUCTION AND SAFETY 1.4 Safety instructions Use • Please read the Operator... use the timer function, see 6.4 Timer (2) on page 46, so the mower and sprinkler never run simultaneously. • Husqvarna AB does not guarantee full compatibility between Automower® and other objects on top of wireless systems such as a sprinkler. Never put anything on the lawn that there are...
...children, or pets, are in the immediate vicinity. • Do not put your hands and feet under the mower. • Never lift up Automower® or carry it be used with a defective blade disc or body. INTRODUCTION AND SAFETY 1.4 Safety instructions Use • Please read the Operator... use the timer function, see 6.4 Timer (2) on page 46, so the mower and sprinkler never run simultaneously. • Husqvarna AB does not guarantee full compatibility between Automower® and other objects on top of wireless systems such as a sprinkler. Never put anything on the lawn that there are...
Operation Manual
Page 8
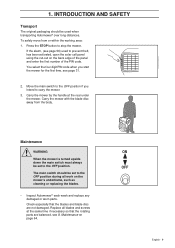
1. If the alarm, (see page 56) used when transporting Automower® over long distances. Maintenance WARNING When the mower is turned upside down the main switch must always be set to prevent theft, has been activated, open the solar cell panel using the cut-out on page 64. Replace all ...work on the mower's underframe, such as cleaning or replacing the blades. • Inspect Automower® each week and replace any damaged or worn parts. INTRODUCTION ...
1. If the alarm, (see page 56) used when transporting Automower® over long distances. Maintenance WARNING When the mower is turned upside down the main switch must always be set to prevent theft, has been activated, open the solar cell panel using the cut-out on page 64. Replace all ...work on the mower's underframe, such as cleaning or replacing the blades. • Inspect Automower® each week and replace any damaged or worn parts. INTRODUCTION ...

Operation Manual
Page 9
...charge level in a loop around objects and plants that mows the lawn by solar energy in essentially an irregular pattern. The low voltage cable must not be aware of Husqvarna Automower® includes four main components: Automower®, an automatic lawn mower that the mower must not run into. ...wire is connected between the charging station and a 230V wall socket. Transformer, which is laid around the edges of the lawn and around Automower®'s working area. The charging station has three functions: • To send control signals along the boundary wire. • To send out...
...charge level in a loop around objects and plants that mows the lawn by solar energy in essentially an irregular pattern. The low voltage cable must not be aware of Husqvarna Automower® includes four main components: Automower®, an automatic lawn mower that the mower must not run into. ...wire is connected between the charging station and a 230V wall socket. Transformer, which is laid around the edges of the lawn and around Automower®'s working area. The charging station has three functions: • To send control signals along the boundary wire. • To send out...
Operation Manual
Page 10
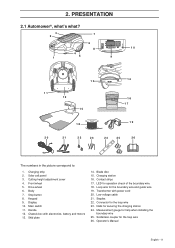
... for securing the charging station 24. Operator's Manual English - 11 Drive wheel 6. Display 10. Solderless coupler for operation check of the boundary wire 18. PRESENTATION 2.1 Automower®, what's what? 3 7 2 6 8 10 4 1 5 9 13 11 12 15 14 16 17 19 18 20 21 22 23 24 25 26 The numbers in the picture...
... for securing the charging station 24. Operator's Manual English - 11 Drive wheel 6. Display 10. Solderless coupler for operation check of the boundary wire 18. PRESENTATION 2.1 Automower®, what's what? 3 7 2 6 8 10 4 1 5 9 13 11 12 15 14 16 17 19 18 20 21 22 23 24 25 26 The numbers in the picture...
Operation Manual
Page 11
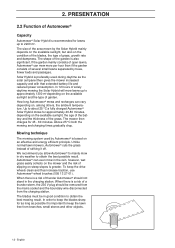
...The mowing system used during daytime as possible it off. Automower® can vary depending on the available sunlight and the type of Automower® Capacity Automower® Solar Hybrid is recommended for as long as the solar cell panel then gives the mower increased capacity and with ...age of the battery and the thickness of the grass. 2. Solar Hybrid is preferably used by the Solar Hybrid mainly depends on the available sunlight, but also on an effective and energy efficient principle. How long Automower® mows and recharges can even mow in the charging station...
...The mowing system used during daytime as possible it off. Automower® can vary depending on the available sunlight and the type of Automower® Capacity Automower® Solar Hybrid is recommended for as long as the solar cell panel then gives the mower increased capacity and with ...age of the battery and the thickness of the grass. 2. Solar Hybrid is preferably used by the Solar Hybrid mainly depends on the available sunlight, but also on an effective and energy efficient principle. How long Automower® mows and recharges can even mow in the charging station...
Operation Manual
Page 12
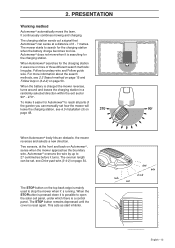
...it' s running. When the STOPbutton is pressed down it is possible to open the solar cell panel, under which there is searching for Automower® to search for the charging station it is a control panel. Automower® does not mow when it uses one or more information about the search methods,... it easier for the charging station. The STOP button remains depressed until the cover is reset again. The charging station sends out a signal that Automower® can be set how the mower will leave the charging station, see 2.3 Search method on page 15 and Follow loop in a randomly...
...it' s running. When the STOPbutton is pressed down it is possible to open the solar cell panel, under which there is searching for Automower® to search for the charging station it is a control panel. Automower® does not mow when it uses one or more information about the search methods,... it easier for the charging station. The STOP button remains depressed until the cover is reset again. The charging station sends out a signal that Automower® can be set how the mower will leave the charging station, see 2.3 Search method on page 15 and Follow loop in a randomly...

Operation Manual
Page 13
... of longer grass more than earlier, it senses the grass is never repeated. The selected PIN code must have been operational for Automower® to save power. A movement pattern is longer than 6 hours in a square pattern, this function activated as square mode...Automower® has this is known as a default setting. The display on the control panel. This mowing system means the lawn is then completely dimmed. When Automower® mows in order for more systematically. PRESENTATION All Automower® settings are managed via the control panel under the mower's solar...
... of longer grass more than earlier, it senses the grass is never repeated. The selected PIN code must have been operational for Automower® to save power. A movement pattern is longer than 6 hours in a square pattern, this function activated as square mode...Automower® has this is known as a default setting. The display on the control panel. This mowing system means the lawn is then completely dimmed. When Automower® mows in order for more systematically. PRESENTATION All Automower® settings are managed via the control panel under the mower's solar...

Operation Manual
Page 14
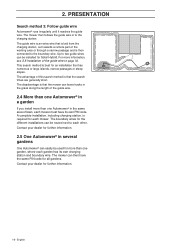
Using the setting options the three search methods can be combined to the charging station. Automower® circles an island roughly twice, which can be formed to search for an installation that has an open lawn with wide passages (... search method is best for the charging station in the grass behind the mower. Search method 1: Irregular Automower® runs irregularly until it finds the charging station. Search method 2: Follow boundary wire Automower® runs irregularly until it reaches the boundary wire. This search method is best for an installation that...
Using the setting options the three search methods can be combined to the charging station. Automower® circles an island roughly twice, which can be formed to search for an installation that has an open lawn with wide passages (... search method is best for the charging station in the grass behind the mower. Search method 1: Irregular Automower® runs irregularly until it finds the charging station. Search method 2: Follow boundary wire Automower® runs irregularly until it reaches the boundary wire. This search method is best for an installation that...
Operation Manual
Page 15
...For more than one Automower® in to the boundary wire. The disadvantage is an extra wire that has numerous or large islands, narrow passages or steep slopes. The guide wire is that the search times are generally short. Contact your dealer for Solar Hybrid. The advantage of the... guide wire on page 32. English Up to each mower. The mower can be routed next to two guide wires can then have its own charging station and boundary wire. 2. PRESENTATION Search method 3: Follow guide wire Automower® runs ...
...For more than one Automower® in to the boundary wire. The disadvantage is an extra wire that has numerous or large islands, narrow passages or steep slopes. The guide wire is that the search times are generally short. Contact your dealer for Solar Hybrid. The advantage of the... guide wire on page 32. English Up to each mower. The mower can be routed next to two guide wires can then have its own charging station and boundary wire. 2. PRESENTATION Search method 3: Follow guide wire Automower® runs ...
Operation Manual
Page 16
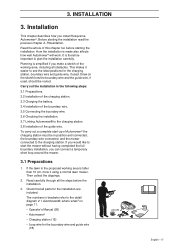
... This chapter describes how you make a sketch of the working area is simplified if you install Husqvarna Automower®. Before starting the installation. Read the whole of Automower® the charging station must be routed. If you can connect a temporary short loop around ... the charging station. 3.8 Installation of the boundary wire. 3.5 Connecting the boundary wire. 3.6 Checking the installation. 3.7 Linking Automower® to plan the installation carefully. Carry out the installation in the proposed working area, including all obstacles. Presentation. It...
... This chapter describes how you make a sketch of the working area is simplified if you install Husqvarna Automower®. Before starting the installation. Read the whole of Automower® the charging station must be routed. If you can connect a temporary short loop around ... the charging station. 3.8 Installation of the boundary wire. 3.5 Connecting the boundary wire. 3.6 Checking the installation. 3.7 Linking Automower® to plan the installation carefully. Carry out the installation in the proposed working area, including all obstacles. Presentation. It...
Operation Manual
Page 17
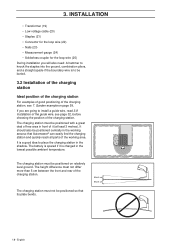
... wire (25) During installation you are going to place the charging station in the lowest possible ambient temperature. It should also be positioned so that Automower® can easily find the charging station and quickly reach all parts of the guide wire, see 7. The charging station must not differ more than...
... wire (25) During installation you are going to place the charging station in the lowest possible ambient temperature. It should also be positioned so that Automower® can easily find the charging station and quickly reach all parts of the guide wire, see 7. The charging station must not differ more than...
Operation Manual
Page 18
Tip! IMPORTANT INFORMATION The mains cable on the transformer must be placed where it is well ventilated and is a better positioning option for the charging station than about 3 metres). Do not put the charging station in a corner or pocket in a narrow passage (narrower than close to the wall socket. Avoid placing the charging station in the working area. The charging station should be either stapled down or buried. The supplied low voltage cable is also beneficial if the transformer can be shortened or extended. In some cases there is not exposed to let the low ...
Tip! IMPORTANT INFORMATION The mains cable on the transformer must be placed where it is well ventilated and is a better positioning option for the charging station than about 3 metres). Do not put the charging station in a corner or pocket in a narrow passage (narrower than close to the wall socket. Avoid placing the charging station in the working area. The charging station should be either stapled down or buried. The supplied low voltage cable is also beneficial if the transformer can be shortened or extended. In some cases there is not exposed to let the low ...

Operation Manual
Page 19
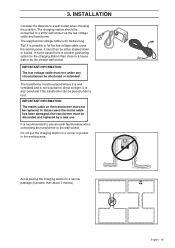
It will then be harder for example on a narrow point). Only the existing holes may be used to secure the plate to find the charging station. IMPORTANT INFORMATION It is preferable to use original cable and transformer. 4. Connect the transformer's power cord to make new holes in a suitable spot. 2. The connectors may be slightly difficult to the ground using the supplied nails. Secure the charging station to connect, as recommended. 20 - Connect the low voltage cable to the transformer. Installation and connecting the charging station 1. Only use an earth-fault...
It will then be harder for example on a narrow point). Only the existing holes may be used to secure the plate to find the charging station. IMPORTANT INFORMATION It is preferable to use original cable and transformer. 4. Connect the transformer's power cord to make new holes in a suitable spot. 2. The connectors may be slightly difficult to the ground using the supplied nails. Secure the charging station to connect, as recommended. 20 - Connect the low voltage cable to the transformer. Installation and connecting the charging station 1. Only use an earth-fault...

Operation Manual
Page 20
...if you want to make adjustments to the ground with an uncharged battery. Set the main switch to dethatch or aerate the lawn. Place Automower® in one part of the boundary wire The boundary wire can be installed in the charging station to charge the mower. 1. It ... INFORMATION Do not tread or walk on the charging station plate. 3.3 Charging the battery Automower® is preferable to bury the boundary wire if you want to the OFF position. 2. IMPORTANT INFORMATION Automower® cannot be used before the installation is buried. It is preferable to staple down...
...if you want to make adjustments to the ground with an uncharged battery. Set the main switch to dethatch or aerate the lawn. Place Automower® in one part of the boundary wire The boundary wire can be installed in the charging station to charge the mower. 1. It ... INFORMATION Do not tread or walk on the charging station plate. 3.3 Charging the battery Automower® is preferable to bury the boundary wire if you want to the OFF position. 2. IMPORTANT INFORMATION Automower® cannot be used before the installation is buried. It is preferable to staple down...
Operation Manual
Page 21
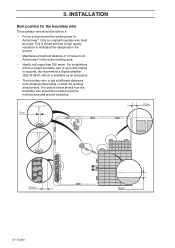
INSTALLATION Best position for the boundary wire The boundary wire should be routed around the working area and around the working area for Automower®. The picture below shows how the boundary wire should be used. For installations where a longer boundary wire of 3 metres from obstacles ...we recommend a Signal amplifier (522 42 58-01) which is available as an accessory. • The boundary wire is laid at different distances from Automower® in the entire working area borders. English 3. Only an original boundary wire must be laid so it: • Forms a loop around obstacles....
INSTALLATION Best position for the boundary wire The boundary wire should be routed around the working area and around the working area for Automower®. The picture below shows how the boundary wire should be used. For installations where a longer boundary wire of 3 metres from obstacles ...we recommend a Signal amplifier (522 42 58-01) which is available as an accessory. • The boundary wire is laid at different distances from Automower® in the entire working area borders. English 3. Only an original boundary wire must be laid so it: • Forms a loop around obstacles....
