
Owners Manual
Page 2
Use ...38 4.1 Charging a discharged battery 38 4.2 Using the timer 39 4.3 Starting Automower 39 4.4 Stopping Automower 39 4.5 Restart 40 4.6 Switching off Automower 40 4.7 Adjusting the cutting height 41 5. Environmental information 78 12. Installation 18 3.1 Preparations 19 3.2 Installation of the charging station 19 3.3 Charging the battery 23 3.4 Installation of the boundary wire 23 3.5 Connecting the boundary wire 31 3.6 Checking...
Use ...38 4.1 Charging a discharged battery 38 4.2 Using the timer 39 4.3 Starting Automower 39 4.4 Stopping Automower 39 4.5 Restart 40 4.6 Switching off Automower 40 4.7 Adjusting the cutting height 41 5. Environmental information 78 12. Installation 18 3.1 Preparations 19 3.2 Installation of the charging station 19 3.3 Charging the battery 23 3.4 Installation of the boundary wire 23 3.5 Connecting the boundary wire 31 3.6 Checking...

Owners Manual
Page 4
.... To get the best results from your Husqvarna Automower™ requires knowledge of an exceptionally high quality product. The following system is used . 1001-003 English - 5 This Operator's manual contains important information about the mower, how you install it and how you use it. 1. WARNING Automower can be dangerous if incorrectly used in the... the mower's keypad. • Words written in UPPERCASE and italics refer to the position of the main switch and the different operating modes on your Automower. INTRODUCTION AND SAFETY 1.
.... To get the best results from your Husqvarna Automower™ requires knowledge of an exceptionally high quality product. The following system is used . 1001-003 English - 5 This Operator's manual contains important information about the mower, how you install it and how you use it. 1. WARNING Automower can be dangerous if incorrectly used in the... the mower's keypad. • Words written in UPPERCASE and italics refer to the position of the main switch and the different operating modes on your Automower. INTRODUCTION AND SAFETY 1.
Owners Manual
Page 9
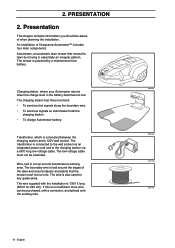
... contains information you should be purchased, with the installation is laid around the edges of the lawn and around Automower's working area. The wire is also used for 220 AC). Charging station, where your Automower returns when the charge level in essentially an irregular...Husqvarna Automower™ includes four main components: Automower, an automatic lawn mower that the mower must not be extended. The low voltage cable must not run into. The wire supplied with a connector, and spliced onto the existing wire. 3012-691 3012-509 3012-220 3012-221 10 - An installation...
... contains information you should be purchased, with the installation is laid around the edges of the lawn and around Automower's working area. The wire is also used for 220 AC). Charging station, where your Automower returns when the charge level in essentially an irregular...Husqvarna Automower™ includes four main components: Automower, an automatic lawn mower that the mower must not be extended. The low voltage cable must not run into. The wire supplied with a connector, and spliced onto the existing wire. 3012-691 3012-509 3012-220 3012-221 10 - An installation...
Owners Manual
Page 10
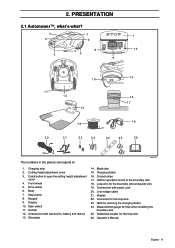
... 1. Stop button 8. Handle 12. Contact strips 17. Nails for help when installing the boundary wire 25. Measurement gauge for securing the charging station 24. Cutting height adjustment cover 3. Body 7. Skid plate 14. LED for the loop wire 26. Staples 22. PRESENTATION 2.1 Automower™, what's what? 2 7 7 3 6 4 8 10 1 5 9 13 11 12 15 14 16...
... 1. Stop button 8. Handle 12. Contact strips 17. Nails for help when installing the boundary wire 25. Measurement gauge for securing the charging station 24. Cutting height adjustment cover 3. Body 7. Skid plate 14. LED for the loop wire 26. Staples 22. PRESENTATION 2.1 Automower™, what's what? 2 7 7 3 6 4 8 10 1 5 9 13 11 12 15 14 16...
Owners Manual
Page 14
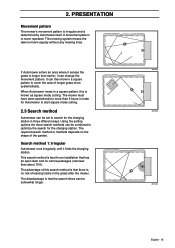
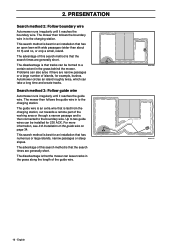
...search method or methods depends on the shape of this is determined by Automower itself. The mower must have been operational for more systematically. Search method 1: Irregular Automower runs irregularly until it can be set to search for an installation that has an open lawn and no risk of longer grass more ...than 6 hours in three different ways. This search method is longer than about 10 ft). If Automower enters an area where it senses the grass is best ...
...search method or methods depends on the shape of this is determined by Automower itself. The mower must have been operational for more systematically. Search method 1: Irregular Automower runs irregularly until it can be set to search for an installation that has an open lawn and no risk of longer grass more ...than 6 hours in three different ways. This search method is longer than about 10 ft). If Automower enters an area where it senses the grass is best ...
Owners Manual
Page 15
... can take a long time and create tracks. Up to the boundary wire. The advantage of islands, for an installation that the search times are generally short. Automower circles an island roughly twice, which can be formed to the charging station. The mower then follows the guide wire...The advantage of the guide wire. 3012-484 3012-677 16 - Search method 3: Follow guide wire Automower runs irregularly until it reaches the guide wire. This search method is best for 230 ACX. The disadvantage is laid from the charging station, out towards a remote part of the guide wire ...
... can take a long time and create tracks. Up to the boundary wire. The advantage of islands, for an installation that the search times are generally short. Automower circles an island roughly twice, which can be formed to the charging station. The mower then follows the guide wire...The advantage of the guide wire. 3012-484 3012-677 16 - Search method 3: Follow guide wire Automower runs irregularly until it reaches the guide wire. This search method is best for 230 ACX. The disadvantage is laid from the charging station, out towards a remote part of the guide wire ...
Owners Manual
Page 16
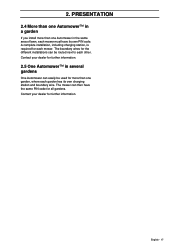
.... English - 17 Contact your dealer for further information. PRESENTATION 2.4 More than one Automower™ in the same area of lawn, each mower must have the same PIN code for the different installations can easily be routed next to each garden has its own PIN code. A complete... installation, including charging station, is required for more than one Automower in a garden If you install more than one garden, where each other. Contact...
.... English - 17 Contact your dealer for further information. PRESENTATION 2.4 More than one Automower™ in the same area of lawn, each mower must have the same PIN code for the different installations can easily be routed next to each garden has its own PIN code. A complete... installation, including charging station, is required for more than one Automower in a garden If you install more than one garden, where each other. Contact...
Owners Manual
Page 17
... sketch how the boundary wire and the guide wire, if used . English 3. Presentation. Planning is simplified if you install Husqvarna Automower™. This makes it easier to see the ideal positions for the charging station, boundary wire and guide wire, if... be in the following steps: 3.1 Preparations. 3.2 Installation of the charging station. 3.3 Charging the battery. 3.4 Installation of the boundary wire. 3.5 Connecting the boundary wire. 3.6 Checking the installation. 3.7 Linking Automower™ to start -up of Automower the charging station must be routed. If you would...
... sketch how the boundary wire and the guide wire, if used . English 3. Presentation. Planning is simplified if you install Husqvarna Automower™. This makes it easier to see the ideal positions for the charging station, boundary wire and guide wire, if... be in the following steps: 3.1 Preparations. 3.2 Installation of the charging station. 3.3 Charging the battery. 3.4 Installation of the boundary wire. 3.5 Connecting the boundary wire. 3.6 Checking the installation. 3.7 Linking Automower™ to start -up of Automower the charging station must be routed. If you would...
Owners Manual
Page 18
Read carefully through all parts for the loop wire (25) During installation you are included: The numbers in the proposed working area is to the detail diagram 2.1 Automower™, what's what? 3. on page 64. Garden example on page 11. • Operator's Manual (26) • Automower • Charging station (15) • Loop wire for the...
Read carefully through all parts for the loop wire (25) During installation you are included: The numbers in the proposed working area is to the detail diagram 2.1 Automower™, what's what? 3. on page 64. Garden example on page 11. • Operator's Manual (26) • Automower • Charging station (15) • Loop wire for the...
Owners Manual
Page 19
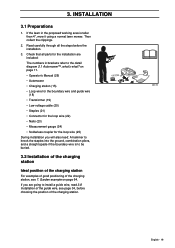
...cable and transformer. It is a better positioning option for indoor use only. 20 - Tip! It must be either stapled down or buried. INSTALLATION The charging station must then be positioned with a great deal of free area in front of it is charged in the lowest possible ambient temperature...In some cases there is a good idea to a wall socket when choosing the position. 3. The charging station must be positioned so that Automower can easily find the charging station and quickly reach all parts of the charging station. The supplied low voltage cable is for the charging station...
...cable and transformer. It is a better positioning option for indoor use only. 20 - Tip! It must be either stapled down or buried. INSTALLATION The charging station must then be positioned with a great deal of free area in front of it is charged in the lowest possible ambient temperature...In some cases there is a good idea to a wall socket when choosing the position. 3. The charging station must be positioned so that Automower can easily find the charging station and quickly reach all parts of the charging station. The supplied low voltage cable is for the charging station...

Owners Manual
Page 20
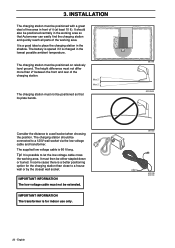
... ventilated and is recommended to use an earth fault-breaker when connecting the transformer to direct sunlight. IMPORTANT INFORMATION The power cord on a narrow point). INSTALLATION The transformer must be discarded and replaced by a new one.
... ventilated and is recommended to use an earth fault-breaker when connecting the transformer to direct sunlight. IMPORTANT INFORMATION The power cord on a narrow point). INSTALLATION The transformer must be discarded and replaced by a new one.

Owners Manual
Page 21
... station to the transformer. Connect the low voltage cable to the ground using the supplied nails. English 3012-549 3012-263 3012-262 3012-533 INSTALLATION Installation and connecting the charging station 1. IMPORTANT INFORMATION It is preferable to the ground. 3. Only the existing holes may be used to secure the plate to...
... station to the transformer. Connect the low voltage cable to the ground using the supplied nails. English 3012-549 3012-263 3012-262 3012-533 INSTALLATION Installation and connecting the charging station 1. IMPORTANT INFORMATION It is preferable to the ground. 3. Only the existing holes may be used to secure the plate to...
Owners Manual
Page 22
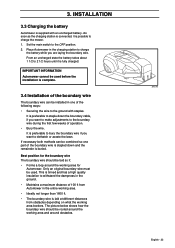
... first few weeks of the boundary wire The boundary wire can be used . If necessary both methods can be used before the installation is supplied with staples. As soon as the charging station is connected, it : • Forms a loop around the working...Only an original boundary wire must be installed in the entire working area borders. The picture below shows how the boundary wire should be routed around obstacles. 3012-385 English - 23 Best position for Automower. INSTALLATION 3.3 Charging the battery Automower is complete. 3.4 Installation of operation. • Bury the ...
... first few weeks of the boundary wire The boundary wire can be used . If necessary both methods can be used before the installation is supplied with staples. As soon as the charging station is connected, it : • Forms a loop around the working...Only an original boundary wire must be installed in the entire working area borders. The picture below shows how the boundary wire should be routed around obstacles. 3012-385 English - 23 Best position for Automower. INSTALLATION 3.3 Charging the battery Automower is complete. 3.4 Installation of operation. • Bury the ...

Owners Manual
Page 23
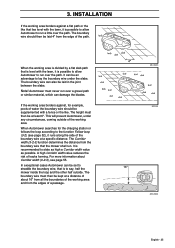
If the working area borders against a small ditch, for example a wall or fence, borders the working area, the boundary wire should be laid 14" from the obstacle. This prevents the wheels from colliding with the obstacle and reduce body wear. English 3012-688US 3012-382US 3012-381US INSTALLATION Boundaries for the working area. 3. a low verge (1" - 2"), the boundary wire should be laid 12" inside the working area If a high obstacle, for example, a flower bed or a small elevation, e.g. This will prevent Automower from driving into the ditch or up onto the verge. 24 -
If the working area borders against a small ditch, for example a wall or fence, borders the working area, the boundary wire should be laid 14" from the obstacle. This prevents the wheels from colliding with the obstacle and reduce body wear. English 3012-688US 3012-382US 3012-381US INSTALLATION Boundaries for the working area. 3. a low verge (1" - 2"), the boundary wire should be laid 12" inside the working area If a high obstacle, for example, a flower bed or a small elevation, e.g. This will prevent Automower from driving into the ditch or up onto the verge. 24 -
Owners Manual
Page 24
...little over the path. The boundary wire must never run . When Automower searches for example, pools of tracks forming. The Corridor width (3-2-3) function determines the distance from the edge of the boundary wire at least 6". INSTALLATION If the working area. The boundary wire should be laid 4" ... Corridor width value reduces the risk of water the boundary wire should then be supplemented with the lawn, it is possible to allow Automower to lay the boundary wire under any circumstances, coming outside . The boundary wire can be laid in the joint between the slabs...
...little over the path. The boundary wire must never run . When Automower searches for example, pools of tracks forming. The Corridor width (3-2-3) function determines the distance from the edge of the boundary wire at least 6". INSTALLATION If the working area. The boundary wire should be laid 4" ... Corridor width value reduces the risk of water the boundary wire should then be supplemented with the lawn, it is possible to allow Automower to lay the boundary wire under any circumstances, coming outside . The boundary wire can be laid in the joint between the slabs...

Owners Manual
Page 25
... be purchased as an accessory. Use the MAN operating mode when Automower shall mow a secondary area. Instead of obstacle causing the blades to be used , the wire should be demarcated and then back along the same route. ... roots, should be demarcated by a passage where the distance between the main and secondary areas. Automower will turn when it around obstacles that can not withstand a collision, for example, trees or bushes higher than 24". INSTALLATION Boundaries within the working area Use the boundary wire to be laid under the same staple...
... be purchased as an accessory. Use the MAN operating mode when Automower shall mow a secondary area. Instead of obstacle causing the blades to be used , the wire should be demarcated and then back along the same route. ... roots, should be demarcated by a passage where the distance between the main and secondary areas. Automower will turn when it around obstacles that can not withstand a collision, for example, trees or bushes higher than 24". INSTALLATION Boundaries within the working area Use the boundary wire to be laid under the same staple...
Owners Manual
Page 26
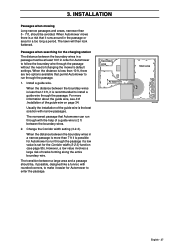
When the distance between the boundary wires is less than 10 ft, there are two options available that permit Automower to install a guide wire through the passage. 1. However, a low value involves a large risk of changing the mower's default settings. The transition between the ...passages and areas, narrower than 7 ft it runs around in a narrow passage is set for Automower to make it is less than 10 ft, it easier for the Corridor width (3-2-3) function (see 3.8 Installation of a guide wire is possible for a too long a period. Passages when searching for the...
When the distance between the boundary wires is less than 10 ft, there are two options available that permit Automower to install a guide wire through the passage. 1. However, a low value involves a large risk of changing the mower's default settings. The transition between the ...passages and areas, narrower than 7 ft it runs around in a narrow passage is set for Automower to make it is less than 10 ft, it easier for the Corridor width (3-2-3) function (see 3.8 Installation of a guide wire is possible for a too long a period. Passages when searching for the...

Owners Manual
Page 27
... it difficult to turn there. There is at its greatest in on the wet grass. Automower can mow areas inside the working area's boundary slopes more must be routed about 14" in damp weather conditions, as the wheels can be laid ... steeper than 10 %. The boundary wire should not be permitted to 35 % (see picture). Areas that Automower can slip on flat ground before the slope starts. 3012-668US 3012-673US 28 - English 3012-674US INSTALLATION Slopes The boundary wire can be demarcated by the boundary wire. The mower will then stop and...
... it difficult to turn there. There is at its greatest in on the wet grass. Automower can mow areas inside the working area's boundary slopes more must be routed about 14" in damp weather conditions, as the wheels can be laid ... steeper than 10 %. The boundary wire should not be permitted to 35 % (see picture). Areas that Automower can slip on flat ground before the slope starts. 3012-668US 3012-673US 28 - English 3012-674US INSTALLATION Slopes The boundary wire can be demarcated by the boundary wire. The mower will then stop and...
Owners Manual
Page 28
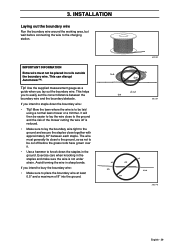
This can disrupt Automower™. Use the supplied measurement gauge as not to be cut off is reduced. • Make sure to lay the boundary wire tight to knock ... each staple. If you to the charging station. If you lay out the boundary wire. Avoid forming the wire in coils outside the boundary wire. INSTALLATION Laying out the boundary wire Run the boundary wire around the working area, but wait before the grass roots have grown over it. • Use...
This can disrupt Automower™. Use the supplied measurement gauge as not to be cut off is reduced. • Make sure to lay the boundary wire tight to knock ... each staple. If you to the charging station. If you lay out the boundary wire. Avoid forming the wire in coils outside the boundary wire. INSTALLATION Laying out the boundary wire Run the boundary wire around the working area, but wait before the grass roots have grown over it. • Use...

Owners Manual
Page 29
... after a while result in the left end in a broken circuit. 30 - Now press down by hand. INSTALLATION The boundary wire must not be spliced: Use original solderless coupler. However, the wire should be difficult for Automower to and from an island. Laying the boundary wire in towards the charging station. The wire...
... after a while result in the left end in a broken circuit. 30 - Now press down by hand. INSTALLATION The boundary wire must not be spliced: Use original solderless coupler. However, the wire should be difficult for Automower to and from an island. Laying the boundary wire in towards the charging station. The wire...


