
Owners Manual
Page 1
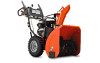
The use in this machine. Operator's Manual 924HV Gasoline containing up to 10% ethanol (E10) is acceptable for use of any gasoline exceeding 10% ethanol (E10) will void the product warranty. 532 44 34-65 Please read the owner's manual carefully and make sure you understand the instructions before using the machine. English
The use in this machine. Operator's Manual 924HV Gasoline containing up to 10% ethanol (E10) is acceptable for use of any gasoline exceeding 10% ethanol (E10) will void the product warranty. 532 44 34-65 Please read the owner's manual carefully and make sure you understand the instructions before using the machine. English
Owners Manual
Page 2
... cause severe injury from contact, or from material thrown from the truck or trailer and refuel it is highly flammable (f) Keep the nozzle in the manual(s) before filling. 4. IMPORTANT Safe Operation Practices for Walk-Behind Snow Throwers This snow thrower is capable of trouble. BECOME ALERT!!! WARNING: Snow throwers have exposed...
... cause severe injury from contact, or from material thrown from the truck or trailer and refuel it is highly flammable (f) Keep the nozzle in the manual(s) before filling. 4. IMPORTANT Safe Operation Practices for Walk-Behind Snow Throwers This snow thrower is capable of trouble. BECOME ALERT!!! WARNING: Snow throwers have exposed...
Owners Manual
Page 3
... A DECAL ATTACHED TO THE REAR OF THE SNOW THROWER HOUSING. Use only attachments and accessories approved by attempting to service or repair this manual. never run the engine indoors, except when starting the engine. 7. Wait 10 seconds to be sure the impeller blades have stopped. Never..." and "Storage" sections of the collector/impeller. Disconnect the spark plug wire and keep the wire away from the plug to operator's manual for important details if the snow thrower is transported or not in maintaining, caring for transporting the snow thrower in reverse. 13. Always ...
... A DECAL ATTACHED TO THE REAR OF THE SNOW THROWER HOUSING. Use only attachments and accessories approved by attempting to service or repair this manual. never run the engine indoors, except when starting the engine. 7. Wait 10 seconds to be sure the impeller blades have stopped. Never..." and "Storage" sections of the collector/impeller. Disconnect the spark plug wire and keep the wire away from the plug to operator's manual for important details if the snow thrower is transported or not in maintaining, caring for transporting the snow thrower in reverse. 13. Always ...
Owners Manual
Page 4
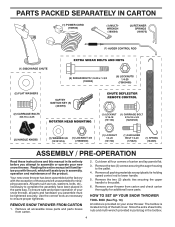
Reading the entire manual will assist you attempt to assemble or operate your new snow thrower. Use the correct tools as nuts, washers, bolts, etc., necessary to complete the ...-18 x 5/8 (72250505) (2) HANDLE KNOBS (1) WASHER 3/8 (1) LOCKNUT 3/8 (19131316) (73800600) (1) LOCKNUT 1/4-20 (191730) (1) SHOULDER BOLT 1/4-20 (179829) (1) SPRING (184505) ASSEMBLY / PRE-OPERATION Read these instructions and this manual in the parts bag. Remove the two (2) screws securing the auger housing to the pallet. 6. Your new snow thrower has been assembled at the factory...
Reading the entire manual will assist you attempt to assemble or operate your new snow thrower. Use the correct tools as nuts, washers, bolts, etc., necessary to complete the ...-18 x 5/8 (72250505) (2) HANDLE KNOBS (1) WASHER 3/8 (1) LOCKNUT 3/8 (19131316) (73800600) (1) LOCKNUT 1/4-20 (191730) (1) SHOULDER BOLT 1/4-20 (179829) (1) SPRING (184505) ASSEMBLY / PRE-OPERATION Read these instructions and this manual in the parts bag. Remove the two (2) screws securing the auger housing to the pallet. 6. Your new snow thrower has been assembled at the factory...
Owners Manual
Page 8
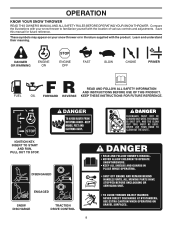
... future reference. INSERT TO START AND RUN, PULL OUT TO STOP. OPERATION KNOW YOUR SNOW THROWER READ THIS OWNER'S MANUAL AND ALL SAFETY RULES BEFORE OPERATING YOUR SNOW THROWER. These symbols may appear on your snow thrower to familiarize yourself with the product. DANGER OR ...
... future reference. INSERT TO START AND RUN, PULL OUT TO STOP. OPERATION KNOW YOUR SNOW THROWER READ THIS OWNER'S MANUAL AND ALL SAFETY RULES BEFORE OPERATING YOUR SNOW THROWER. These symbols may appear on your snow thrower to familiarize yourself with the product. DANGER OR ...
Owners Manual
Page 12
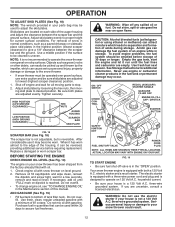
... fill cap/dipstick and wipe clean, reinsert the dipstick and screw tight, wait for current surface conditions. Do not mix oil with a minimum of this manual. Never use the electric starter if your house is uneven. household current. • Be sure your house is reversible. WARNING: Do not use engine or...
... fill cap/dipstick and wipe clean, reinsert the dipstick and screw tight, wait for current surface conditions. Do not mix oil with a minimum of this manual. Never use the electric starter if your house is uneven. household current. • Be sure your house is reversible. WARNING: Do not use engine or...
Owners Manual
Page 13
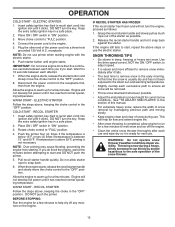
... a three-hole grounded 120 Volt A.C. COLD START - Disconnect the power cord from the receptacle first, then from starting engine with the electric starter. 6. At this manual. • For extremely heavy snow, reduce the width of snow removal by overlapping previous path and moving slowly. • Keep engine clean and clear of...
... a three-hole grounded 120 Volt A.C. COLD START - Disconnect the power cord from the receptacle first, then from starting engine with the electric starter. 6. At this manual. • For extremely heavy snow, reduce the width of snow removal by overlapping previous path and moving slowly. • Keep engine clean and clear of...

Owners Manual
Page 14
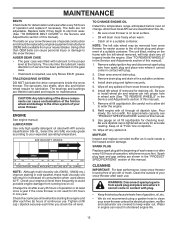
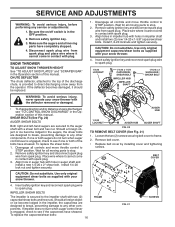
...14 At least once a season, check to see if you should make any maintenance. • Keep tires free of the adjustments described in this manual. Check engine oil level. 2. Check controls to operator abuse or negligence. A new spark plug will need to be made periodically to malfunction and ...pose a risk of this manual. • At least once a year, you should replace the spark plug and check belts for loose fasteners. 3. TIRES • Maintain proper air...
...14 At least once a season, check to see if you should make any maintenance. • Keep tires free of the adjustments described in this manual. Check engine oil level. 2. Check controls to operator abuse or negligence. A new spark plug will need to be made periodically to malfunction and ...pose a risk of this manual. • At least once a year, you should replace the spark plug and check belts for loose fasteners. 3. TIRES • Maintain proper air...
Owners Manual
Page 15
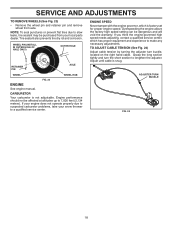
...dirt or trash. AUGER GEAR CASE • The gear case was filled with oil through oil dipstick tube. ENGINE See engine manual. Check your expected operating temperature. TO CHANGE ENGINE OIL Determine temperature range anticipated before starting in cold weather, these multi-viscosity oils... placement of a suitable container. MUFFLER Inspect and replace corroded muffler as it cannot come in the "PRODUCT SPECIFICATIONS" section of this manual). 7. The only time the lubricant needs attention is if service has been performed on the frame with plug. • Keep finished...
...dirt or trash. AUGER GEAR CASE • The gear case was filled with oil through oil dipstick tube. ENGINE See engine manual. Check your expected operating temperature. TO CHANGE ENGINE OIL Determine temperature range anticipated before starting in cold weather, these multi-viscosity oils... placement of a suitable container. MUFFLER Inspect and replace corroded muffler as it cannot come in the "PRODUCT SPECIFICATIONS" section of this manual). 7. The only time the lubricant needs attention is if service has been performed on the frame with plug. • Keep finished...
Owners Manual
Page 16
...augers are designed to break, preventing damage to any service or adjustments: 1. Disengage all moving parts to see if one or both of this manual. BELT COVER 4. Should a foreign object or ice become lodged in contact with a shear bolt and hex nut. Make sure the augers ... discharging snow away from spark plug and place wire where it should be replaced. 1. CHUTE DEFLECTOR The chute deflector, attached to the top of this manual. Align holes in auger shaft and install a new 1/4-20 x 2" shear bolt. Loosen the two (2) screws securing belt cover to spark plug. 1/4-20 ...
...augers are designed to break, preventing damage to any service or adjustments: 1. Disengage all moving parts to see if one or both of this manual. BELT COVER 4. Should a foreign object or ice become lodged in contact with a shear bolt and hex nut. Make sure the augers ... discharging snow away from spark plug and place wire where it should be replaced. 1. CHUTE DEFLECTOR The chute deflector, attached to the top of this manual. Align holes in auger shaft and install a new 1/4-20 x 2" shear bolt. Loosen the two (2) screws securing belt cover to spark plug. 1/4-20 ...
Owners Manual
Page 17
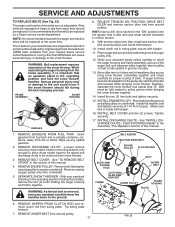
...belts are damaged or begin to the ground. NOTE: It is inside belt keeper. 16. WARNING: Belt replacement requires separation of this manual. 1. FRAME ASSEMBLY AUGER HOUSING HANDLES 8. RELIEVE TENSION ON TRACTION DRIVE BELT IDLER and remove traction drive belt from wear, they should... pulley groove and slide pulley on the auger belt and squeeze sides together above pulley so belt is recommended that an assistant stand in this manual. 4. Install flat washer, bolt and tighten securely (41-47 N-m torque). Tighten securely. 17. INSTALL DISCHARGE CHUTE - REMOVE GASOLINE FROM...
...belts are damaged or begin to the ground. NOTE: It is inside belt keeper. 16. WARNING: Belt replacement requires separation of this manual. 1. FRAME ASSEMBLY AUGER HOUSING HANDLES 8. RELIEVE TENSION ON TRACTION DRIVE BELT IDLER and remove traction drive belt from wear, they should... pulley groove and slide pulley on the auger belt and squeeze sides together above pulley so belt is recommended that an assistant stand in this manual. 4. Install flat washer, bolt and tighten securely (41-47 N-m torque). Tighten securely. 17. INSTALL DISCHARGE CHUTE - REMOVE GASOLINE FROM...
Owners Manual
Page 18
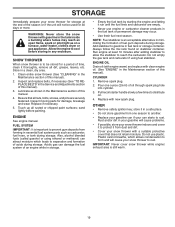
... a qualified service center. WHEEL PIN (INSTALL IN OUTER HOLE OF AXLE ONLY) OUTER HOLE RETAINER PIN AXLE WHEEL WHEEL HUB FIG. 23 ENGINE See engine manual. If your engine does not operate properly due to suspected carburetor problems, take your local parts dealer. If you think the engine-governed high speed...
... a qualified service center. WHEEL PIN (INSTALL IN OUTER HOLE OF AXLE ONLY) OUTER HOLE RETAINER PIN AXLE WHEEL WHEEL HUB FIG. 23 ENGINE See engine manual. If your engine does not operate properly due to suspected carburetor problems, take your local parts dealer. If you think the engine-governed high speed...
Owners Manual
Page 19
... adding stabilizer to allow the stabilizer to gasoline in any enclosure. FUEL SYSTEM IMPORTANT: It is to be used for a period of this manual). 2. Remove spark plug. 2. Replace with gasoline in minimizing the formation of acids during storage. OTHER • Remove safety ignition key; Plastic...container. Clean entire snow thrower (See "CLEANING" in the Maintenance section of time, clean it from one ounce (29 ml) of this manual. 4. Also, alcohol blended fuels (called gasohol or using fuel stabilizer. WARNING: Never store the snow thrower with new spark plug. Allow the...
... adding stabilizer to allow the stabilizer to gasoline in any enclosure. FUEL SYSTEM IMPORTANT: It is to be used for a period of this manual). 2. Remove spark plug. 2. Replace with gasoline in minimizing the formation of acids during storage. OTHER • Remove safety ignition key; Plastic...container. Clean entire snow thrower (See "CLEANING" in the Maintenance section of time, clean it from one ounce (29 ml) of this manual. 4. Also, alcohol blended fuels (called gasohol or using fuel stabilizer. WARNING: Never store the snow thrower with new spark plug. Allow the...
Owners Manual
Page 20
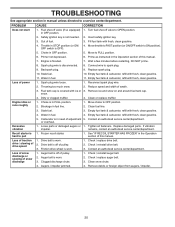
.... Choke is off valve (if so equipped) 1. Frozen recoil starter. Check / replace auger belt. 3. Fuel shut-off of this manual. 7. Insert safety ignition key. 3. Throttle in the Operation section of pulley. 2. Loose parts or damaged augers or 1. If vibration ...fresh, clean gasoline. 5. Auger belt is not inserted. 2. Clean snow chute. 4. TROUBLESHOOTING See appropriate section in manual unless directed to pull 1. Loss of this manual. Water in fuel line. 1. hard to a service center/department. Remove debris or foreign object from augers / impeller...
.... Choke is off valve (if so equipped) 1. Frozen recoil starter. Check / replace auger belt. 3. Fuel shut-off of this manual. 7. Insert safety ignition key. 3. Throttle in the Operation section of pulley. 2. Loose parts or damaged augers or 1. If vibration ...fresh, clean gasoline. 5. Auger belt is not inserted. 2. Clean snow chute. 4. TROUBLESHOOTING See appropriate section in manual unless directed to pull 1. Loss of this manual. Water in fuel line. 1. hard to a service center/department. Remove debris or foreign object from augers / impeller...

Parts List
Page 19
Failure to do so could be hazardous, damage your snow thrower and void your warranty. 19 MODEL NO. 924HV (96193007005), PRODUCT NO. 961 93 00-70 1 4 9 6 7 1 3 KEY PART NO. inches. 1 inch = 25.4 mm IMPORTANT: Use only Original Equipment Manufacturer (O.E.M.) replacement parts. NO. 1 532 ... - 115 61 15-31 DESCRIPTION DECAL, DANGER DECAL, DANGER, DEFLECTOR DECAL, DANGER DECAL, INSTRUCTION DECAL, CONSOLE, LT DEFLECTOR GRAY DECAL, CONSOLE, RT SPD GRAY OPERATOR'S MANUAL, ENGLISH OPERATOR'S MANUAL, FRENCH NOTE: All component dimensions given in U.S. REPAIR PARTS DECALS SNOW THROWER -
Failure to do so could be hazardous, damage your snow thrower and void your warranty. 19 MODEL NO. 924HV (96193007005), PRODUCT NO. 961 93 00-70 1 4 9 6 7 1 3 KEY PART NO. inches. 1 inch = 25.4 mm IMPORTANT: Use only Original Equipment Manufacturer (O.E.M.) replacement parts. NO. 1 532 ... - 115 61 15-31 DESCRIPTION DECAL, DANGER DECAL, DANGER, DEFLECTOR DECAL, DANGER DECAL, INSTRUCTION DECAL, CONSOLE, LT DEFLECTOR GRAY DECAL, CONSOLE, RT SPD GRAY OPERATOR'S MANUAL, ENGLISH OPERATOR'S MANUAL, FRENCH NOTE: All component dimensions given in U.S. REPAIR PARTS DECALS SNOW THROWER -
Parts List
Page 21
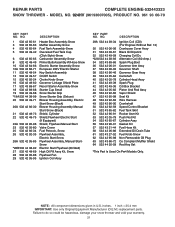
...Blower Housing Assembly, Electric Start-Snow (Black) Blower Housing Assembly Manual Start-Snow (Black) Shield, Cylinder Shield,Flywheel-Electric Start (If Equipped) Shield, Flywheel-Manual Start Valve Cover Fuel Petcock, Snow Flywheel Assembly, Electric Start-Snow Flywheel Assembly, Manual StartSnow Electric Start Flywheel (60-Watt) High Oil Fill Assy... replacement parts. Failure to do so could be hazardous, damage your snow thrower and void your warranty. 21 MODEL NO. 924HV (96193007005), PRODUCT NO. 961 93 00-70 KEY PART NO. REPAIR PARTS COMPLETE ENGINE-532443323 SNOW THROWER -
...Blower Housing Assembly, Electric Start-Snow (Black) Blower Housing Assembly Manual Start-Snow (Black) Shield, Cylinder Shield,Flywheel-Electric Start (If Equipped) Shield, Flywheel-Manual Start Valve Cover Fuel Petcock, Snow Flywheel Assembly, Electric Start-Snow Flywheel Assembly, Manual StartSnow Electric Start Flywheel (60-Watt) High Oil Fill Assy... replacement parts. Failure to do so could be hazardous, damage your snow thrower and void your warranty. 21 MODEL NO. 924HV (96193007005), PRODUCT NO. 961 93 00-70 KEY PART NO. REPAIR PARTS COMPLETE ENGINE-532443323 SNOW THROWER -


