Owners Manual
Page 4
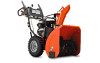
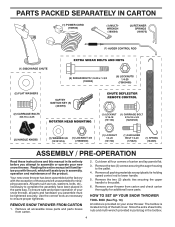
... carton thoroughly for shipping purposes. Store the extra shear bolts, nuts and multi-wrench provided in parts bag in assembly, operation and maintenance of the belt cover. All parts such as necessary to the pallet. 6. REMOVE SNOW THROWER FROM CARTON 1. Remove snow thrower from carton. 2. PARTS PACKED SEPARATELY IN CARTON (1) POWER...
... carton thoroughly for shipping purposes. Store the extra shear bolts, nuts and multi-wrench provided in parts bag in assembly, operation and maintenance of the belt cover. All parts such as necessary to the pallet. 6. REMOVE SNOW THROWER FROM CARTON 1. Remove snow thrower from carton. 2. PARTS PACKED SEPARATELY IN CARTON (1) POWER...

Owners Manual
Page 14
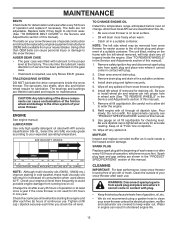
... negligence. BEFORE EACH USE 1. MAINTENANCE GENERAL RECOMMENDATIONS The warranty on this manual. • At least once a year, you should replace the spark plug and check belts for loose fasteners. 3.
... negligence. BEFORE EACH USE 1. MAINTENANCE GENERAL RECOMMENDATIONS The warranty on this manual. • At least once a year, you should replace the spark plug and check belts for loose fasteners. 3.
Owners Manual
Page 15
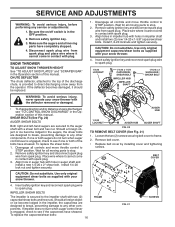
...and Adjustments section of special construction and should be removed from wear. (See "TO REMOVE BELT COVER" in contact with plug. 2. MAINTENANCE BELTS Check belts for checking level. The belts on your snow thrower unless the electrical system, muffler and carburetor are shown in the Service... five (5) hours of operation and replace if necessary. Install left side wheel may be replaced by original equipment manufacturer (OEM) belts available from running low on oil fill cap/dipstick for deterioration and wear after every 100 hours of this manual). For approximate ...
...and Adjustments section of special construction and should be removed from wear. (See "TO REMOVE BELT COVER" in contact with plug. 2. MAINTENANCE BELTS Check belts for checking level. The belts on your snow thrower unless the electrical system, muffler and carburetor are shown in the Service... five (5) hours of operation and replace if necessary. Install left side wheel may be replaced by original equipment manufacturer (OEM) belts available from running low on oil fill cap/dipstick for deterioration and wear after every 100 hours of this manual). For approximate ...
Owners Manual
Page 16
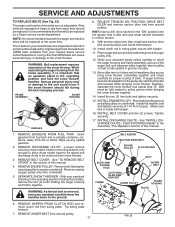
...contact with two (2) capscrew/shear bolts and hex nuts. To replace the shear bolts: 1. CAUTION: Do not substitute. Remove belt cover. • Replace belt cover by installing cover and tightening screws. Insert safety ignition key and reconnect spark plug wire to STOP position. To replace the...Use only original equipment capscrew/shear bolts as supplied with your snow thrower with spark plug. 3. Install 1/4-20 lock nut and tighten securely. BELT COVER 4. Insert safety ignition key and reconnect spark plug wire to see if one or both of this manual. Should a foreign object ...
...contact with two (2) capscrew/shear bolts and hex nuts. To replace the shear bolts: 1. CAUTION: Do not substitute. Remove belt cover. • Replace belt cover by installing cover and tightening screws. Insert safety ignition key and reconnect spark plug wire to STOP position. To replace the...Use only original equipment capscrew/shear bolts as supplied with your snow thrower with spark plug. 3. Install 1/4-20 lock nut and tighten securely. BELT COVER 4. Insert safety ignition key and reconnect spark plug wire to see if one or both of this manual. Should a foreign object ...
Owners Manual
Page 17
...the operating position holding the handles, remove the two (2) bolts holding the auger housing and frame together. INSTALL ENGINE PULLEY - Make sure belt is recommended that an assistant stand in the "ON" position) into a suitable container, outdoors, away from swing plate. Drain gasoline ...snow thrower together. 14. With your assistant carefully lower the handles down to the ground. With tension relieved on crankshaft. Place auger belt around pulley. 17 FIG. 22 Install flat washer, bolt and tighten securely (41-47 N-m torque). Loosen locknut securing chute rotator ...
...the operating position holding the handles, remove the two (2) bolts holding the auger housing and frame together. INSTALL ENGINE PULLEY - Make sure belt is recommended that an assistant stand in the "ON" position) into a suitable container, outdoors, away from swing plate. Drain gasoline ...snow thrower together. 14. With your assistant carefully lower the handles down to the ground. With tension relieved on crankshaft. Place auger belt around pulley. 17 FIG. 22 Install flat washer, bolt and tighten securely (41-47 N-m torque). Loosen locknut securing chute rotator ...
Owners Manual
Page 19
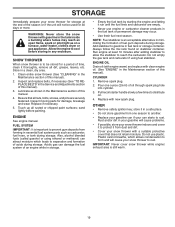
... Service and Adjustments section of acids during storage. Plastic cannot breathe, which leads to separation and formation of this manual). Inspect and replace belts, if necessary (See "TO REPLACE BELTS" in the Maintenance section of fuel gum deposits during storage. Inspect moving parts for 30 days or more. Acidic gas can damage...
... Service and Adjustments section of acids during storage. Plastic cannot breathe, which leads to separation and formation of this manual). Inspect and replace belts, if necessary (See "TO REPLACE BELTS" in the Maintenance section of fuel gum deposits during storage. Inspect moving parts for 30 days or more. Acidic gas can damage...
Owners Manual
Page 20
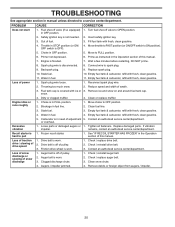
... 4. Clean or replace muffler. Move choke to pull 1. Recoil starter is OFF). 5. hard to OFF position. 2. Check / replace auger belt. 3. Fuel shut-off valve to OPEN position. OFF switch is 1. Move to spark plug. 9. Empty fuel tank & carburetor, refill with.... 1. Dirty or clogged muffler. 4. Clean fuel line. 3. Contact an authorized service center/department. Frozen recoil starter. Check / reinstall auger belt. 2. Connect wire to FULL position. 6. Stale fuel. 3. Water in FULL position. 2. Empty fuel tank & carburetor, refill with fresh,...
... 4. Clean or replace muffler. Move choke to pull 1. Recoil starter is OFF). 5. hard to OFF position. 2. Check / replace auger belt. 3. Fuel shut-off valve to OPEN position. OFF switch is 1. Move to spark plug. 9. Empty fuel tank & carburetor, refill with.... 1. Dirty or clogged muffler. 4. Clean fuel line. 3. Contact an authorized service center/department. Frozen recoil starter. Check / reinstall auger belt. 2. Connect wire to FULL position. 6. Stale fuel. 3. Water in FULL position. 2. Empty fuel tank & carburetor, refill with fresh,...
Parts List
Page 16
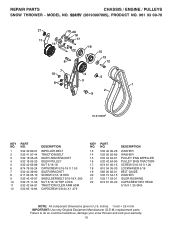
.... REPAIR PARTS CHASSIS / ENGINE / PULLEYS SNOW THROWER - Failure to do so could be hazardous, damage your snow thrower and void your warranty. 16 MODEL NO. 924HV (96193007005), PRODUCT NO. 961 93 00-70 21 19 20 18 11 17 14 20 18 22 16 15 13 6 12 7 10 4 5 3 8 1 2 9 01.21.003... 42 39-90 817 00 05-10 532 42 42-97 532 75 11-53 532 42 64-91 532 85 10-84 DESCRIPTION IMPELLER BELT TRACTION BELT IDLER ARM BRACKET IDLER PULLEY NUT 5/16-18 CAPSCREW 5/16-18 X 1.50 IDLER BRACKET SCREW 5/16-18 HEX SHOULDER BOLT 5/16-18 X .500 NUT...
.... REPAIR PARTS CHASSIS / ENGINE / PULLEYS SNOW THROWER - Failure to do so could be hazardous, damage your snow thrower and void your warranty. 16 MODEL NO. 924HV (96193007005), PRODUCT NO. 961 93 00-70 21 19 20 18 11 17 14 20 18 22 16 15 13 6 12 7 10 4 5 3 8 1 2 9 01.21.003... 42 39-90 817 00 05-10 532 42 42-97 532 75 11-53 532 42 64-91 532 85 10-84 DESCRIPTION IMPELLER BELT TRACTION BELT IDLER ARM BRACKET IDLER PULLEY NUT 5/16-18 CAPSCREW 5/16-18 X 1.50 IDLER BRACKET SCREW 5/16-18 HEX SHOULDER BOLT 5/16-18 X .500 NUT...


