Owners Manual
Page 3
...result in permanent hearing impairment. WARNING! Under no circumstances may not cover damage or liability caused by the use of nonauthorized accessories or replacement parts. A blower is what on the Emissions Compliance label indicates the numbers of operating hours for blowing lawns, ...;cations and/or accessories can cause serious, even fatal injuries. WARNING! Your warranty may ! The machine is extremely important that the product has been approved in accordance with American exhaust emissions requirements EPA Ph III and CARB Tier III. Husqvarna AB has a ...
...result in permanent hearing impairment. WARNING! Under no circumstances may not cover damage or liability caused by the use of nonauthorized accessories or replacement parts. A blower is what on the Emissions Compliance label indicates the numbers of operating hours for blowing lawns, ...;cations and/or accessories can cause serious, even fatal injuries. WARNING! Your warranty may ! The machine is extremely important that the product has been approved in accordance with American exhaust emissions requirements EPA Ph III and CARB Tier III. Husqvarna AB has a ...
Owners Manual
Page 5
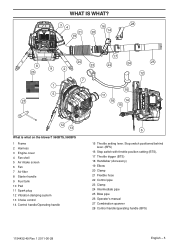
... 20 14 19 8 26 27 9 2 1 5 20 23 17 22 24 7 10 11 18 14 15 25 12 12 13 What is what on the blower? 560BTS, 560BFS 1 Frame 2 Harness 3 Engine cover 4 Fan shell 5 Air intake screen 6 Fan 7 Air filter 8 Starter handle 9 Fuel tank 10 Pad 11 Spark plug 12 ... handle 6 15 Throttle setting lever. Stop switch positioned behind lever. (BFS) 16 Stop switch with throttle position setting (BTS), 17 Throttle trigger (BTS) 18 Handlebar (Accessory) 19 Elbow 20 Clamp 21 Flexible hose 22 Control pipe 23 Clamp 24 Intermediate pipe 25 Blow pipe 26 Operator's manual 27 Combination spanner 28...
... 20 14 19 8 26 27 9 2 1 5 20 23 17 22 24 7 10 11 18 14 15 25 12 12 13 What is what on the blower? 560BTS, 560BFS 1 Frame 2 Harness 3 Engine cover 4 Fan shell 5 Air intake screen 6 Fan 7 Air filter 8 Starter handle 9 Fuel tank 10 Pad 11 Spark plug 12 ... handle 6 15 Throttle setting lever. Stop switch positioned behind lever. (BFS) 16 Stop switch with throttle position setting (BTS), 17 Throttle trigger (BTS) 18 Handlebar (Accessory) 19 Elbow 20 Clamp 21 Flexible hose 22 Control pipe 23 Clamp 24 Intermediate pipe 25 Blow pipe 26 Operator's manual 27 Combination spanner 28...
Owners Manual
Page 6
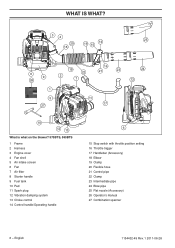
... plug 12 Vibration damping system 13 Choke control 14 Control handle/Operating handle 6 15 Stop switch with throttle position setting 16 Throttle trigger 17 Handlebar (Accessory) 18 Elbow 19 Clamp 20 Flexible hose 21 Control pipe 22 Clamp 23 Intermediate pipe 24 Blow pipe 25 Flat nozzle...
... plug 12 Vibration damping system 13 Choke control 14 Control handle/Operating handle 6 15 Stop switch with throttle position setting 16 Throttle trigger 17 Handlebar (Accessory) 18 Elbow 19 Clamp 20 Flexible hose 21 Control pipe 22 Clamp 23 Intermediate pipe 24 Blow pipe 25 Flat nozzle...

Owners Manual
Page 7
... plug 12 Vibration damping system 13 Choke control 14 Control handle/Operating handle 6 15 Stop switch with throttle position setting 16 Throttle trigger 17 Handlebar (Accessory) 18 Elbow 19 Clamp 20 Flexible hose 21 Control pipe 22 Clamp 23 Intermediate pipe 24 Blow pipe 25 Flat nozzle...
... plug 12 Vibration damping system 13 Choke control 14 Control handle/Operating handle 6 15 Stop switch with throttle position setting 16 Throttle trigger 17 Handlebar (Accessory) 18 Elbow 19 Clamp 20 Flexible hose 21 Control pipe 22 Clamp 23 Intermediate pipe 24 Blow pipe 25 Flat nozzle...
Owners Manual
Page 13
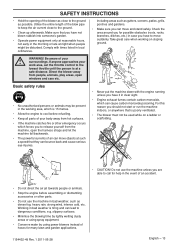
... keep the air current close to the lowest throttle until the person is 15 metres. • Allow the engine to cool before assembling or dismantling accessories or other parts. • Do not use the machine unless you for possible obstacles (roots, rocks, branches, ditches, etc.) in clear sight. • Engine exhaust...
... keep the air current close to the lowest throttle until the person is 15 metres. • Allow the engine to cool before assembling or dismantling accessories or other parts. • Do not use the machine unless you for possible obstacles (roots, rocks, branches, ditches, etc.) in clear sight. • Engine exhaust...

Owners Manual
Page 15
... sure to the holder pipe. Clamp both ends of the control pipe. Disassemble the knob from the holder and puch the holder on the holder. Accessories Handlebar Disassemble the intermediate pipe. ASSEMBLY Assembling the blow pipe and control handle • Connect the blower and control pipe with the convex of the...
... sure to the holder pipe. Clamp both ends of the control pipe. Disassemble the knob from the holder and puch the holder on the holder. Accessories Handlebar Disassemble the intermediate pipe. ASSEMBLY Assembling the blow pipe and control handle • Connect the blower and control pipe with the convex of the...
Owners Manual
Page 23
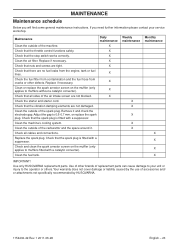
... fitted with a catalytic converter). Replace if necessary. Clean the outside of accessories and/ or attachments not specifically recommended by HUSQVARNA. 1154432-49 Rev. 1 2011-06-28 English - 23 Check that the throttle control functions safely. Use only HUSQVARNA replacement parts. X Check that all cables and connections. X Check that nuts and...
... fitted with a catalytic converter). Replace if necessary. Clean the outside of accessories and/ or attachments not specifically recommended by HUSQVARNA. 1154432-49 Rev. 1 2011-06-28 English - 23 Check that the throttle control functions safely. Use only HUSQVARNA replacement parts. X Check that all cables and connections. X Check that nuts and...
