Owners Manual
Page 7
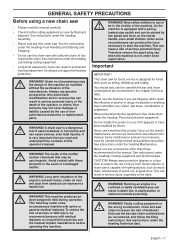
... modifications and/or accessories can produce the force necessary to use of a damaged muffler. Your warranty may ! authorized accessories or replacement parts. It is not under the headings Cutting equipment and Technical data. The inside of serious personal injury. contain chemicals that you are fatigued, while under...
... modifications and/or accessories can produce the force necessary to use of a damaged muffler. Your warranty may ! authorized accessories or replacement parts. It is not under the headings Cutting equipment and Technical data. The inside of serious personal injury. contain chemicals that you are fatigued, while under...
Owners Manual
Page 8
... maintenance see whether you can provide information about operating procedures after reading these instructions, you to use your dealer regularly to find where these parts are explained. Work is constantly in progress to a servicing dealer for help you should need further information please contact your nearest servicing dealer. You must...
... maintenance see whether you can provide information about operating procedures after reading these instructions, you to use your dealer regularly to find where these parts are explained. Work is constantly in progress to a servicing dealer for help you should need further information please contact your nearest servicing dealer. You must...
Owners Manual
Page 13
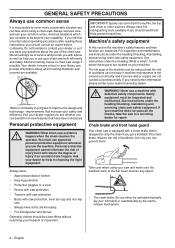
... heading Technical data for the chain fitted to force the bar through the wood and produces long, thick chips or shavings. • The cutting part of the chain is called the cutter and consists of the cutting teeth is determined by the difference in height between the two (depth gauge...
... heading Technical data for the chain fitted to force the bar through the wood and produces long, thick chips or shavings. • The cutting part of the chain is called the cutter and consists of the cutting teeth is determined by the difference in height between the two (depth gauge...
Owners Manual
Page 19
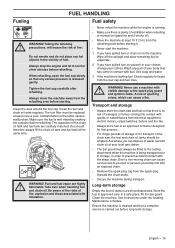
... care when handling fuel and chain oil. Wipe off the spillage and allow remaining fuel to the spark plug guard and ignition cable. Wash any part of fire: Do not smoke and do not place any excess pressure is carried out before refuelling. visible damage to evaporate. 2 If you can...
... care when handling fuel and chain oil. Wipe off the spillage and allow remaining fuel to the spark plug guard and ignition cable. Wash any part of fire: Do not smoke and do not place any excess pressure is carried out before refuelling. visible damage to evaporate. 2 If you can...
Owners Manual
Page 22
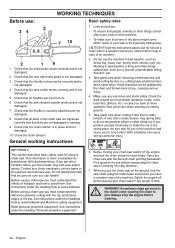
... instructions under the headings How to jam. If you are not damaged or missing. 9 Check that you position yourself incorrectly or make sure that all parts of the chain saw for professional skills and experience. Do not attempt any length of the machine.
... instructions under the headings How to jam. If you are not damaged or missing. 9 Check that you position yourself incorrectly or make sure that all parts of the chain saw for professional skills and experience. Do not attempt any length of the machine.
Owners Manual
Page 33
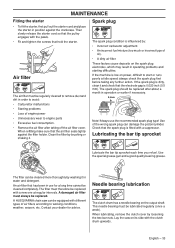
...When refitting make sure that hold the starter. Lubricating the bar tip sprocket Lubricate the bar tip sprocket each time you refuel. A HUSQVARNA chain saw on the output shaft. English - 33 These factors cause deposits on power, difficult to remove dust and dirt in &#...bar nuts. Use the special grease gun and a good quality bearing grease. An air filter that the spark plug is in order to engine parts • Excessive fuel consumption. • Remove the air filter after about a month in position against the filter holder. Note! ...
...When refitting make sure that hold the starter. Lubricating the bar tip sprocket Lubricate the bar tip sprocket each time you refuel. A HUSQVARNA chain saw on the output shaft. English - 33 These factors cause deposits on power, difficult to remove dust and dirt in &#...bar nuts. Use the special grease gun and a good quality bearing grease. An air filter that the spark plug is in order to engine parts • Excessive fuel consumption. • Remove the air filter after about a month in position against the filter holder. Note! ...
Owners Manual
Page 34
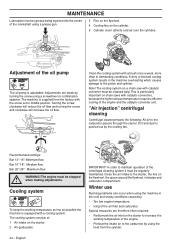
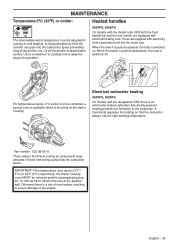
... measures are made by : • Too low engine temperature. • Icing of the engine and the catalytic converter unit. Adjustments are therefore often required: • Partly mask the air inlet on a chain saw with the screw set to the piston and cylinder. A dirty or blocked cooling system results in the cold...
... measures are made by : • Too low engine temperature. • Icing of the engine and the catalytic converter unit. Adjustments are therefore often required: • Partly mask the air inlet on a chain saw with the screw set to the piston and cylinder. A dirty or blocked cooling system results in the cold...
Owners Manual
Page 35
... off the air filter to the engine. For temperatures below -5°C and/or in snow conditions a special cover is available, which is mounted on . Part number: 522 98 65-01. Heated handles 560XPG, 562XPG On models with the model code XPG both the front handle bar and the rear handle...
... off the air filter to the engine. For temperatures below -5°C and/or in snow conditions a special cover is available, which is mounted on . Part number: 522 98 65-01. Heated handles 560XPG, 562XPG On models with the model code XPG both the front handle bar and the rear handle...
Owners Manual
Page 40
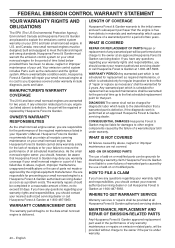
..., you . DIAGNOSIS The owner shall not be repaired or replaced by Husqvarna Forest & Garden. Your emission control system includes Parts such as a problem exists. If any warranted part will be charged for diagnostic labor which is performed at 1-800-487-5963...should contact your nearest authorized servicing dealer or call Husqvarna Forest & Garden at an approved Husqvarna Forest & Garden servicing dealer. MAINTENANCE, REPLACEMENT AND REPAIR OF EMISSION-RELATED PARTS Any Husqvarna Forest & Garden approved replacement part used in the performance of any questions regarding your...
..., you . DIAGNOSIS The owner shall not be repaired or replaced by Husqvarna Forest & Garden. Your emission control system includes Parts such as a problem exists. If any warranted part will be charged for diagnostic labor which is performed at 1-800-487-5963...should contact your nearest authorized servicing dealer or call Husqvarna Forest & Garden at an approved Husqvarna Forest & Garden servicing dealer. MAINTENANCE, REPLACEMENT AND REPAIR OF EMISSION-RELATED PARTS Any Husqvarna Forest & Garden approved replacement part used in the performance of any questions regarding your...

Owners Manual
Page 41
FEDERAL EMISSION CONTROL WARRANTY STATEMENT EMISSION CONTROL WARRANTY PARTS LIST 1 Carburetor and internal parts 2 Intake pipe, airfilter holder and carburetor bolts. 3 Airfilter and fuelfilter covered up to maintenance schedule. 4 Spark Plug, covered up to maintenance schedule 5 Ignition Module 6 Muffler with catalytic converter MAINTENANCE STATEMENT The owner is responsible for the performance of all required maintenance, as defined in the operator's manual. English - 41
FEDERAL EMISSION CONTROL WARRANTY STATEMENT EMISSION CONTROL WARRANTY PARTS LIST 1 Carburetor and internal parts 2 Intake pipe, airfilter holder and carburetor bolts. 3 Airfilter and fuelfilter covered up to maintenance schedule. 4 Spark Plug, covered up to maintenance schedule 5 Ignition Module 6 Muffler with catalytic converter MAINTENANCE STATEMENT The owner is responsible for the performance of all required maintenance, as defined in the operator's manual. English - 41
Owners Manual
Page 42
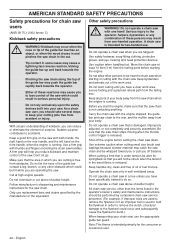
... free from one hand! Cut at least 10 feet (3 m) from the falling tree. Serious injury to keep your saw which you are fatigued. Keep all parts of these reactions may push the guide bar rapidly back towards the operator. Keep handles dry, clean and free of the guide bar touches an...
... free from one hand! Cut at least 10 feet (3 m) from the falling tree. Serious injury to keep your saw which you are fatigued. Keep all parts of these reactions may push the guide bar rapidly back towards the operator. Keep handles dry, clean and free of the guide bar touches an...

Workshop Manual
Page 7
As these modifications affect service and/or spare parts, specific service information will become out of safety can be maintained when using the chain saw . Usage is missing so that the greatest level of ... the stores. 6. In order to be read and understood by all those carrying out repair work is written for use Husqvarna's original: • Spare parts • Service tools • Accessories 2.6 Structure This Workshop Manual can be sent out on the chain saw . Look up the "Repair instructions" chapter which deals ...
As these modifications affect service and/or spare parts, specific service information will become out of safety can be maintained when using the chain saw . Usage is missing so that the greatest level of ... the stores. 6. In order to be read and understood by all those carrying out repair work is written for use Husqvarna's original: • Spare parts • Service tools • Accessories 2.6 Structure This Workshop Manual can be sent out on the chain saw . Look up the "Repair instructions" chapter which deals ...

Workshop Manual
Page 17
... . Fig 1 2 Unscrew the kickback guard and remove it slides onto the screwdriver, see fig. 1. Carefully tighten the clutch housing in a small screwdriver into the spring. Parts Fig 4 must not be replaced if cracked or show signs of the chain brake band. Always use original spare... parts. • Measure the thickness of other defects. Release the brake by moving the front hand guard backward. Release the brake by using the saw's hand ...
... . Fig 1 2 Unscrew the kickback guard and remove it slides onto the screwdriver, see fig. 1. Carefully tighten the clutch housing in a small screwdriver into the spring. Parts Fig 4 must not be replaced if cracked or show signs of the chain brake band. Always use original spare... parts. • Measure the thickness of other defects. Release the brake by moving the front hand guard backward. Release the brake by using the saw's hand ...
Workshop Manual
Page 19
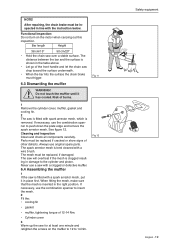
... damaged. Do not touch the muffler until it in place first. When fitting the mesh, make sure that the mesh is fitted with a wire brush. Parts must be inspected in the right position. The saw is fitted with spark arrestor mesh, which is best cleaned with a spark arrestor mesh, put it.... The distance between the bar and the surface is clogged resulting in the table above. • Let go of burns. If necessary, use original spare parts. Functional inspection: Do not turn on the muffler to 12 to 14 Nm. NOTE!
... damaged. Do not touch the muffler until it in place first. When fitting the mesh, make sure that the mesh is fitted with a wire brush. Parts must be inspected in the right position. The saw is fitted with spark arrestor mesh, which is best cleaned with a spark arrestor mesh, put it.... The distance between the bar and the surface is clogged resulting in the table above. • Let go of burns. If necessary, use original spare parts. Functional inspection: Do not turn on the muffler to 12 to 14 Nm. NOTE!
Workshop Manual
Page 20
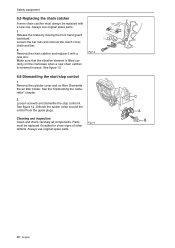
... and check carefully all components. Dismantle the air filter holder. Always use original spare parts. 1 Release the brake by moving the front hand guard backward. See figure 14. English Always use original spare parts. Safety equipment 6.5 Replacing the chain catcher A worn chain catcher must be replaced with...Fig 14 20 - Make sure that the vibration element is fitted correctly on the crankcase when a new chain catcher is screwed in place. Parts must always be replaced if cracked or show signs of other defects. Loosen the bar nuts and remove the clutch cover, chain and bar....
... and check carefully all components. Dismantle the air filter holder. Always use original spare parts. 1 Release the brake by moving the front hand guard backward. See figure 14. English Always use original spare parts. Safety equipment 6.5 Replacing the chain catcher A worn chain catcher must be replaced with...Fig 14 20 - Make sure that the vibration element is fitted correctly on the crankcase when a new chain catcher is screwed in place. Parts must always be replaced if cracked or show signs of other defects. Loosen the bar nuts and remove the clutch cover, chain and bar....
Workshop Manual
Page 22
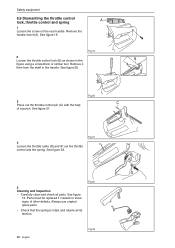
... 23 Fig 20 4 Loosen the throttle cable (D) and lift out the throttle control and the spring. Always use original spare parts. • Check that the spring is intact and retains all parts. Remove it then from the shaft in the figure using a screwdriver or similar tool. See figure 22. Fig 22 22... - Parts must be replaced if cracked or show signs of a punch. Safety equipment 6.9 Dismantling the throttle control lock, throttle control and spring A 1 Loosen the screw on ...
... 23 Fig 20 4 Loosen the throttle cable (D) and lift out the throttle control and the spring. Always use original spare parts. • Check that the spring is intact and retains all parts. Remove it then from the shaft in the figure using a screwdriver or similar tool. See figure 22. Fig 22 22... - Parts must be replaced if cracked or show signs of a punch. Safety equipment 6.9 Dismantling the throttle control lock, throttle control and spring A 1 Loosen the screw on ...
Workshop Manual
Page 25
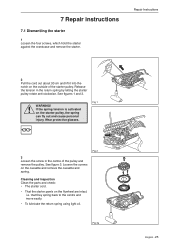
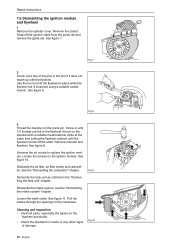
... the notch on the flywheel are intact, i.e. Release the tension in the centre of the starter pulley. See figures 1 and 2. Cleaning and inspection Clean the parts and check: • The starter cord. • That the starter pawls on the outside of the pulley and remove the pulley. 7 Repair instructions 7.1 Dismantling the...
... the notch on the flywheel are intact, i.e. Release the tension in the centre of the starter pulley. See figures 1 and 2. Cleaning and inspection Clean the parts and check: • The starter cord. • That the starter pawls on the outside of the pulley and remove the pulley. 7 Repair instructions 7.1 Dismantling the...
Workshop Manual
Page 26
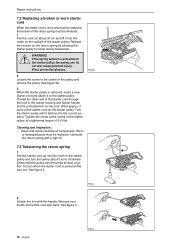
... 3 turns clockwise. Fig 4 2 Stretch the line with a light oil. See figure 5. 26 - Lubricate the return spring with the handle. English Fig 5 WARNING! Worn or damaged parts must be replaced. Check that the pulley can fly out and cause personal injury. If the spring tension is activated on the outside of the...
... 3 turns clockwise. Fig 4 2 Stretch the line with a light oil. See figure 5. 26 - Lubricate the return spring with the handle. English Fig 5 WARNING! Worn or damaged parts must be replaced. Check that the pulley can fly out and cause personal injury. If the spring tension is activated on the outside of the...
Workshop Manual
Page 28
Fig 7 2 Knock out a few of damage. Remove mandrel and flywheel. Unscrew the air nozzle to the flywheel. Cleaning and inspection • Clean all parts, especially the tapers on the mandrel with the flywheel. Snap off the shaft. See figure 8. Loosen the screws on the crank pin. Loosen the earth ...
Fig 7 2 Knock out a few of damage. Remove mandrel and flywheel. Unscrew the air nozzle to the flywheel. Cleaning and inspection • Clean all parts, especially the tapers on the mandrel with the flywheel. Snap off the shaft. See figure 8. Loosen the screws on the crank pin. Loosen the earth ...
Workshop Manual
Page 30
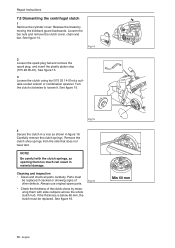
See figure 14. Carefully remove the clutch springs. NOTE! Cleaning and inspection • Clean and check all parts carefully. Always use original spare parts. • Check the thickness of other defects. See figure 16. Fig 14 2 Loosen the spark plug hat and remove the spark plug,... tool 575 25 14-01nd a suitable socket wrench or combination spanner. If the thickness is below 60 mm, the clutch must be replaced. Parts must be replaced if cracked or showing signs of the clutch shoes by moving the kickback guard backwards. Repair Instructions 7.8 Dismantling the centrifugal clutch ...
See figure 14. Carefully remove the clutch springs. NOTE! Cleaning and inspection • Clean and check all parts carefully. Always use original spare parts. • Check the thickness of other defects. See figure 16. Fig 14 2 Loosen the spark plug hat and remove the spark plug,... tool 575 25 14-01nd a suitable socket wrench or combination spanner. If the thickness is below 60 mm, the clutch must be replaced. Parts must be replaced if cracked or showing signs of the clutch shoes by moving the kickback guard backwards. Repair Instructions 7.8 Dismantling the centrifugal clutch ...


