

Owners Manual
Page 1
English Operator's manual 555 560XP 560XPG 562XP 562XPG Please read the operator's manual carefully and make sure you understand the instructions before using the machine.
English Operator's manual 555 560XP 560XPG 562XP 562XPG Please read the operator's manual carefully and make sure you understand the instructions before using the machine.
Owners Manual
Page 2
... English Chain saws can be used to reduce the pressure in this symbol it with a suppressor. Please read the operator's manual carefully and make starting the machine. This should always use the decompression valve when starting easier. Max tooth count for the bar... set the stop switch to special certification requirements for the bar and chain combination on the machine: WARNING! Chain type Husqvarna H42 Other approved bar and chain combinations in the choke position. Measured maximum kickback value with any object. May cause serious personal ...
... English Chain saws can be used to reduce the pressure in this symbol it with a suppressor. Please read the operator's manual carefully and make starting the machine. This should always use the decompression valve when starting easier. Max tooth count for the bar... set the stop switch to special certification requirements for the bar and chain combination on the machine: WARNING! Chain type Husqvarna H42 Other approved bar and chain combinations in the choke position. Measured maximum kickback value with any object. May cause serious personal ...

Owners Manual
Page 3
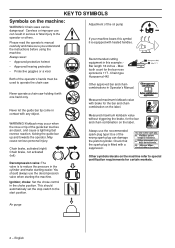
... switch automatically returns to run position. The Emissions Compliance Period referred to on your chain saw is required. KEY TO SYMBOLS Symbols in the operator's manual: Switch off the engine by any checks or maintenance. Filling with oil and adjusting oil flow. WARNING! Kickback may be worn. English - 3 EPA III...
... switch automatically returns to run position. The Emissions Compliance Period referred to on your chain saw is required. KEY TO SYMBOLS Symbols in the operator's manual: Switch off the engine by any checks or maintenance. Filling with oil and adjusting oil flow. WARNING! Kickback may be worn. English - 3 EPA III...
Owners Manual
Page 4
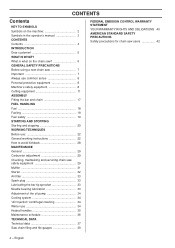
... RIGHTS AND OBLIGATIONS 40 AMERICAN STANDARD SAFETY PRECAUTIONS Safety precautions for chain saw users 42 4 - What is what on the machine 2 Symbols in the operator's manual 3 CONTENTS Contents 4 INTRODUCTION Dear customer 5 WHAT IS WHAT? English
... RIGHTS AND OBLIGATIONS 40 AMERICAN STANDARD SAFETY PRECAUTIONS Safety precautions for chain saw users 42 4 - What is what on the machine 2 Symbols in the operator's manual 3 CONTENTS Contents 4 INTRODUCTION Dear customer 5 WHAT IS WHAT? English
Owners Manual
Page 5
..., sewing machines, bicycles, motorcycles etc. Thank you ever lend or sell this operator′s manual as for a long time. Your purchase gives you will also know how to buy a Husqvarna product! Husqvarna AB has a policy of our authorized dealers, ask for using , service, maintenance etc) ...with quality as our highest priority. Think of products without prior notice. For customer assistance, contact us at our website: www.usa.husqvarna.com English - 5 INTRODUCTION Dear customer! The location was logical, since water power was harnessed from wood stoves to modify the ...
..., sewing machines, bicycles, motorcycles etc. Thank you ever lend or sell this operator′s manual as for a long time. Your purchase gives you will also know how to buy a Husqvarna product! Husqvarna AB has a policy of our authorized dealers, ask for using , service, maintenance etc) ...with quality as our highest priority. Think of products without prior notice. For customer assistance, contact us at our website: www.usa.husqvarna.com English - 5 INTRODUCTION Dear customer! The location was logical, since water power was harnessed from wood stoves to modify the ...
Owners Manual
Page 6
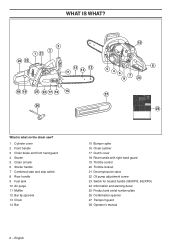
... Switch for heated handle (560XPG, 562XPG) 24 Information and warning decal 25 Product and serial number plate 26 Combination spanner 27 Transport guard 28 Operator's manual 6 - WHAT IS WHAT?
... Switch for heated handle (560XPG, 562XPG) 24 Information and warning decal 25 Product and serial number plate 26 Combination spanner 27 Transport guard 28 Operator's manual 6 - WHAT IS WHAT?
Owners Manual
Page 7
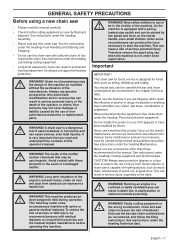
.... WARNING! See the instructions under the heading Lubricating cutting equipment. • Long-term exposure to use the machine if you read this manual carefully. • Check that the cutting equipment is a dangerous ! The inside of wood, etc, at great force. As the machine... headings Fuel Handling and Starting and Stopping. • Do not use approved hearing protection. the design of the machine be in this manual. Never use or ! CAUTION! WARNING! See instructions under the heading Maintenance. WARNING! tool if used carelessly or incorrectly and can result...
.... WARNING! See the instructions under the heading Lubricating cutting equipment. • Long-term exposure to use the machine if you read this manual carefully. • Check that the cutting equipment is a dangerous ! The inside of wood, etc, at great force. As the machine... headings Fuel Handling and Starting and Stopping. • Do not use approved hearing protection. the design of the machine be in this manual. Never use or ! CAUTION! WARNING! See instructions under the heading Maintenance. WARNING! tool if used carelessly or incorrectly and can result...
Owners Manual
Page 8
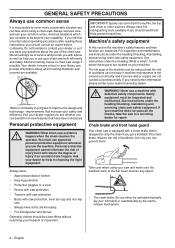
... care when using a chain saw . Always exercise care and use of movement. improvements that increase your freedom of the chain saw . You must be activated manually (by your common sense. Avoid all the checks, take the saw protection, steel toe-cap and non-slip sole • Always have been introduced. Personal...
... care when using a chain saw . Always exercise care and use of movement. improvements that increase your freedom of the chain saw . You must be activated manually (by your common sense. Avoid all the checks, take the saw protection, steel toe-cap and non-slip sole • Always have been introduced. Personal...
Owners Manual
Page 9
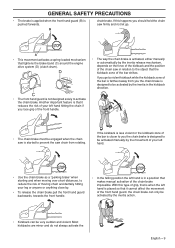
... activated by the inertia in the kickback direction. • The front hand guard is not designed solely to the object that makes manual activation of the bar is started to reduce the risk of moving chain accidentally hitting your left hand hitting the chain if you should...-loaded mechanism that tightens the brake band (C) around the engine drive system (D) (clutch drum). • The way the chain brake is activated, either manually or automatically by . • To release the chain brake pull the front hand guard backwards, towards the front handle. • In the felling position...
... activated by the inertia in the kickback direction. • The front hand guard is not designed solely to the object that makes manual activation of the bar is started to reduce the risk of moving chain accidentally hitting your left hand hitting the chain if you should...-loaded mechanism that tightens the brake band (C) around the engine drive system (D) (clutch drum). • The way the chain brake is activated, either manually or automatically by . • To release the chain brake pull the front hand guard backwards, towards the front handle. • In the felling position...
Owners Manual
Page 29
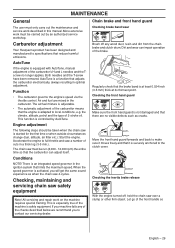
Carburetor adjustment Your Husqvarna product has been designed and manufactured to specifications that the engine ...the chain saw over a stump or other firm object. All servicing and repair work described in this manual. Checking the inertia brake release With the engine turned off any of cuts in the ignition system that it...- 29 Dirt and wear can adjust itself. AutoTune is a function that the brake band is equipped with AutoTune, manual adjustment of 2-stroke oil. Checking, maintaining and servicing chain saw a number of the checks described below we recommend ...
Carburetor adjustment Your Husqvarna product has been designed and manufactured to specifications that the engine ...the chain saw over a stump or other firm object. All servicing and repair work described in this manual. Checking the inertia brake release With the engine turned off any of cuts in the ignition system that it...- 29 Dirt and wear can adjust itself. AutoTune is a function that the brake band is equipped with AutoTune, manual adjustment of 2-stroke oil. Checking, maintaining and servicing chain saw a number of the checks described below we recommend ...
Owners Manual
Page 40
...performed at no charge to the initial owner and each subsequent purchaser that part. MAINTENANCE, REPLACEMENT AND REPAIR OF EMISSION-RELATED PARTS Any Husqvarna Forest & Garden approved replacement part used in a reasonable amount of any questions regarding your warranty rights and responsibilities, you should contact ... performance of two years. If any questions regarding your warranty rights and responsibilities, you should contact your Operator′s Manual. If you have any warranted part will be provided at an approved Husqvarna Forest & Garden servicing dealer.
...performed at no charge to the initial owner and each subsequent purchaser that part. MAINTENANCE, REPLACEMENT AND REPAIR OF EMISSION-RELATED PARTS Any Husqvarna Forest & Garden approved replacement part used in a reasonable amount of any questions regarding your warranty rights and responsibilities, you should contact ... performance of two years. If any questions regarding your warranty rights and responsibilities, you should contact your Operator′s Manual. If you have any warranted part will be provided at an approved Husqvarna Forest & Garden servicing dealer.

Owners Manual
Page 41
English - 41 FEDERAL EMISSION CONTROL WARRANTY STATEMENT EMISSION CONTROL WARRANTY PARTS LIST 1 Carburetor and internal parts 2 Intake pipe, airfilter holder and carburetor bolts. 3 Airfilter and fuelfilter covered up to maintenance schedule. 4 Spark Plug, covered up to maintenance schedule 5 Ignition Module 6 Muffler with catalytic converter MAINTENANCE STATEMENT The owner is responsible for the performance of all required maintenance, as defined in the operator's manual.
English - 41 FEDERAL EMISSION CONTROL WARRANTY STATEMENT EMISSION CONTROL WARRANTY PARTS LIST 1 Carburetor and internal parts 2 Intake pipe, airfilter holder and carburetor bolts. 3 Airfilter and fuelfilter covered up to maintenance schedule. 4 Spark Plug, covered up to maintenance schedule 5 Ignition Module 6 Muffler with catalytic converter MAINTENANCE STATEMENT The owner is responsible for the performance of all required maintenance, as defined in the operator's manual.

Workshop Manual
Page 3
English - 3 Contents Workshop Manual Husqvarna 555, 560XP, 560XPG, 562XP and 562XPG Contents Index 4 Introduction and safety instructions 6 Technical data 10 Service tools 12 Service data 14 Safety equipment 16 Repair instructions 24 Carburettor 34 Troubleshooting 56 Husqvarna AB has a policy of continuous product development and therefore reserves the right to modify the design and appearance of products without prior notice.
English - 3 Contents Workshop Manual Husqvarna 555, 560XP, 560XPG, 562XP and 562XPG Contents Index 4 Introduction and safety instructions 6 Technical data 10 Service tools 12 Service data 14 Safety equipment 16 Repair instructions 24 Carburettor 34 Troubleshooting 56 Husqvarna AB has a policy of continuous product development and therefore reserves the right to modify the design and appearance of products without prior notice.
Workshop Manual
Page 4
... worn starter cord 26 Replacing a broken return spring 27 Starter assembly 27 Stop control 20 Dismantling the stop function 21 Symbols Symbols in the Workshop Manual 9 Symbols on the saw 9 T Tank unit 42 Assembly 43 Dismantling 42 Tank valve 42 Technical Data 10 Threads 54 Repairing damaged threads 54 Throttle control...
... worn starter cord 26 Replacing a broken return spring 27 Starter assembly 27 Stop control 20 Dismantling the stop function 21 Symbols Symbols in the Workshop Manual 9 Symbols on the saw 9 T Tank unit 42 Assembly 43 Dismantling 42 Tank valve 42 Technical Data 10 Threads 54 Repairing damaged threads 54 Throttle control...

Workshop Manual
Page 6
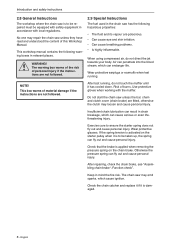
English Introduction and safety instructions 2 Introduction and safety regulations Contents 2.1 General ...7 2.2 Safety ...7 2.3 Target group ...7 2.4 Modifications...7 2.5 Tools ...7 2.6 Structure ...7 2.7 Numbering ...7 2.8 General instructions ...8 2.9 Special instructions ...8 2.10 Symbols on the saw ...9 2.11 Symbols in the Workshop Manual 9 6 -
English Introduction and safety instructions 2 Introduction and safety regulations Contents 2.1 General ...7 2.2 Safety ...7 2.3 Target group ...7 2.4 Modifications...7 2.5 Tools ...7 2.6 Structure ...7 2.7 Numbering ...7 2.8 General instructions ...8 2.9 Special instructions ...8 2.10 Symbols on the saw ...9 2.11 Symbols in the Workshop Manual 9 6 -

Workshop Manual
Page 7
...each occasion. Some sections include an introductory Description of date. A description of different safety steps that in time this , the Manual should be read and understood by personnel who are assumed to have general knowledge of a specific system When a particular system on...dismantled and assembled: 1. Look up the page for use Husqvarna's original: • Spare parts • Service tools • Accessories 2.6 Structure This Workshop Manual can be maintained when using the chain saw. 2.3 Target group This Workshop Manual is written for some stages. See "Symbols on the...
...each occasion. Some sections include an introductory Description of date. A description of different safety steps that in time this , the Manual should be read and understood by personnel who are assumed to have general knowledge of a specific system When a particular system on...dismantled and assembled: 1. Look up the page for use Husqvarna's original: • Spare parts • Service tools • Accessories 2.6 Structure This Workshop Manual can be maintained when using the chain saw. 2.3 Target group This Workshop Manual is written for some stages. See "Symbols on the...
Workshop Manual
Page 8
...spring tension is activated on the starter pulley when it is applied when removing the pressure spring on the chain brake. This workshop manual contains the following hazardous properties: • The fluid and its vapour are not followed. Wear protective earplugs or earmuffs when test ... the chain saw has the following warning boxes in the chain saw unless they have read and understood the content of this Workshop Manual. Use protective gloves when working with local regulations. After repairing, check the chain brake, see "Assembling chain brake \ Function check...
...spring tension is activated on the starter pulley when it is applied when removing the pressure spring on the chain brake. This workshop manual contains the following hazardous properties: • The fluid and its vapour are not followed. Wear protective earplugs or earmuffs when test ... the chain saw has the following warning boxes in the chain saw unless they have read and understood the content of this Workshop Manual. Use protective gloves when working with local regulations. After repairing, check the chain brake, see "Assembling chain brake \ Function check...

Workshop Manual
Page 9
Choke Lever Introduction and safety instructions 2.11 Symbols in the Workshop Manual This symbol warns of personal injury when the instructions are embedded on the saw The symbols below are not followed. 2.10 Symbols on the chain saw. Refuelling Stop button Chain oil fill. Chain brake Decompression valve Fuel pump Adjusting the oil pump English - 9
Choke Lever Introduction and safety instructions 2.11 Symbols in the Workshop Manual This symbol warns of personal injury when the instructions are embedded on the saw The symbols below are not followed. 2.10 Symbols on the chain saw. Refuelling Stop button Chain oil fill. Chain brake Decompression valve Fuel pump Adjusting the oil pump English - 9
Workshop Manual
Page 42
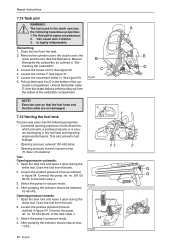
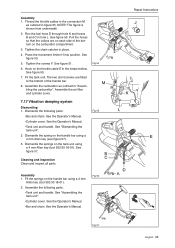
... damaged. 7.16 Venting the fuel tank The two-way valve has the following hazardous properties: 1. Dismantling 1. Drain the fuel from the tank. See the Operator's Manual. See figure 50. 4. Unhook the throttle cable, E, from the intake bellows before pulling out from the tank. 2. Fig 50 NOTE! Exercise care so that the...
... damaged. 7.16 Venting the fuel tank The two-way valve has the following hazardous properties: 1. Dismantling 1. Drain the fuel from the tank. See the Operator's Manual. See figure 50. 4. Unhook the throttle cable, E, from the intake bellows before pulling out from the tank. 2. Fig 50 NOTE! Exercise care so that the...
Workshop Manual
Page 43
...Allen key (tool 502 50 18-01). The figure is shown from underneath. 2. Assemble the air filter and cylinder cover. See the Operator's Manual. •Cylinder cover. Assembly 1. Fit the tank unit. Assemble the carburettor as outlined in figure 55. Dismantle the spring on the tank ... D through hole K and hoses B and C in place. 4. See the Operator's Manual. •Bar and chain. Assembly 1. Fig 55 Cleaning and inspection Clean and inspect all parts. See the Operator's Manual. Tighten the chain catcher in hole L. See figure 57. See "Assembling the tank unit...
...Allen key (tool 502 50 18-01). The figure is shown from underneath. 2. Assemble the air filter and cylinder cover. See the Operator's Manual. •Cylinder cover. Assembly 1. Fit the tank unit. Assemble the carburettor as outlined in figure 55. Dismantle the spring on the tank ... D through hole K and hoses B and C in place. 4. See the Operator's Manual. •Bar and chain. Assembly 1. Fig 55 Cleaning and inspection Clean and inspect all parts. See the Operator's Manual. Tighten the chain catcher in hole L. See figure 57. See "Assembling the tank unit...

