
Owners Manual
Page 29
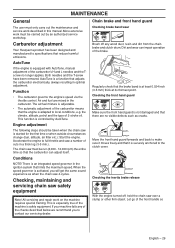
...entire time so that it moves freely and that the carburettor can impair operation of cuts in optimal adjustment. Carburetor adjustment Your Husqvarna product has been designed and manufactured to specifications that there are mixed in the carburetor. the climate, altitude, petrol ...Move the front hand guard forwards and back to contact our servicing dealer. Engine adjustment The following steps should be carried out by AutoTune. Function • The carburetor governs the engine's speed via the throttle control. This function is an integrated speed governor in ...
...entire time so that it moves freely and that the carburettor can impair operation of cuts in optimal adjustment. Carburetor adjustment Your Husqvarna product has been designed and manufactured to specifications that there are mixed in the carburetor. the climate, altitude, petrol ...Move the front hand guard forwards and back to contact our servicing dealer. Engine adjustment The following steps should be carried out by AutoTune. Function • The carburetor governs the engine's speed via the throttle control. This function is an integrated speed governor in ...

Workshop Manual
Page 37
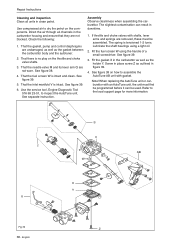
L M P Repair Instructions H J K Q R Fig 38 English - 37 See figure 39. 10 If necessary, dismantle throttle valve T and choke valve U and air valve S, and remove the shafts with lever arm Q, shaft L and spring R. 9 Use a needle or similar device and carefully pull up the fuel screen (W). 7 Dismantle the pump cover H and carefully remove the control diaphragm J and gasket K. 8 Unscrew screw P and remove needle valve M with lever arms and springs (see figure 39). 11 If necessary, dismantle the AutoTune AB unit. See figure 39.
L M P Repair Instructions H J K Q R Fig 38 English - 37 See figure 39. 10 If necessary, dismantle throttle valve T and choke valve U and air valve S, and remove the shafts with lever arm Q, shaft L and spring R. 9 Use a needle or similar device and carefully pull up the fuel screen (W). 7 Dismantle the pump cover H and carefully remove the control diaphragm J and gasket K. 8 Unscrew screw P and remove needle valve M with lever arms and springs (see figure 39). 11 If necessary, dismantle the AutoTune AB unit. See figure 39.
Workshop Manual
Page 38
... 69 23-01, to the local support page for more information. See figure 39. 3. Refer to inspect the AutoTune unit. Use compressed air to assemble the AutoTune AB unit with gasket. Direct the air through all units in clean petrol. That there is intact. If throttle ...programmed before it can result in downtime. 1. See figure 39. 6. See separate instruction. The spring is intact and clean. When replacing the AutoTune unit or carburettor with shafts, lever arms and springs are undamaged, as well as outlined in figure 39. 4. Assembly Observe cleanliness when assembling ...
... 69 23-01, to the local support page for more information. See figure 39. 3. Refer to inspect the AutoTune unit. Use compressed air to assemble the AutoTune AB unit with gasket. Direct the air through all units in clean petrol. That there is intact. If throttle ...programmed before it can result in downtime. 1. See figure 39. 6. See separate instruction. The spring is intact and clean. When replacing the AutoTune unit or carburettor with shafts, lever arms and springs are undamaged, as well as outlined in figure 39. 4. Assembly Observe cleanliness when assembling ...

Workshop Manual
Page 40
... for troubleshooting before dismantling. Fig 43 Leak in Fault with Diffuser jets Leak in main jets, idling needles, measuring cover gaskets and measuring diaphragms, and autotune gaskets. Needle valve Pump membrane Control membrane Fitting on the saw 1 Press the connector together as follows: 1 Connect pressure tester to show leakages in the...
... for troubleshooting before dismantling. Fig 43 Leak in Fault with Diffuser jets Leak in main jets, idling needles, measuring cover gaskets and measuring diaphragms, and autotune gaskets. Needle valve Pump membrane Control membrane Fitting on the saw 1 Press the connector together as follows: 1 Connect pressure tester to show leakages in the...

Workshop Manual
Page 57
... English - 57 Starting Idling (low speed) (continued) Difficult to the left while the probable fault alternatives are divided into four groups. See separate instruction for Autotune troubleshooting. Within each group possible operating faults are listed to start Air filter blocked Choke does not work Worn choke axle Worn choke valve Blocked...
... English - 57 Starting Idling (low speed) (continued) Difficult to the left while the probable fault alternatives are divided into four groups. See separate instruction for Autotune troubleshooting. Within each group possible operating faults are listed to start Air filter blocked Choke does not work Worn choke axle Worn choke valve Blocked...

