
Owners Manual
Page 6
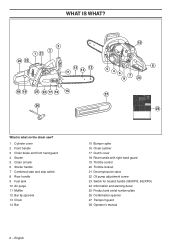
... 5 Chain oil tank 6 Starter handle 7 Combined start and stop switch 8 Rear handle 9 Fuel tank 10 Air purge 11 Muffler 12 Bar tip sprocket 13 Chain 14 Bar 15 Bumper spike 16 Chain catcher 17 Clutch cover 18 Rear handle with right hand guard 19 Throttle control 20 Throttle lockout 21... Decompression valve 22 Oil pump adjustment screw 23 Switch for heated handle (560XPG, 562XPG) 24 Information and warning decal 25 Product and serial number...
... 5 Chain oil tank 6 Starter handle 7 Combined start and stop switch 8 Rear handle 9 Fuel tank 10 Air purge 11 Muffler 12 Bar tip sprocket 13 Chain 14 Bar 15 Bumper spike 16 Chain catcher 17 Clutch cover 18 Rear handle with right hand guard 19 Throttle control 20 Throttle lockout 21... Decompression valve 22 Oil pump adjustment screw 23 Switch for heated handle (560XPG, 562XPG) 24 Information and warning decal 25 Product and serial number...
Owners Manual
Page 24
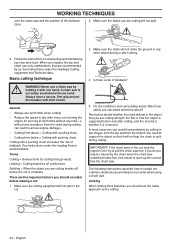
Always have a secure, firm grip around the handles with one hand. Terms Cutting = General term for cutting. 24 - from the top and from below = Cutting with pushing chain. WORKING TECHNIQUES over the chain saw and the position of the ...i.e. Limbing = Cutting branches off before making a cut: 1 Make sure the cutting equipment will not split. 9 Follow the instructions on sharpening and maintaining your bar and chain. You need to serious engine damage). • Cutting from above = Cutting with a pulling chain. • Cutting from the bottom. Limbing When...
Always have a secure, firm grip around the handles with one hand. Terms Cutting = General term for cutting. 24 - from the top and from below = Cutting with pushing chain. WORKING TECHNIQUES over the chain saw and the position of the ...i.e. Limbing = Cutting branches off before making a cut: 1 Make sure the cutting equipment will not split. 9 Follow the instructions on sharpening and maintaining your bar and chain. You need to serious engine damage). • Cutting from above = Cutting with a pulling chain. • Cutting from the bottom. Limbing When...
Owners Manual
Page 37
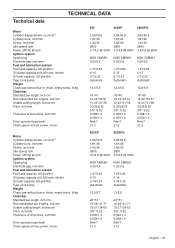
... chain, empty tanks, lb/kg Chain/bar Standard bar length, inch/cm Recommended bar lengths, inch/cm Usable cutting length, inches/cm Pitch, inch/mm Thickness of drive links, inch/mm Drive sprocket type/teeth Chain speed at max. power, m/sec 555 560XP 560XPG 3,65/59,8 1,81/46 1,42/36 2800 3,1/4,2 @ 9600 ... 1,37/0,65 6-15 0,7/0,33 Automatic 1,37/0,65 6-15 0,7/0,33 Automatic 12,3/5,6 12,3/5,6 12,8/5,8 16"/41 13-24"/33-61 12-23"/31-58 0,325/8,25 3/8" /9,52 0,058/1,5 0,050/1,3 Rim/7 21,3 18"/46 13-24"/33-61 12-23"/31-58 0,325/8,25 3/8" /9,52 0,058/1,5 0,050/1,3 Rim/7 21,3 18"/46 13...
... chain, empty tanks, lb/kg Chain/bar Standard bar length, inch/cm Recommended bar lengths, inch/cm Usable cutting length, inches/cm Pitch, inch/mm Thickness of drive links, inch/mm Drive sprocket type/teeth Chain speed at max. power, m/sec 555 560XP 560XPG 3,65/59,8 1,81/46 1,42/36 2800 3,1/4,2 @ 9600 ... 1,37/0,65 6-15 0,7/0,33 Automatic 1,37/0,65 6-15 0,7/0,33 Automatic 12,3/5,6 12,3/5,6 12,8/5,8 16"/41 13-24"/33-61 12-23"/31-58 0,325/8,25 3/8" /9,52 0,058/1,5 0,050/1,3 Rim/7 21,3 18"/46 13-24"/33-61 12-23"/31-58 0,325/8,25 3/8" /9,52 0,058/1,5 0,050/1,3 Rim/7 21,3 18"/46 13...
Owners Manual
Page 38
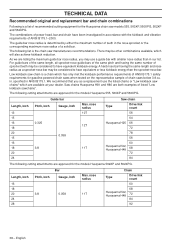
... models 555, 560XP, 560XPG, 562XP and 562XPG. There may be considered to have equivalent or less kickback energy than in accordance with the kickback and vibration requirements of a solid bar. Saw chains Husqvarna H81 and H80 are approved for the models Husqvarna 562XP and 562XPG. Length, inch 16 18 20 24 28 Pitch, inch Bar Gauge...
... models 555, 560XP, 560XPG, 562XP and 562XPG. There may be considered to have equivalent or less kickback energy than in accordance with the kickback and vibration requirements of a solid bar. Saw chains Husqvarna H81 and H80 are approved for the models Husqvarna 562XP and 562XPG. Length, inch 16 18 20 24 28 Pitch, inch Bar Gauge...

Workshop Manual
Page 24
... Replacing the fuel pump 44 7.21 Dismantling the piston and cylinder 45 7.22 Assembling the piston and cylinder 47 7.23 Pressure testing the cylinder 48 7.24 Dismantling the crankshaft and crankcase 49 7.25 Assembling the complete crankshaft 54 7.26 Replacing the...
... Replacing the fuel pump 44 7.21 Dismantling the piston and cylinder 45 7.22 Assembling the piston and cylinder 47 7.23 Pressure testing the cylinder 48 7.24 Dismantling the crankshaft and crankcase 49 7.25 Assembling the complete crankshaft 54 7.26 Replacing the...

Workshop Manual
Page 49
... the 5 screws from entering the bearings. 2. Fit tool 575 28 69-01 as outlined in figure 71. 7.24 Dismantling the crankshaft and crankcase 1 Dismantle the following: • The clutch cover • The chain and bar. • The centrifugal clutch * • The cylinder cover • The starter * • The flywheel * • The carburettor...
... the 5 screws from entering the bearings. 2. Fit tool 575 28 69-01 as outlined in figure 71. 7.24 Dismantling the crankshaft and crankcase 1 Dismantle the following: • The clutch cover • The chain and bar. • The centrifugal clutch * • The cylinder cover • The starter * • The flywheel * • The carburettor...


