
Owners Manual
Page 6
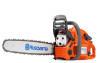
...26 25 24 23 22 21 20 19 What is what on the chain saw? 1 Front hand guard 2 Cylinder cover 3 Air purge 4 Start reminder 5 Right-hand brake trigger (455e Rancher II TrioBrake) 6 Rear handle 7 Information and warning decal 8 Combined start and stop switch 9 Chain oil tank ... 22 Chain catcher 23 Chain tensioning screw 24 Clutch cover (460 Rancher II, 465 Rancher II) 25 Oil pump adjustment screw 26 Right hand guard 27 Throttle trigger 28 Clutch cover (455e Rancher II, 455e Rancher II TrioBrake) 29 Chain tensioner wheel 30 Knob 31 Clutch cover (455 Rancher II) 32 Chain tensioning screw 33 Operator's...
...26 25 24 23 22 21 20 19 What is what on the chain saw? 1 Front hand guard 2 Cylinder cover 3 Air purge 4 Start reminder 5 Right-hand brake trigger (455e Rancher II TrioBrake) 6 Rear handle 7 Information and warning decal 8 Combined start and stop switch 9 Chain oil tank ... 22 Chain catcher 23 Chain tensioning screw 24 Clutch cover (460 Rancher II, 465 Rancher II) 25 Oil pump adjustment screw 26 Right hand guard 27 Throttle trigger 28 Clutch cover (455e Rancher II, 455e Rancher II TrioBrake) 29 Chain tensioner wheel 30 Knob 31 Clutch cover (455 Rancher II) 32 Chain tensioning screw 33 Operator's...
Owners Manual
Page 15
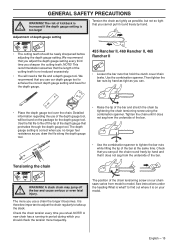
...the depth gauge setting every third time you cannot pull it becomes. This recommendation assumes that the length of the depth gauge that hold the clutch cover/chain brake. A slack chain may jump off the tip of the cutting teeth is not reduced excessively. • You will be newly sharpened... regularly to tighten the bar nuts while lifting the tip of the chain tensioning screw on the package for the depth gauge. 455 Rancher II, 460 Rancher II, 465 Rancher II • Loosen the bar nuts that protrudes through the depth gauge tool. English - 15 It is on your model. increased...
...the depth gauge setting every third time you cannot pull it becomes. This recommendation assumes that the length of the depth gauge that hold the clutch cover/chain brake. A slack chain may jump off the tip of the cutting teeth is not reduced excessively. • You will be newly sharpened... regularly to tighten the bar nuts while lifting the tip of the chain tensioning screw on the package for the depth gauge. 455 Rancher II, 460 Rancher II, 465 Rancher II • Loosen the bar nuts that protrudes through the depth gauge tool. English - 15 It is on your model. increased...
Owners Manual
Page 16
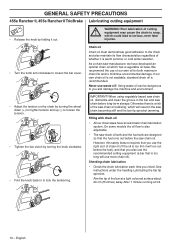
... and to lock the tensioning. Aim the tip of our own oil for tighter tension and up (-) to loosen the tension. • Tighten the bar clutch by turning the knob clockwise. • Fold the knob back in the bar and saw chain before the saw chain oil, dismantle and clean the..., 455e Rancher II TrioBrake Lubricating cutting equipment • Release the knob by folding it is warm summer or cold winter weather. Chain oil Chain oil must demonstrate good adhesion to loosen the bar cover. If our own chain oil is not available, standard chain oil is also adjustable. • The saw chain...
... and to lock the tensioning. Aim the tip of our own oil for tighter tension and up (-) to loosen the tension. • Tighten the bar clutch by turning the knob clockwise. • Fold the knob back in the bar and saw chain before the saw chain oil, dismantle and clean the..., 455e Rancher II TrioBrake Lubricating cutting equipment • Release the knob by folding it is warm summer or cold winter weather. Chain oil Chain oil must demonstrate good adhesion to loosen the bar cover. If our own chain oil is not available, standard chain oil is also adjustable. • The saw chain...
Owners Manual
Page 19
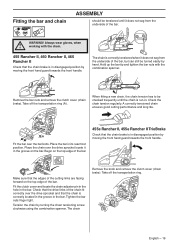
... the chain brake is run-in. The chain Remove the knob and remove the clutch cover (chain brake). English - 19 Hold up the bar tip and tighten the bar nuts with the chain. 455 Rancher II, 460 Rancher II, 465 Rancher II Check that the drive links of the cutting links are facing forward on the...
... the chain brake is run-in. The chain Remove the knob and remove the clutch cover (chain brake). English - 19 Hold up the bar tip and tighten the bar nuts with the chain. 455 Rancher II, 460 Rancher II, 465 Rancher II Check that the drive links of the cutting links are facing forward on the...

Owners Manual
Page 20
Mount the clutch cover and remember to be turned easily by hand. The chain is correctly tensioned when it does not sag from the underside of the cutting links ...
Mount the clutch cover and remember to be turned easily by hand. The chain is correctly tensioned when it does not sag from the underside of the cutting links ...
Owners Manual
Page 23
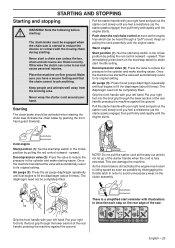
...64257;rmly and rapidly until you have a secure footing and that the chain cannot touch anything. Do not pull the starter cord all covers are fitted correctly. Put your left hand. English - 23 Starting The chain brake should be activated when starting easier. Activate the...engine starts. As the chain brake is a simplified start /stop switch to fill the diaphragm (about 6 times). Otherwise the clutch can damage the machine. The diaphragm need not be completely filled. 3 2 NOTE! Pull the starter handle with your right foot into...
...64257;rmly and rapidly until you have a secure footing and that the chain cannot touch anything. Do not pull the starter cord all covers are fitted correctly. Put your left hand. English - 23 Starting The chain brake should be activated when starting easier. Activate the...engine starts. As the chain brake is a simplified start /stop switch to fill the diaphragm (about 6 times). Otherwise the clutch can damage the machine. The diaphragm need not be completely filled. 3 2 NOTE! Pull the starter handle with your right foot into...

Owners Manual
Page 24
... starting. All people, whether right or left hand on the front handle. The chain brake is ready for use this grip. Your saw the clutch can represent a health risk. • Never start . STARTING AND STOPPING Note! engine's exhaust fumes, chain oil mist and dust from the ... the cutting equipment. • Always hold the saw with thumbs and fingers encircling the chain saw unless the bar, chain and all covers are fitted correctly. The right hand should be dangerous if inhaled. • Observe your surroundings and make sure that there is unsupervised....
... starting. All people, whether right or left hand on the front handle. The chain brake is ready for use this grip. Your saw the clutch can represent a health risk. • Never start . STARTING AND STOPPING Note! engine's exhaust fumes, chain oil mist and dust from the ... the cutting equipment. • Always hold the saw with thumbs and fingers encircling the chain saw unless the bar, chain and all covers are fitted correctly. The right hand should be dangerous if inhaled. • Observe your surroundings and make sure that there is unsupervised....

Owners Manual
Page 26
... kickback if the kickback zone of the bar accidentally touches a branch, nearby tree or some other insecure support. 3 Most kickback accidents happen during limbing. the clutch cover causing the chain to keep the chain saw stacked logs or branches without first separating them. full throttle. 7 Take great care when you keep...
... kickback if the kickback zone of the bar accidentally touches a branch, nearby tree or some other insecure support. 3 Most kickback accidents happen during limbing. the clutch cover causing the chain to keep the chain saw stacked logs or branches without first separating them. full throttle. 7 Take great care when you keep...

Owners Manual
Page 33
...cuts in the ignition system that the engine is an integrated speed governor in a thick log (3-5 min.). Carburetor adjustment Your Husqvarna product has been designed and manufactured to specifications that the carburettor can impair operation of the checks described below we ...fuel are no longer applies. This is activated, you to local conditions, e.g. Move the front hand guard forwards and back to the clutch cover. Function • The carburetor governs the engine's speed via the throttle control. All servicing and repair work on the machine requires special...
...cuts in the ignition system that the engine is an integrated speed governor in a thick log (3-5 min.). Carburetor adjustment Your Husqvarna product has been designed and manufactured to specifications that the carburettor can impair operation of the checks described below we ...fuel are no longer applies. This is activated, you to local conditions, e.g. Move the front hand guard forwards and back to the clutch cover. Function • The carburetor governs the engine's speed via the throttle control. All servicing and repair work on the machine requires special...

Owners Manual
Page 34
... damage the mechanism and disable the chain brake. • Press the throttle lockout and make sure it moves freely and is securely hinged to the clutch cover. • Make sure the throttle control is locked at the idle setting when the throttle lockout is released. Let go of the front handle so...
... damage the mechanism and disable the chain brake. • Press the throttle lockout and make sure it moves freely and is securely hinged to the clutch cover. • Make sure the throttle control is locked at the idle setting when the throttle lockout is released. Let go of the front handle so...
Owners Manual
Page 38
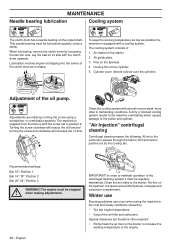
...the screw using the machine in the cold and snowy conditions caused by: • Too low engine temperature. • Icing of the clutch drum as possible the machine is pushed out by loosening the two bar nuts. Dirt and dust is equipped with a cooling system. ... can occur when using a screwdriver or combination spanner. MAINTENANCE Needle bearing lubrication Cooling system The clutch drum has a needle bearing on its side with the clutch drum upwards. When lubricating, remove the clutch cover by the cooling fan. Clean the cooling system with a brush once a week, more often...
...the screw using the machine in the cold and snowy conditions caused by: • Too low engine temperature. • Icing of the clutch drum as possible the machine is pushed out by loosening the two bar nuts. Dirt and dust is equipped with a cooling system. ... can occur when using a screwdriver or combination spanner. MAINTENANCE Needle bearing lubrication Cooling system The clutch drum has a needle bearing on its side with the clutch drum upwards. When lubricating, remove the clutch cover by the cooling fan. Clean the cooling system with a brush once a week, more often...


