

Operation Manual
Page 5
...-06-03 16 Muffler 17 Chain 18 Bar tip sprocket 19 Bar 20 Spike bumper 21 Chain catcher 22 Chain tensioner wheel 23 Clutch cover 24 Right hand guard 25 Throttle control 26 Throttle lockout 27 Knob 28 Operator′s manual 29 Bar guard 30 Combination spanner English...
...-06-03 16 Muffler 17 Chain 18 Bar tip sprocket 19 Bar 20 Spike bumper 21 Chain catcher 22 Chain tensioner wheel 23 Clutch cover 24 Right hand guard 25 Throttle control 26 Throttle lockout 27 Knob 28 Operator′s manual 29 Bar guard 30 Combination spanner English...

Operation Manual
Page 8
... your leg or anyone or anything close by the inertia in relation to the object that tightens the brake band (C) around the engine drive system (D) (clutch drum). • Kickback can either manually or automatically by the inertia release mechanism, depends on with the chain brake 8 - Do not leave the chain saw...
... your leg or anyone or anything close by the inertia in relation to the object that tightens the brake band (C) around the engine drive system (D) (clutch drum). • Kickback can either manually or automatically by the inertia release mechanism, depends on with the chain brake 8 - Do not leave the chain saw...
Operation Manual
Page 14
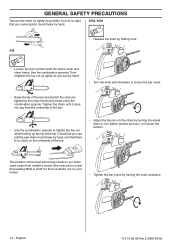
...; Release the knob by folding it out. 435 • Loosen the bar nut that holds the clutch cover and chain brake. Tighten the chain until it is on your model. • Tighten the bar clutch by turning the knob clockwise. 14 - GENERAL SAFETY PRECAUTIONS Tension the chain as tightly as you can...
...; Release the knob by folding it out. 435 • Loosen the bar nut that holds the clutch cover and chain brake. Tighten the chain until it is on your model. • Tighten the bar clutch by turning the knob clockwise. 14 - GENERAL SAFETY PRECAUTIONS Tension the chain as tightly as you can...

Operation Manual
Page 16
GENERAL SAFETY PRECAUTIONS Chain drive sprocket Bar The clutch drum is fitted with one of the following drive sprockets: A Spur sprocket (the chain sprocket is welded on the drum) B Rim sprocket (replaceable) Check ...
GENERAL SAFETY PRECAUTIONS Chain drive sprocket Bar The clutch drum is fitted with one of the following drive sprockets: A Spur sprocket (the chain sprocket is welded on the drum) B Rim sprocket (replaceable) Check ...

Operation Manual
Page 17
... be tensioned until it in the groove on the underside of the bar. English - 17 WARNING! Unscrew the bar nut and remove the clutch cover (chain brake). Mount the clutch cover and remember to be turned easily by hand. When fitting a new chain, the chain tension has to fit the chain... adjuster pin in the hole in the bar. Loosen the chain tensioner wheel and remove the clutch cover (chain brake). Begin on the top edge of the bar. 115 10 82-26 Rev.2 2008-06-03 Make sure that the edges of...
... be tensioned until it in the groove on the underside of the bar. English - 17 WARNING! Unscrew the bar nut and remove the clutch cover (chain brake). Mount the clutch cover and remember to be turned easily by hand. When fitting a new chain, the chain tension has to fit the chain... adjuster pin in the hole in the bar. Loosen the chain tensioner wheel and remove the clutch cover (chain brake). Begin on the top edge of the bar. 115 10 82-26 Rev.2 2008-06-03 Make sure that the edges of...
Operation Manual
Page 18
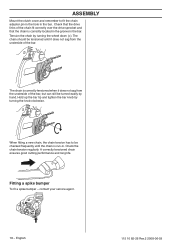
... does not sag from the underside of the chain fit correctly over the drive sprocket and that the chain is run-in. ASSEMBLY Mount the clutch cover and remember to be turned easily by hand. Check the chain tension regularly. Hold up the bar tip and tighten the bar knob by...
... does not sag from the underside of the chain fit correctly over the drive sprocket and that the chain is run-in. ASSEMBLY Mount the clutch cover and remember to be turned easily by hand. Check the chain tension regularly. Hold up the bar tip and tighten the bar knob by...
Operation Manual
Page 21
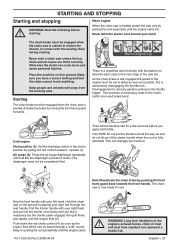
... saw is heated restart the saw is still engaged the speed of contact with your hand. Pull the starter handle with illustrations to the clutch, clutch drum and brake band. A 2 Then let the machine idle for use. Long term inhalation of the starter handle when the cord is...WARNING! upward (1). The chain saw unless the bar, chain and all the way out and do not let go of the ! starting . Otherwise the clutch can damage the machine. 1 Note! Disengagement is fully extended. Cold engine Start position (1): Set the start reminder with your right foot through a "puff...
... saw is heated restart the saw is still engaged the speed of contact with your hand. Pull the starter handle with illustrations to the clutch, clutch drum and brake band. A 2 Then let the machine idle for use. Long term inhalation of the starter handle when the cord is...WARNING! upward (1). The chain saw unless the bar, chain and all the way out and do not let go of the ! starting . Otherwise the clutch can damage the machine. 1 Note! Disengagement is fully extended. Cold engine Start position (1): Set the start reminder with your right foot through a "puff...
Operation Manual
Page 22
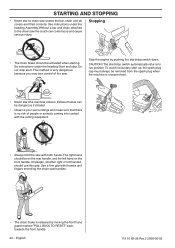
This method is released by pushing the start /stop switch automatically returns to the chain saw the clutch can be on the rear handle, and the left handed, should be dangerous if inhaled. • Observe your surroundings and make sure that there is ...
This method is released by pushing the start /stop switch automatically returns to the chain saw the clutch can be on the rear handle, and the left handed, should be dangerous if inhaled. • Observe your surroundings and make sure that there is ...
Operation Manual
Page 31
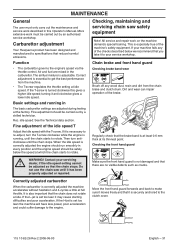
... General The user must be carried out by a skilled technician. Carburettor adjustment Your Husqvarna product has been designed and manufactured to get the best performance from the chain brake and clutch drum. Correct adjustment is not damaged and that there are mixed in The basic carburettor...Correctly adjusted carburettor When the carburettor is set too lean the machine will have less power, poor acceleration and could suffer damage to the clutch cover. 115 10 82-26 Rev.2 2008-06-03 English - 31 If the L-jet is correctly adjusted the machine accelerates without hesitation...
... General The user must be carried out by a skilled technician. Carburettor adjustment Your Husqvarna product has been designed and manufactured to get the best performance from the chain brake and clutch drum. Correct adjustment is not damaged and that there are mixed in The basic carburettor...Correctly adjusted carburettor When the carburettor is set too lean the machine will have less power, poor acceleration and could suffer damage to the clutch cover. 115 10 82-26 Rev.2 2008-06-03 English - 31 If the L-jet is correctly adjusted the machine accelerates without hesitation...
Operation Manual
Page 36
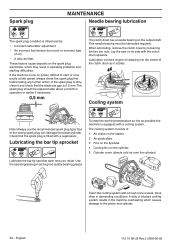
...;culties. Cooling system Note! Use the special grease gun and a good quality bearing grease. The spark plug should be lubricated regularly. The clutch drum has a needle bearing on its side with a suppressor. Lubrication involves engine oil dripping into the centre of the wrong spark plug can... damage the piston/cylinder. Use of the clutch drum as possible the machine is low on the cylinder. 5 Cylinder cover (directs cold air over the cylinder). A dirty or blocked cooling...
...;culties. Cooling system Note! Use the special grease gun and a good quality bearing grease. The spark plug should be lubricated regularly. The clutch drum has a needle bearing on its side with a suppressor. Lubrication involves engine oil dripping into the centre of the wrong spark plug can... damage the piston/cylinder. Use of the clutch drum as possible the machine is low on the cylinder. 5 Cylinder cover (directs cold air over the cylinder). A dirty or blocked cooling...

Operation Manual
Page 38
...converter, check the cooling system weekly. Clean the starter units air intake. English 115 10 82-26 Rev.2 2008-06-03 Lubricate the clutch drum bearing. Clean the air filter. Check that it is stiff or whether the rivets and links are described in the rivets... are tight. Monthly maintenance Check the brake band on the muffler. Check the drive sprocket for wear. Check the clutch centre, clutch drum and clutch spring for excessive wear and replace if necessary. Clean the outside of the carburettor. Replace when less than 0.6 mm (0,024 inch...
...converter, check the cooling system weekly. Clean the starter units air intake. English 115 10 82-26 Rev.2 2008-06-03 Lubricate the clutch drum bearing. Clean the air filter. Check that it is stiff or whether the rivets and links are described in the rivets... are tight. Monthly maintenance Check the brake band on the muffler. Check the drive sprocket for wear. Check the clutch centre, clutch drum and clutch spring for excessive wear and replace if necessary. Clean the outside of the carburettor. Replace when less than 0.6 mm (0,024 inch...


