
Owners Manual
Page 6
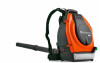
... appear in mind that: Engine exhaust fumes contain carbon monoxide, which can start or run the machine indoors, or anywhere that is undamaged and securely attached. WARNING! The exhaust fumes from the user. Consequently, we guarantee the availability of your nearest service agent. SAFETY INSTRUCTIONS Vibration damping system Your machine is...
... appear in mind that: Engine exhaust fumes contain carbon monoxide, which can start or run the machine indoors, or anywhere that is undamaged and securely attached. WARNING! The exhaust fumes from the user. Consequently, we guarantee the availability of your nearest service agent. SAFETY INSTRUCTIONS Vibration damping system Your machine is...
Owners Manual
Page 7
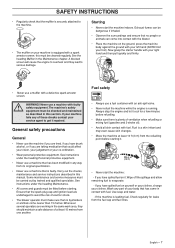
... the ground, press the machine body against the ground with a spark arrestor screen; SAFETY INSTRUCTIONS • Regularly check that the muffler is securely attached to the machine. • The muffler on yourself or your clothes, change your clothes. Not your foot). See instructions under the heading Maintenance...
... the ground, press the machine body against the ground with a spark arrestor screen; SAFETY INSTRUCTIONS • Regularly check that the muffler is securely attached to the machine. • The muffler on yourself or your clothes, change your clothes. Not your foot). See instructions under the heading Maintenance...

Owners Manual
Page 11
... the outlet pipe. • Disassemble the knob from the holder and puch the holder on to the holder pipe. Accessories Handlebar Disassemble the intermediate pipe. Attach the cabling in the cover. • Place these on to the control pipe. • Assemble the knob and adjust position and angle to secure the...
... the outlet pipe. • Disassemble the knob from the holder and puch the holder on to the holder pipe. Accessories Handlebar Disassemble the intermediate pipe. Attach the cabling in the cover. • Place these on to the control pipe. • Assemble the knob and adjust position and angle to secure the...

Owners Manual
Page 17
... there are not damaged. 6 Clean the fuel tank. English - 17 Change if necessary. 2 Check all cables and connections. 3 Replace the spark plug. IMPORTANT! Use only HUSQVARNA replacement parts. Weekly maintenance 1 Clean the air filter. Remove and check the electrode gap. Use of other damage. MAINTENANCE Maintenance schedule Below you need... nuts and screws are tight. 5 Check that the vibration damping elements are no fuel leaks. Replace if necessary. 2 Clean the outside of accessories and/or attachments not specifically recommended by HUSQVARNA.
... there are not damaged. 6 Clean the fuel tank. English - 17 Change if necessary. 2 Check all cables and connections. 3 Replace the spark plug. IMPORTANT! Use only HUSQVARNA replacement parts. Weekly maintenance 1 Clean the air filter. Remove and check the electrode gap. Use of other damage. MAINTENANCE Maintenance schedule Below you need... nuts and screws are tight. 5 Check that the vibration damping elements are no fuel leaks. Replace if necessary. 2 Clean the outside of accessories and/or attachments not specifically recommended by HUSQVARNA.

