

Owners Manual
Page 2
... blades can result in the STOP position. Arrows which show limits for certain markets. speed of output axle, rpm This product is trimmer head with applicable CE directives. Beware of falling objects • Ear protection • Approved eye protection Max. Always keep people and... to the operator or others. Regular cleaning required. 2 - Clearing saws, brushcutters and trimmers can cause the amputation of the machine shall ensure, while working, that is in accordance with trimmer cord. Always use non-metallic, flexible cutting elements, that no persons or animals come ...
... blades can result in the STOP position. Arrows which show limits for certain markets. speed of output axle, rpm This product is trimmer head with applicable CE directives. Beware of falling objects • Ear protection • Approved eye protection Max. Always keep people and... to the operator or others. Regular cleaning required. 2 - Clearing saws, brushcutters and trimmers can cause the amputation of the machine shall ensure, while working, that is in accordance with trimmer cord. Always use non-metallic, flexible cutting elements, that no persons or animals come ...

Owners Manual
Page 3
...referred to on the brushcutter 17 ASSEMBLY Assembling the handlebars (323R 18 Assembling the handlebars (325RX, 325RXT, 325RDX) ....... 18 Transport position, handlebars (325RX, 325RXT, 325RDX) . 18 Assembly of the blade and trimmer head 19 Assembling the blade guard and grass blade 19 ...Your warranty rights and obligations 31 3 English - For customer assistance call: 704-921-7000 or contact us at our website: www.husqvarna.com List of contents SYMBOL EXPLANATION Symbols 2 CONTENTS List of contents 3 SAFETY INSTRUCTIONS Personal protective equipment 4 The machine's safety equipment ...
...referred to on the brushcutter 17 ASSEMBLY Assembling the handlebars (323R 18 Assembling the handlebars (325RX, 325RXT, 325RDX) ....... 18 Transport position, handlebars (325RX, 325RXT, 325RDX) . 18 Assembly of the blade and trimmer head 19 Assembling the blade guard and grass blade 19 ...Your warranty rights and obligations 31 3 English - For customer assistance call: 704-921-7000 or contact us at our website: www.husqvarna.com List of contents SYMBOL EXPLANATION Symbols 2 CONTENTS List of contents 3 SAFETY INSTRUCTIONS Personal protective equipment 4 The machine's safety equipment ...

Owners Manual
Page 4
.... Secure hair so it into the handle (= when you read and understand the content of a clearing saw , brushcutter or trimmer, protective equipment approved by the appropriate authorities must be worn when necessary, e.g., when assembling cutting equipment. Personal protective equipment does ...long pants. When the trigger lock (A) is automatically locked in this manual. • When using a clearing saw , brushcutter or trimmer can turn it is designed to prevent the WARNING! English This section describes the machine's safety equipment, its "idling" position. GLOVES ...
.... Secure hair so it into the handle (= when you read and understand the content of a clearing saw , brushcutter or trimmer, protective equipment approved by the appropriate authorities must be worn when necessary, e.g., when assembling cutting equipment. Personal protective equipment does ...long pants. When the trigger lock (A) is automatically locked in this manual. • When using a clearing saw , brushcutter or trimmer can turn it is designed to prevent the WARNING! English This section describes the machine's safety equipment, its "idling" position. GLOVES ...
Owners Manual
Page 6
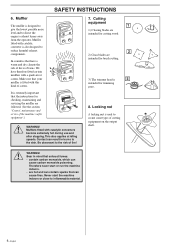
... are followed. (See the section "Control, maintenance and service of cutting equipment on the output shaft. ! Muffler The muffler is 3 intended for brush cutting. 3) The trimmer head is designed to give the lowest possible noise level and to the skin. Contact can result in mind that have therefore fitted certain mufflers...
... are followed. (See the section "Control, maintenance and service of cutting equipment on the output shaft. ! Muffler The muffler is 3 intended for brush cutting. 3) The trimmer head is designed to give the lowest possible noise level and to the skin. Contact can result in mind that have therefore fitted certain mufflers...
Owners Manual
Page 10
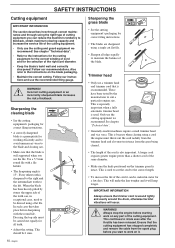
.... When the blade has been heavily pitted by the manufacturer to suit a particular engine size. This continues to the instructions on the trimmer guard is also important. Follow our recommendations. Follow our instructions and use the file. This should be carried out equally for the selection... that the blade is recommended. This will make the line tougher and it will occur. ! English IMPORTANT INFORMATION Always ensure the trimmer cord is sharpened to the right and the intermediate tooth to work on it can , in water for a few days. See ...
.... When the blade has been heavily pitted by the manufacturer to suit a particular engine size. This continues to the instructions on the trimmer guard is also important. Follow our recommendations. Follow our instructions and use the file. This should be carried out equally for the selection... that the blade is recommended. This will make the line tougher and it will occur. ! English IMPORTANT INFORMATION Always ensure the trimmer cord is sharpened to the right and the intermediate tooth to work on it can , in water for a few days. See ...

Owners Manual
Page 12
... or extreme cold, etc. To work in unfavourable weather conditions. Look out for working on sloping ground. 4. Never put the machine down with brushcutters and trimmers. • If you encounter a situation where you are uncertain how to proceed you consider to be switched off before using the machine. slippery surfaces, affect...
... or extreme cold, etc. To work in unfavourable weather conditions. Look out for working on sloping ground. 4. Never put the machine down with brushcutters and trimmers. • If you encounter a situation where you are uncertain how to proceed you consider to be switched off before using the machine. slippery surfaces, affect...
Owners Manual
Page 13
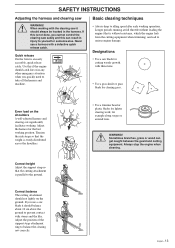
... the position of the support strap attachment ring to serious engine damage. English - 13 SAFETY INSTRUCTIONS Adjusting the harness and clearing saw correctly. • Use a trimmer head or plastic blades for lighter clearing work, for example along verges or around trees. ! Even load on the ground. WARNING! When working . Quick release...
... the position of the support strap attachment ring to serious engine damage. English - 13 SAFETY INSTRUCTIONS Adjusting the harness and clearing saw correctly. • Use a trimmer head or plastic blades for lighter clearing work, for example along verges or around trees. ! Even load on the ground. WARNING! When working . Quick release...
Owners Manual
Page 15
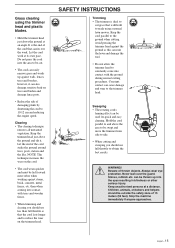
...procedures. Let the cord work . WARNING! Stop the machine immediately if anyone approaches. Children, animals, onlookers and helpers should be swept and move the trimmer from side to side. • When cutting and sweeping you should use less than when coming into contact with trees and wooden fences. • ... the cord parallel to and above the ground and tilt it can ruin the lawn and damage the tool. • Do not allow the trimmer head to cut . • The cord can easily remove grass and weeds up into the eyes resulting in blindness or other serious injury. Keep...
...procedures. Let the cord work . WARNING! Stop the machine immediately if anyone approaches. Children, animals, onlookers and helpers should be swept and move the trimmer from side to side. • When cutting and sweeping you should use less than when coming into contact with trees and wooden fences. • ... the cord parallel to and above the ground and tilt it can ruin the lawn and damage the tool. • Do not allow the trimmer head to cut . • The cord can easily remove grass and weeds up into the eyes resulting in blindness or other serious injury. Keep...

Owners Manual
Page 16
Clutch cover 18. Support cup 22. Trimmer head 24. Transport guard 27. Locking pin 29. Handlebars 7. Starter handle 13. Choke 15. Locking nut 20. Allen key 28. Blade guard 32. Start throttle ...
Clutch cover 18. Support cup 22. Trimmer head 24. Transport guard 27. Locking pin 29. Handlebars 7. Starter handle 13. Choke 15. Locking nut 20. Allen key 28. Blade guard 32. Start throttle ...
Owners Manual
Page 18
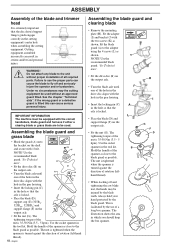
... axle is locked. • Place the blade (D), support cup (E) (325RX, 325RXT, 325RDX) and support flange (F) on the output axle. ASSEMBLY Assembly of the blade and trimmer head It is extremely important that the disc drive's/support flange's guide engages correctly in the tool kit. Fit the adapter (I) and bracket (J) with the...
... axle is locked. • Place the blade (D), support cup (E) (325RX, 325RXT, 325RDX) and support flange (F) on the output axle. ASSEMBLY Assembly of the blade and trimmer head It is extremely important that the disc drive's/support flange's guide engages correctly in the tool kit. Fit the adapter (I) and bracket (J) with the...
Owners Manual
Page 19
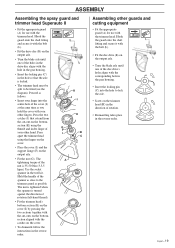
...the cover. • Place the cover (I B C A Assembling other guards and cutting equipment • Fit the appropriate guard (A) for use with the trimmer head. Proceed as you hold the cover with your other fingers. The tightening torque of your other hand. The nut is tightened when the spanner... is turned against the direction of rotation (left-hand thread). • Fit the trimmer head's bottom section (K) on the bottom section (K) using the fingers on the cover. • To dismantle follow the instructions in the tool ...
...the cover. • Place the cover (I B C A Assembling other guards and cutting equipment • Fit the appropriate guard (A) for use with the trimmer head. Proceed as you hold the cover with your other fingers. The tightening torque of your other hand. The nut is tightened when the spanner... is turned against the direction of rotation (left-hand thread). • Fit the trimmer head's bottom section (K) on the bottom section (K) using the fingers on the cover. • To dismantle follow the instructions in the tool ...
Owners Manual
Page 22
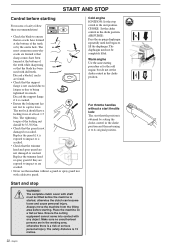
... personal injury. START AND STOP Control before starting For reasons of safety follow these recommendations! • Check the blade to ensure that the trimmer head and spray guard are not damaged or cracked. Replace the guard if it to fill the diaphragm. CHOKE: Set the choke control in... the choke position. Place the machine on a flat surface. Replace the trimmer head or spray guard if they are cracked. • Never use the machine without a start throttle lock: The start position. Ensure the cutting ...
... personal injury. START AND STOP Control before starting For reasons of safety follow these recommendations! • Check the blade to ensure that the trimmer head and spray guard are not damaged or cracked. Replace the guard if it to fill the diaphragm. CHOKE: Set the choke control in... the choke position. Place the machine on a flat surface. Replace the trimmer head or spray guard if they are cracked. • Never use the machine without a start throttle lock: The start position. Ensure the cutting ...

Owners Manual
Page 28
...and the space around it to the operator or others. When the blade has been heavily pitted by HUSQVARNA. Use a 5.5 mm round file with a catalytic converter). 28 - NOTE: Use only HUSQVARNA replacement parts. Monthly maintenance • Clean the fuel tank. • Clean the exterior of impacts ...left. Daily maintenance • Check throttle trigger and throttle trigger lockout function. • Check stop switch function. • Check that blade/trimmer head does not rotate at the starter is not clogged. • Check that the blade is 15°. Weekly maintenance • Check ...
...and the space around it to the operator or others. When the blade has been heavily pitted by HUSQVARNA. Use a 5.5 mm round file with a catalytic converter). 28 - NOTE: Use only HUSQVARNA replacement parts. Monthly maintenance • Clean the fuel tank. • Clean the exterior of impacts ...left. Daily maintenance • Check throttle trigger and throttle trigger lockout function. • Check stop switch function. • Check that blade/trimmer head does not rotate at the starter is not clogged. • Check that the blade is 15°. Weekly maintenance • Check ...

Owners Manual
Page 30
TECHNICAL DATA Approved accessories 323R Centre hole in blades Ø 25,4 mm Threaded blade axle M10 Grass blade Saw blade Plastic knives Trimmer head Support cup Type Grass 255-4 1" (∅ 255 4-teeth) Grass 255-8 1" (∅ 250 8-teeth) Multi 255-3 1" (∅ 255 3-teeth) Maxi X ... - English Approved accessories 325R , 325R , 325RD X XT X Centre hole in blades Ø 25,4 mm Threaded blade axle M10 Grass blade Saw blade Plastic knives Trimmer head Support cup Type Grass 255-4 1" (∅ 255 4-teeth) Grass 255-8 1" (∅ 250 8-teeth) Maxi X 200-26 1" (∅ 200 26-teeth...
TECHNICAL DATA Approved accessories 323R Centre hole in blades Ø 25,4 mm Threaded blade axle M10 Grass blade Saw blade Plastic knives Trimmer head Support cup Type Grass 255-4 1" (∅ 255 4-teeth) Grass 255-8 1" (∅ 250 8-teeth) Multi 255-3 1" (∅ 255 3-teeth) Maxi X ... - English Approved accessories 325R , 325R , 325RD X XT X Centre hole in blades Ø 25,4 mm Threaded blade axle M10 Grass blade Saw blade Plastic knives Trimmer head Support cup Type Grass 255-4 1" (∅ 255 4-teeth) Grass 255-8 1" (∅ 250 8-teeth) Maxi X 200-26 1" (∅ 200 26-teeth...


