
Owners Manual
Page 2
... closer than 15 metres. Always wear approved protective gloves. 15 m 50FT 15 m 50FT The operator of the machine shall ensure, while working, that is trimmer head with the stop switch in the STOP position. Ocular control. Careless or incorrect use can cause the amputation of falling objects • Ear protection •...
... closer than 15 metres. Always wear approved protective gloves. 15 m 50FT 15 m 50FT The operator of the machine shall ensure, while working, that is trimmer head with the stop switch in the STOP position. Ocular control. Careless or incorrect use can cause the amputation of falling objects • Ear protection •...

Owners Manual
Page 3
...individual. ! For customer assistance call: 704-921-7000 or contact us at our website: www.husqvarna.com List of contents SYMBOL EXPLANATION Symbols 2 CONTENTS List of contents 3 SAFETY INSTRUCTIONS Personal protective...machine's safety equipment 4 Control, maintenance and service of the blade and trimmer head 19 Assembling the blade guard and grass blade 19 Assembling the blade guard and clearing ... the grass blade 27 Sharpening the clearing blade 28 Maintenance schedule 28 TECHNICAL DATA 323R 29 325RX 29 325RXT 29 325RDX 29 EMISSION CONTROL WARRANTY STATEMENT Your warranty rights ...
...individual. ! For customer assistance call: 704-921-7000 or contact us at our website: www.husqvarna.com List of contents SYMBOL EXPLANATION Symbols 2 CONTENTS List of contents 3 SAFETY INSTRUCTIONS Personal protective...machine's safety equipment 4 Control, maintenance and service of the blade and trimmer head 19 Assembling the blade guard and grass blade 19 Assembling the blade guard and clearing ... the grass blade 27 Sharpening the clearing blade 28 Maintenance schedule 28 TECHNICAL DATA 323R 29 325RX 29 325RXT 29 325RDX 29 EMISSION CONTROL WARRANTY STATEMENT Your warranty rights ...
Owners Manual
Page 6
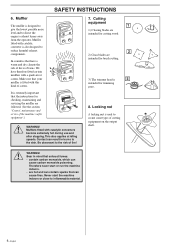
... observant to secure some types of fire! 7. Cutting equipment 1 1) Clearing blades are intended for cutting wood. 2 2) Grass blades are intended for brush cutting. 3) The trimmer head is fitted with catalytic converters become extremely hot during use and after stopping. Therefore never start the machine indoors or close to the skin. In...
... observant to secure some types of fire! 7. Cutting equipment 1 1) Clearing blades are intended for cutting wood. 2 2) Grass blades are intended for brush cutting. 3) The trimmer head is fitted with catalytic converters become extremely hot during use and after stopping. Therefore never start the machine indoors or close to the skin. In...
Owners Manual
Page 10
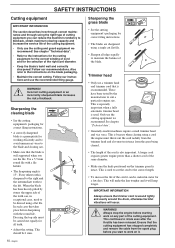
.... This should be carried out equally for a few days. See chapter "Technical data". • Generally smaller machines require a small trimmer head and vice versa. IMPORTANT INFORMATION Always ensure the trimmer cord is used to cut flat file. • Sharpen all teeth. • Adjust...spark plug before starting work on the trimmer guard is also important. Follow our recommendations. Follow our instructions and use a trimmer head and trimmer cord that the cutting equipment has stopped completely and remove the cable from the grass being cleared. • The ...
.... This should be carried out equally for a few days. See chapter "Technical data". • Generally smaller machines require a small trimmer head and vice versa. IMPORTANT INFORMATION Always ensure the trimmer cord is used to cut flat file. • Sharpen all teeth. • Adjust...spark plug before starting work on the trimmer guard is also important. Follow our recommendations. Follow our instructions and use a trimmer head and trimmer cord that the cutting equipment has stopped completely and remove the cable from the grass being cleared. • The ...
Owners Manual
Page 13
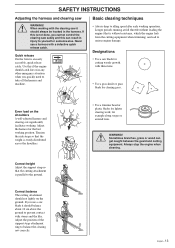
... attachment ring to yourself or someone else. Adjust the harness for example along verges or around trees. ! Designations • Use a saw correctly. • Use a trimmer head or plastic blades for lighter clearing work, for the best working operation. Correct height Adjust the support strap so that is parallel to idling speed...
... attachment ring to yourself or someone else. Adjust the harness for example along verges or around trees. ! Designations • Use a saw correctly. • Use a trimmer head or plastic blades for lighter clearing work, for the best working operation. Correct height Adjust the support strap so that is parallel to idling speed...
Owners Manual
Page 15
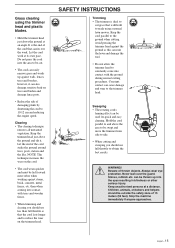
... wear on the cord. • The cord wears quicker and must be used for quick and easy cleaning. Always wear eye protection. Keep the trimmer head just above the ground and tilt it can be fed forward more often when working against stones, brick, concrete, metal fences, etc. Constant contact can... against the ground as this can cause damage and wear to the ground when cutting. Let the end of thrown objects. Avoid pressing the trimmer head against walls, fences, trees and borders, however, it . can be cut grass that is the end of 15 meters (50 feet). Hold the cord ...
... wear on the cord. • The cord wears quicker and must be used for quick and easy cleaning. Always wear eye protection. Keep the trimmer head just above the ground and tilt it can be fed forward more often when working against stones, brick, concrete, metal fences, etc. Constant contact can... against the ground as this can cause damage and wear to the ground when cutting. Let the end of thrown objects. Avoid pressing the trimmer head against walls, fences, trees and borders, however, it . can be cut grass that is the end of 15 meters (50 feet). Hold the cord ...

Owners Manual
Page 16
... 23. Blade guard 32. Adjusting the throttle wire Blade 2. Throttle 8. Air purge 16. Socket spanner 25. WHAT IS WHAT? Combination guard 5. Locking nut 20. Trimmer head 24. Spray guard 31. Stop switch 9. Starter handle 13. Start throttle button 34. What is what on the brushcutter? 1. Grease filler cap 3. Handlebars 7. Support cup...
... 23. Blade guard 32. Adjusting the throttle wire Blade 2. Throttle 8. Air purge 16. Socket spanner 25. WHAT IS WHAT? Combination guard 5. Locking nut 20. Trimmer head 24. Spray guard 31. Stop switch 9. Starter handle 13. Start throttle button 34. What is what on the brushcutter? 1. Grease filler cap 3. Handlebars 7. Support cup...
Owners Manual
Page 18
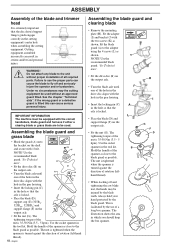
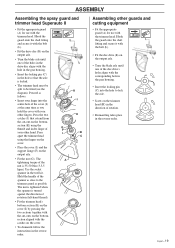
... when assembling the cutting equipment. English Assembling the blade guard and clearing blade • Remove the mounting plate (H). ASSEMBLY Assembly of the blade and trimmer head It is extremely important that the disc drive's/support flange's guide engages correctly in which you should keep the box spanner. If the wrong guard...
... when assembling the cutting equipment. English Assembling the blade guard and clearing blade • Remove the mounting plate (H). ASSEMBLY Assembly of the blade and trimmer head It is extremely important that the disc drive's/support flange's guide engages correctly in which you should keep the box spanner. If the wrong guard...
Owners Manual
Page 19
...the cover. • To dismantle follow the instructions in the tool kit. Press the two catches (J) that the axle is locked. • The trimmer head must be split to be fitted (see the diagram). English - 19 The tightening torque of your other fingers. Hold the handle of rotation. • Dismantling... on the output axle. • Fit the nut (G). Use the socket spanner in the reverse order. Proceed as you hold the cover with the trimmer head. Hook the guard onto the shaft fitting and secure it with the bolt (L). • Fit the disc drive (B) on the output axle. •...
...the cover. • To dismantle follow the instructions in the tool kit. Press the two catches (J) that the axle is locked. • The trimmer head must be split to be fitted (see the diagram). English - 19 The tightening torque of your other fingers. Hold the handle of rotation. • Dismantling... on the output axle. • Fit the nut (G). Use the socket spanner in the reverse order. Proceed as you hold the cover with the trimmer head. Hook the guard onto the shaft fitting and secure it with the bolt (L). • Fit the disc drive (B) on the output axle. •...
Owners Manual
Page 22
The nut lock should be 35-50 Nm. • Check that the guard is not damaged or cracked. Replace the trimmer head or spray guard if they are exposed to impact or are cracked. • Never use the machine without a start throttle lock: The start position. The ... sure no cracks have formed at least 1.5 Nm. Replace the guard if it is exposed to impact or is cracked. • Check that the trimmer head and spray guard are found. • Check that the support flange is not cracked due to fatigue or due to being tightened too much. AIR...
The nut lock should be 35-50 Nm. • Check that the guard is not damaged or cracked. Replace the trimmer head or spray guard if they are exposed to impact or are cracked. • Never use the machine without a start throttle lock: The start position. The ... sure no cracks have formed at least 1.5 Nm. Replace the guard if it is exposed to impact or is cracked. • Check that the trimmer head and spray guard are found. • Check that the support flange is not cracked due to fatigue or due to being tightened too much. AIR...
Owners Manual
Page 25
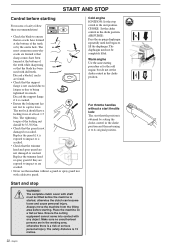
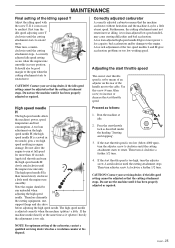
... H The high speed needle affects the machine's power, speed, temperature and fuel consumption. Then turn adjuster screw A clockwise a further 1/2 turn. Proceed as described under the heading "Starting and stopping". 3. Note the engine should also be adjusted so that the cutting attachment stops. MAINTENANCE Final setting of the two speed needles L and...
... H The high speed needle affects the machine's power, speed, temperature and fuel consumption. Then turn adjuster screw A clockwise a further 1/2 turn. Proceed as described under the heading "Starting and stopping". 3. Note the engine should also be adjusted so that the cutting attachment stops. MAINTENANCE Final setting of the two speed needles L and...

Owners Manual
Page 28
... Daily maintenance • Check throttle trigger and throttle trigger lockout function. • Check stop switch function. • Check that blade/trimmer head does not rotate at the starter is not clogged. • Check that the blade is filled with a catalytic converter). Monthly maintenance •...8226; Clean the exterior of replacement parts can be carried out equally for wear. When the blade has been heavily pitted by HUSQVARNA. This should be dressed using a flat file. English Every other damage. MAINTENANCE Sharpening the clearing blade WARNING! Use of other...
... Daily maintenance • Check throttle trigger and throttle trigger lockout function. • Check stop switch function. • Check that blade/trimmer head does not rotate at the starter is not clogged. • Check that the blade is filled with a catalytic converter). Monthly maintenance •...8226; Clean the exterior of replacement parts can be carried out equally for wear. When the blade has been heavily pitted by HUSQVARNA. This should be dressed using a flat file. English Every other damage. MAINTENANCE Sharpening the clearing blade WARNING! Use of other...

Owners Manual
Page 30
TECHNICAL DATA Approved accessories 323R Centre hole in blades Ø 25,4 mm Threaded blade axle M10 Grass blade Saw blade Plastic knives Trimmer head Support cup Type Grass 255-4 1" (∅ 255 4-teeth) Grass 255-8 1" (∅ 250 8-teeth) Multi 255-3 1" (∅ 255 3-teeth) Maxi X 200... Approved accessories 325R , 325R , 325RD X XT X Centre hole in blades Ø 25,4 mm Threaded blade axle M10 Grass blade Saw blade Plastic knives Trimmer head Support cup Type Grass 255-4 1" (∅ 255 4-teeth) Grass 255-8 1" (∅ 250 8-teeth) Maxi X 200-26 1" (∅ 200 26-teeth...
TECHNICAL DATA Approved accessories 323R Centre hole in blades Ø 25,4 mm Threaded blade axle M10 Grass blade Saw blade Plastic knives Trimmer head Support cup Type Grass 255-4 1" (∅ 255 4-teeth) Grass 255-8 1" (∅ 250 8-teeth) Multi 255-3 1" (∅ 255 3-teeth) Maxi X 200... Approved accessories 325R , 325R , 325RD X XT X Centre hole in blades Ø 25,4 mm Threaded blade axle M10 Grass blade Saw blade Plastic knives Trimmer head Support cup Type Grass 255-4 1" (∅ 255 4-teeth) Grass 255-8 1" (∅ 250 8-teeth) Maxi X 200-26 1" (∅ 200 26-teeth...


