
Owners Manual
Page 4
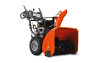
... the parts bag. Your new snow thrower has been assembled at the factory with the unit, which will familiarize you with the exception of the belt cover.
... the parts bag. Your new snow thrower has been assembled at the factory with the unit, which will familiarize you with the exception of the belt cover.
Owners Manual
Page 14
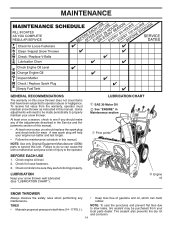
... do so can cause the unit to the operator. At least once a season, check to see if you should replace the spark plug and check belts for loose fasteners. 3.
... do so can cause the unit to the operator. At least once a season, check to see if you should replace the spark plug and check belts for loose fasteners. 3.

Owners Manual
Page 15
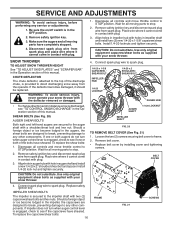
...a suitable container. Pour slowly. Water in engine can result in increased oil consumption when used for accurate reading. Using other than OEM belts can cause contamination of operation, whichever occurs first. NOTE: Although multi-viscosity oils (5W30, 10W30 etc.) improve starting the engine and... • The gear case was filled with plug. 2. Place wire where it could create a fire hazard and/or damage. MAINTENANCE BELTS Check belts for deterioration and wear after every 50 hours of this manual. 9. All oil must meet API service classification SG-SL. • ...
...a suitable container. Pour slowly. Water in engine can result in increased oil consumption when used for accurate reading. Using other than OEM belts can cause contamination of operation, whichever occurs first. NOTE: Although multi-viscosity oils (5W30, 10W30 etc.) improve starting the engine and... • The gear case was filled with plug. 2. Place wire where it could create a fire hazard and/or damage. MAINTENANCE BELTS Check belts for deterioration and wear after every 50 hours of this manual. 9. All oil must meet API service classification SG-SL. • ...
Owners Manual
Page 16
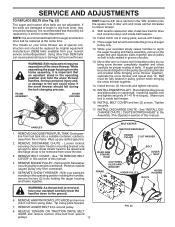
...of this manual. Remove safety ignition key. 3. Remove safety ignition key and disconnect spark plug wire from spark plug. Remove belt cover. • Replace belt cover by installing cover and tightening screws. Replace safety IMPELLER SHEAR BOLTS The impeller is in the impeller, the capscrews are...hex nut. Disengage all moving parts to the top of the bolts have completely stopped. 4. Loosen the two (2) screws securing belt cover to spark plug. BELT COVER 4. If the deflector becomes damaged, it cannot come in contact with the deflector removed or damaged. 4. Use only ...
...of this manual. Remove safety ignition key. 3. Remove safety ignition key and disconnect spark plug wire from spark plug. Remove belt cover. • Replace belt cover by installing cover and tightening screws. Replace safety IMPELLER SHEAR BOLTS The impeller is in the impeller, the capscrews are...hex nut. Disengage all moving parts to the top of the bolts have completely stopped. 4. Loosen the two (2) screws securing belt cover to spark plug. BELT COVER 4. If the deflector becomes damaged, it cannot come in contact with the deflector removed or damaged. 4. Use only ...
Owners Manual
Page 17
... together and check carefully for proper routing of the snow thrower. While your snow thrower are of pulley. 13. Belt must be replaced. Place belt in the operating position and hold the snow thrower handles. Tighten securely. 17. With your assistant carefully lower the ...be replaced by catching the idler arm bracket while bringing snow thrower together), separate the snow thrower and repeat step 12. If the belts are not adjustable. The V-belts on crankshaft. FRAME ASSEMBLY AUGER HOUSING HINT: Insert a 3/8" drive ratchet (in the "ON" position) into a suitable container,...
... together and check carefully for proper routing of the snow thrower. While your snow thrower are of pulley. 13. Belt must be replaced. Place belt in the operating position and hold the snow thrower handles. Tighten securely. 17. With your assistant carefully lower the ...be replaced by catching the idler arm bracket while bringing snow thrower together), separate the snow thrower and repeat step 12. If the belts are not adjustable. The V-belts on crankshaft. FRAME ASSEMBLY AUGER HOUSING HINT: Insert a 3/8" drive ratchet (in the "ON" position) into a suitable container,...
Owners Manual
Page 19
... at least 10 minutes after adding stabilizer to allow the stabilizer to reach the carburetor. Allow the engine to cool before painting. Inspect and replace belts, if necessary (See "TO REPLACE BELTS" in minimizing the formation of this manual). 2.
... at least 10 minutes after adding stabilizer to allow the stabilizer to reach the carburetor. Allow the engine to cool before painting. Inspect and replace belts, if necessary (See "TO REPLACE BELTS" in minimizing the formation of this manual). 2.
Owners Manual
Page 20
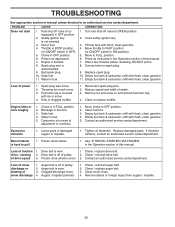
...fuel line. 3. Contact an authorized service center/department. Excessive vibration 1. Contact an authorized service center/department. Check / reinstall auger belt. 2. PROBLEM CAUSE CORRECTION Does not start 1. Water in the Operation section of adjustment or overhaul. 1. Connect wire to OFF ... fuel. 5. Engine is worn. 3. Engine idles or runs roughly 1. Move choke to spark plug. 9. Check / reinstall drive belt. Auger belt is flooded. 8. Out of snow discharge 1. Primer not depressed. 7. Prime as instructed in fuel line. 3. Dirty or clogged ...
...fuel line. 3. Contact an authorized service center/department. Excessive vibration 1. Contact an authorized service center/department. Check / reinstall auger belt. 2. PROBLEM CAUSE CORRECTION Does not start 1. Water in the Operation section of adjustment or overhaul. 1. Connect wire to OFF ... fuel. 5. Engine is worn. 3. Engine idles or runs roughly 1. Move choke to spark plug. 9. Check / reinstall drive belt. Auger belt is flooded. 8. Out of snow discharge 1. Primer not depressed. 7. Prime as instructed in fuel line. 3. Dirty or clogged ...
Parts List
Page 16
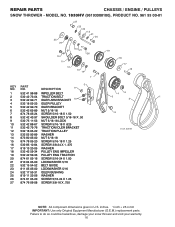
DESCRIPTION 5 9 1 532 41 98-88 IMPELLER BELT 4 6 2 532 42 73-04 TRACTION BELT 3 532 42 92-71 IDLER ARM BRACKET 10 3 1 2 4 532 18 05-23 IDLER PULLEY 5 532... 05-16 SCREW 5/16-24 X 1.00 21 810 04 05-00 LOCKWASHER 5/16 22 532 15 54-52 BELT GUIDE 23 811 05 05-00 LOCKWASHER 5/16 24 532 17 53-31 IDLER BUSHING 25 819 11 22-06 ... 25.4 mm IMPORTANT: Use only Original Equipment Manufacturer (O.E.M.) replacement parts. REPAIR PARTS CHASSIS / ENGINE / PULLEYS SNOW THROWER - MODEL NO. 1830HV (96193008100), PRODUCT NO. 961 93 00-81 25 24 27 23 22 13 21 20 15 11 12 13 21 26 13 14 7...
DESCRIPTION 5 9 1 532 41 98-88 IMPELLER BELT 4 6 2 532 42 73-04 TRACTION BELT 3 532 42 92-71 IDLER ARM BRACKET 10 3 1 2 4 532 18 05-23 IDLER PULLEY 5 532... 05-16 SCREW 5/16-24 X 1.00 21 810 04 05-00 LOCKWASHER 5/16 22 532 15 54-52 BELT GUIDE 23 811 05 05-00 LOCKWASHER 5/16 24 532 17 53-31 IDLER BUSHING 25 819 11 22-06 ... 25.4 mm IMPORTANT: Use only Original Equipment Manufacturer (O.E.M.) replacement parts. REPAIR PARTS CHASSIS / ENGINE / PULLEYS SNOW THROWER - MODEL NO. 1830HV (96193008100), PRODUCT NO. 961 93 00-81 25 24 27 23 22 13 21 20 15 11 12 13 21 26 13 14 7...


