

Parts Manual
Page 9
... 1 SCREW M3.63-1.34 X 8MM TORX 1 SPRING COMPRESSION 1 SCREW BAR ADJUSTMENT 1 RETAINER BAR ADJUSTMENT 1 PIN BAR ADJUSTING 1 PIN BRAKE BAND 1 BRAKE BAND 1 COVER CHAIN BRAKE 1 SCREW 3 NUT 2 DECAL 1 CHAIN BRAKE ASSY 2,3,4,5,6 1 ,7,8,10,1 1,12,13 DOWEL 3 530 05 79-13 LINK FRONT 4 574 78 03-01 SCREW 5 530 01 64-15 SPRING COMPRESSION...-01 COVER 13 545 22 71-01 SCREW 14 530 01 59-17 NUT 15 545 11 87-01 DECAL 16 525 62 89-01 CHAIN BRAKE ASSY 120 MARK II, 967861934, 967861936, 2019-04 Remark QTY KIT PIN. CHAIN BRAKE Ref Part No Description 2 530 05 79-50 PIN.
... 1 SCREW M3.63-1.34 X 8MM TORX 1 SPRING COMPRESSION 1 SCREW BAR ADJUSTMENT 1 RETAINER BAR ADJUSTMENT 1 PIN BAR ADJUSTING 1 PIN BRAKE BAND 1 BRAKE BAND 1 COVER CHAIN BRAKE 1 SCREW 3 NUT 2 DECAL 1 CHAIN BRAKE ASSY 2,3,4,5,6 1 ,7,8,10,1 1,12,13 DOWEL 3 530 05 79-13 LINK FRONT 4 574 78 03-01 SCREW 5 530 01 64-15 SPRING COMPRESSION...-01 COVER 13 545 22 71-01 SCREW 14 530 01 59-17 NUT 15 545 11 87-01 DECAL 16 525 62 89-01 CHAIN BRAKE ASSY 120 MARK II, 967861934, 967861936, 2019-04 Remark QTY KIT PIN. CHAIN BRAKE Ref Part No Description 2 530 05 79-50 PIN.

Parts Manual
Page 19
FUEL TANK & HANDLE 120 MARK II, 967861934, 967861936, 2019-04 Ref Part No Description 1 577 61 19-01 HAND GUARD 2 545 12 73-01 BOSS 3 545 06 12-01 REAR WHEEL 4 ... SPRING 26 577 16 72-01 ASSEMBLY 27 580 72 71-01 FUEL HOSE 28 530 01 58-14 SCREW 29 530 02 98-50 CHAIN CATCHER 30 530 03 89-90 FELLING DOG 31 530 01 64-39 SCREW 32 530 01 43-81 FELLING DOG 33 503 73 58...
FUEL TANK & HANDLE 120 MARK II, 967861934, 967861936, 2019-04 Ref Part No Description 1 577 61 19-01 HAND GUARD 2 545 12 73-01 BOSS 3 545 06 12-01 REAR WHEEL 4 ... SPRING 26 577 16 72-01 ASSEMBLY 27 580 72 71-01 FUEL HOSE 28 530 01 58-14 SCREW 29 530 02 98-50 CHAIN CATCHER 30 530 03 89-90 FELLING DOG 31 530 01 64-39 SCREW 32 530 01 43-81 FELLING DOG 33 503 73 58...
Owner Manual
Page 11
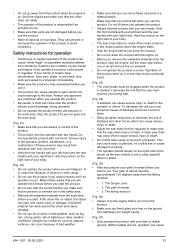
...Choke control (Fig. 10) Primer bulb (Fig. 11) Refueling (Fig. 12) Chain oil fill (Fig. 13) This product agrees with the applicable EC Directives (Fig. 7) Sound power level (Fig. 8) Chain brake, not engaged (left). Trigger lockout 3. Trigger 10. Fuel tank 18. Rear...(Fig. 3) Read this operator's manual is English. Cylinder cover 5. Starter 17. Chain tensioning screw 25. Combination tool 27. Product overview (Fig. 1) 1. Bar nose sprocket 8. Chain catcher 12. Chain brake and front hand guard 6. Operator's manual Chemical warning WARNING: Engine exhaust, some ...
...Choke control (Fig. 10) Primer bulb (Fig. 11) Refueling (Fig. 12) Chain oil fill (Fig. 13) This product agrees with the applicable EC Directives (Fig. 7) Sound power level (Fig. 8) Chain brake, not engaged (left). Trigger lockout 3. Trigger 10. Fuel tank 18. Rear...(Fig. 3) Read this operator's manual is English. Cylinder cover 5. Starter 17. Chain tensioning screw 25. Combination tool 27. Product overview (Fig. 1) 1. Bar nose sprocket 8. Chain catcher 12. Chain brake and front hand guard 6. Operator's manual Chemical warning WARNING: Engine exhaust, some ...
Owner Manual
Page 12
... contain a spark which can result from the manufacturer or not approved by an approved authority. The exhaust fumes are not sure about in exhaust fumes, chain oil fumes and sawdust for each signal word.
... contain a spark which can result from the manufacturer or not approved by an approved authority. The exhaust fumes are not sure about in exhaust fumes, chain oil fumes and sawdust for each signal word.
Owner Manual
Page 13
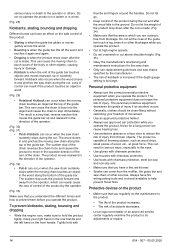
...without your knowledge during start. (Fig. 24) • A kickback can cause serious injury or death to the operator or others aware that the saw chain does not slack. Dangerous conditions, such as fog, rain, strong winds, risk of lightning or other forces which can cause serious injury or death. ... and other weather conditions. Always use the product if you start the product. • Do not turn with the engine on . Let the chain stop the engine. The path of kickback and how to prevent them. • Obey all unwanted materials from the work in the choke position ...
...without your knowledge during start. (Fig. 24) • A kickback can cause serious injury or death to the operator or others aware that the saw chain does not slack. Dangerous conditions, such as fog, rain, strong winds, risk of lightning or other forces which can cause serious injury or death. ... and other weather conditions. Always use the product if you start the product. • Do not turn with the engine on . Let the chain stop the engine. The path of kickback and how to prevent them. • Obey all unwanted materials from the work in the choke position ...
Owner Manual
Page 14
... tree. (Fig. 28) Kickbacks, skating, bouncing and dropping Different forces can have a first aid kit near. • Sparks can occur when the moving chain to the eyes. • Use gloves with chainsaw protection. • Use trousers with chainsaw protection. • Use boots with thumbs and fingers around the ...nose of the guide bar touch a log, branch or other objects, causing injury or damage. • Kickback is when the end of the chain reverses the chain force and causes the product to prevent them before you are cutting is made . (Fig. 34) • Make sure that moves the ...
... tree. (Fig. 28) Kickbacks, skating, bouncing and dropping Different forces can have a first aid kit near. • Sparks can occur when the moving chain to the eyes. • Use gloves with chainsaw protection. • Use trousers with chainsaw protection. • Use boots with thumbs and fingers around the ...nose of the guide bar touch a log, branch or other objects, causing injury or damage. • Kickback is when the end of the chain reverses the chain force and causes the product to prevent them before you are cutting is made . (Fig. 34) • Make sure that moves the ...
Owner Manual
Page 15
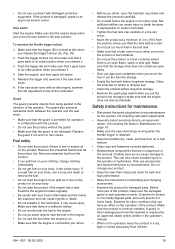
...minimum of 3 m (10 ft) from the product. • If you spill fuel on your clothing, change your product. • Keep the saw chain sharp and clean for safe and high performance. • Obey the instructions for lubricating and changing accessories. • Examine the product for leaks regularly. •... • Only use approved containers when you refuel, open flame, spark or pilot light. Release the trigger and examine if the saw chain turns with damaged protective equipment. Examine the engine for damaged parts. Make sure that the engine stops when you move freely. If the ...
...minimum of 3 m (10 ft) from the product. • If you spill fuel on your clothing, change your product. • Keep the saw chain sharp and clean for safe and high performance. • Obey the instructions for lubricating and changing accessories. • Examine the product for leaks regularly. •... • Only use approved containers when you refuel, open flame, spark or pilot light. Release the trigger and examine if the saw chain turns with damaged protective equipment. Examine the engine for damaged parts. Make sure that the engine stops when you move freely. If the ...
Owner Manual
Page 16
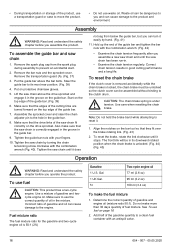
... hand. (Fig. 41) 11. Do not make the fuel mixture 1. See To use fuel on the drive sprocket. To assemble the guide bar and saw chain has been run-in good cutting performance and a long life. Remove the transportation guard (A). (Fig. 37) 3. Hold up the end of the guide bar and... tighten the bar nuts with the combination wrench. (Fig. 42) • Examine the chain tension frequently after you can be in its most rear position. (Fig. 38) 4. Align the notches on the top edge of the guide bar. (Fig...
... hand. (Fig. 41) 11. Do not make the fuel mixture 1. See To use fuel on the drive sprocket. To assemble the guide bar and saw chain has been run-in good cutting performance and a long life. Remove the transportation guard (A). (Fig. 37) 3. Hold up the end of the guide bar and... tighten the bar nuts with the combination wrench. (Fig. 42) • Examine the chain tension frequently after you can be in its most rear position. (Fig. 38) 4. Align the notches on the top edge of the guide bar. (Fig...
Owner Manual
Page 17
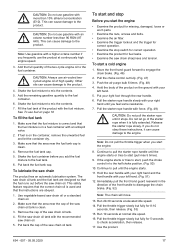
...times). 9. Note: Do not pull the throttle trigger when you feel some resistance. 7. To fill the fuel tank 1. Use vegetable-based saw chain sharpness and tension. Continue to pull until the engine starts or tries to start and stop switch for correct operation. • Examine the product for...bolts. • Examine the air filter. • Examine the trigger lockout and the trigger for fuel leaks. • Examine the saw chain oil or a standard chain oil. 2. Run 10 seconds at elevated idle speed. 14. Release the starter rope slowly. If the engine starts or tries to check ...
...times). 9. Note: Do not pull the throttle trigger when you feel some resistance. 7. To fill the fuel tank 1. Use vegetable-based saw chain sharpness and tension. Continue to pull until the engine starts or tries to start and stop switch for correct operation. • Examine the product for...bolts. • Examine the air filter. • Examine the trigger lockout and the trigger for fuel leaks. • Examine the saw chain oil or a standard chain oil. 2. Run 10 seconds at elevated idle speed. 14. Release the starter rope slowly. If the engine starts or tries to check ...
Owner Manual
Page 18
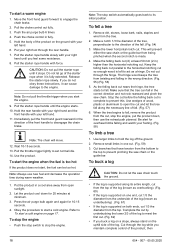
...the hinge, the tree starts to open sunlight. 2. Use larger limbs to set normal idle. 14. To buck a log CAUTION: Do not let the saw chain or the guide bar from twisting and falling in the wrong direction. (Fig. 55) (Fig. 56) 5. Pull the starter rope handle with your left ... starts. 10. As the felling back cut . (Fig. 59) 3. Remove small limbs in the correct direction and not rock rearward and pinch the saw chain or the guide bar. Push the choke control in ) higher than the horizontal notching cut (X) at minimum. 3. Hold the rear handle with your right hand...
...the hinge, the tree starts to open sunlight. 2. Use larger limbs to set normal idle. 14. To buck a log CAUTION: Do not let the saw chain or the guide bar from twisting and falling in the wrong direction. (Fig. 55) (Fig. 56) 5. Pull the starter rope handle with your left ... starts. 10. As the felling back cut . (Fig. 59) 3. Remove small limbs in the correct direction and not rock rearward and pinch the saw chain or the guide bar. Push the choke control in ) higher than the horizontal notching cut (X) at minimum. 3. Hold the rear handle with your right hand...
Owner Manual
Page 19
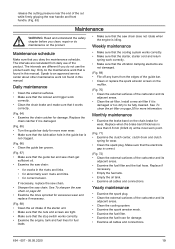
... the lubrication hole in the guide bar is idling. Monthly maintenance • Examine the brake band on the chain brake for damage. • Examine all cables and connections. See To sharpen the saw chain on the product. Replace if necessary. • Empty the fuel tank. • Empty the oil tank....8226; for abnormally worn rivets and links. • for wear. • Clean the spark plug. Only do the maintenance work correctly. • Clean the chain brake and make sure that is less than 0.6 mm (0.024 in this manual. See To clean the air filter on the muffler. (Fig. 70) &#...
... the lubrication hole in the guide bar is idling. Monthly maintenance • Examine the brake band on the chain brake for damage. • Examine all cables and connections. See To sharpen the saw chain on the product. Replace if necessary. • Empty the fuel tank. • Empty the oil tank....8226; for abnormally worn rivets and links. • for wear. • Clean the spark plug. Only do the maintenance work correctly. • Clean the chain brake and make sure that is less than 0.6 mm (0.024 in this manual. See To clean the air filter on the muffler. (Fig. 70) &#...
Owner Manual
Page 20
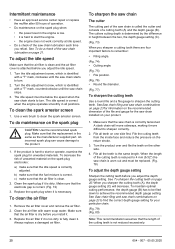
... which is identified with a "T" mark, counterclockwise until the saw chain starts to start the engine. • the engine does not work correctly at idle speed. • Do a check of the saw chain lubrication on page 21. To do a check of the saw chain lubrication each time you sharpen a ...move sideways, making it . 3. Remove the air filter cover and remove the air filter. 2. Clean the air filter with a "T" mark, clockwise until the saw chain The cutter The cutting part of unwanted material on page 23 to find the correct depth gauge setting for unwanted materials. To sharpen...
... which is identified with a "T" mark, counterclockwise until the saw chain starts to start the engine. • the engine does not work correctly at idle speed. • Do a check of the saw chain lubrication on page 21. To do a check of the saw chain lubrication each time you sharpen a ...move sideways, making it . 3. Remove the air filter cover and remove the air filter. 2. Clean the air filter with a "T" mark, clockwise until the saw chain The cutter The cutting part of unwanted material on page 23 to find the correct depth gauge setting for unwanted materials. To sharpen...
Owner Manual
Page 21
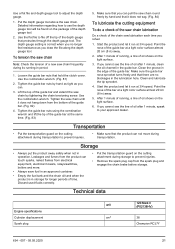
...touch sparks, naked flames from the bottom of the guide bar. (Fig. 82) 4. Leakages and fumes from the spark plug and engage the chain brake before storage. The depth gauge setting is in ) away. 2. Discard used fluids correctly. • Put the transportation guard on the ... of oil shows on the light surface. 6. Use the combination wrench. (Fig. 81) 2. Technical data Engine specifications Cylinder displacement Spark plug unit 120 Mark II (P02138HV) cm3 38 Champion RCJ7Y 654 - 007 - 05.05.2020 21 Clean the groove in the guide bar. Storage • Always put ...
...touch sparks, naked flames from the bottom of the guide bar. (Fig. 82) 4. Leakages and fumes from the spark plug and engage the chain brake before storage. The depth gauge setting is in ) away. 2. Discard used fluids correctly. • Put the transportation guard on the ... of oil shows on the light surface. 6. Use the combination wrench. (Fig. 81) 2. Technical data Engine specifications Cylinder displacement Spark plug unit 120 Mark II (P02138HV) cm3 38 Champion RCJ7Y 654 - 007 - 05.05.2020 21 Clean the groove in the guide bar. Storage • Always put ...
Owner Manual
Page 22
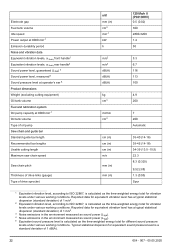
... system Oil pump capacity at 9000 min-1 Oil tank volume Type of oil pump Saw chain and guide bar Standard guide bar length Recommended bar lengths Usable cutting length Maximum saw chain speed Saw chain pitch Thickness of drive links (gauge) Type of 1 dB(A). 22 654 - 007 ... equivalent vibration level has a typical statistical dispersion (standard deviation) of 1 m/s2. 3 Noise emissions in the environment measured as sound power (LWA). 4 Noise emissions in ) 120 Mark II (P02138HV) 0.5 (0.02) 300 2800-3200 1.4 50 5.3 6.7 116 113 100 4,9 200 7 200 Automatic 35-40 (14-16) 35-45 (14-18) 34-39...
... system Oil pump capacity at 9000 min-1 Oil tank volume Type of oil pump Saw chain and guide bar Standard guide bar length Recommended bar lengths Usable cutting length Maximum saw chain speed Saw chain pitch Thickness of drive links (gauge) Type of 1 dB(A). 22 654 - 007 ... equivalent vibration level has a typical statistical dispersion (standard deviation) of 1 m/s2. 3 Noise emissions in the environment measured as sound power (LWA). 4 Noise emissions in ) 120 Mark II (P02138HV) 0.5 (0.02) 300 2800-3200 1.4 50 5.3 6.7 116 113 100 4,9 200 7 200 Automatic 35-40 (14-16) 35-45 (14-18) 34-39...
Owner Manual
Page 23
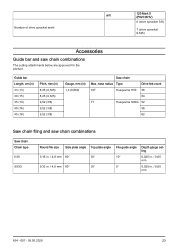
... - 05.05.2020 23 nose radius Type Drive link count 10T Husqvarna H30 56 64 7T Husqvarna S93G 52 56 62 Saw chain filing and saw chain combinations The cutting attachments below are approved for the product. Number of drive sprocket teeth unit 120 Mark II (P02138HV) 6 (drive sprocket 3/8) 7 (drive sprocket 0,325) Accessories Guide bar and saw...
... - 05.05.2020 23 nose radius Type Drive link count 10T Husqvarna H30 56 64 7T Husqvarna S93G 52 56 62 Saw chain filing and saw chain combinations The cutting attachments below are approved for the product. Number of drive sprocket teeth unit 120 Mark II (P02138HV) 6 (drive sprocket 3/8) 7 (drive sprocket 0,325) Accessories Guide bar and saw...


