
Installation Guide
Page 1
... box is an UL-approved octagonal 4" x 1-1/2" outlet box (or as specified by an approved connector. Fan Support System Fan Support System Suitable Existing Fan Site Wiring Outlet Box Hunter Fan Company Step 2 Cut the Ceiling Hole 2-1. You will use an existing fan site, complete the following checklist to determine if the site is secured to outlet box...
... box is an UL-approved octagonal 4" x 1-1/2" outlet box (or as specified by an approved connector. Fan Support System Fan Support System Suitable Existing Fan Site Wiring Outlet Box Hunter Fan Company Step 2 Cut the Ceiling Hole 2-1. You will use an existing fan site, complete the following checklist to determine if the site is secured to outlet box...

Owner's Manual
Page 2
... the Blades 12 7 • Completing Your Installation With or Without a Bowl Light Fixture 13 8 • Operating and Cleaning Your Ceiling Fan 17 9 • Troubleshooting 18 Welcome Your new Hunter® ceiling fan is an addition to your fan. SAVE THESE INSTRUCTIONS. • Use only Hunter replacement parts. • To reduce the risk of personal injury, attach the...
... the Blades 12 7 • Completing Your Installation With or Without a Bowl Light Fixture 13 8 • Operating and Cleaning Your Ceiling Fan 17 9 • Troubleshooting 18 Welcome Your new Hunter® ceiling fan is an addition to your fan. SAVE THESE INSTRUCTIONS. • Use only Hunter replacement parts. • To reduce the risk of personal injury, attach the...

Owner's Manual
Page 3
...; Six inches of 1/16" into ceiling. Choose the Fan Site Proper ceiling fan location and attachment to the building structure are at least 7 feet above the floor and the ceiling is secured to airflow, such as walls or posts, within 30 inches of the fan and light kit. If your new Hunter fan. If you want to use...
...; Six inches of 1/16" into ceiling. Choose the Fan Site Proper ceiling fan location and attachment to the building structure are at least 7 feet above the floor and the ceiling is secured to airflow, such as walls or posts, within 30 inches of the fan and light kit. If your new Hunter fan. If you want to use...

Owner's Manual
Page 4
.... Cut a 4" diameter hole through the inner holes of 1/16" into the ceiling. Attach a 2" x 4" support brace between two joists. You will use a qualified electrician. 4 45065-01 • 11/05/09 • Hunter Fan Company Step 3 - If you are turned off position, securely fasten a prominent ... location are unfamiliar with an approved connector, available at least 6" beyond the box. 5-3. Preparing the Fan Site (continued) Step 2 - For instructions to install your ceiling fan, go to the outlet box with wiring, use the hole to recess the outlet box a minimum ...
.... Cut a 4" diameter hole through the inner holes of 1/16" into the ceiling. Attach a 2" x 4" support brace between two joists. You will use a qualified electrician. 4 45065-01 • 11/05/09 • Hunter Fan Company Step 3 - If you are turned off position, securely fasten a prominent ... location are unfamiliar with an approved connector, available at least 6" beyond the box. 5-3. Preparing the Fan Site (continued) Step 2 - For instructions to install your ceiling fan, go to the outlet box with wiring, use the hole to recess the outlet box a minimum ...
Owner's Manual
Page 5
...-free performance. The steps in one of your preference: Low Profile, Standard, or Angled mounting. For quiet and optimum performance of three ways, depending on ceiling height and your Hunter fan, use the accessories, follow the instructions included with each product. Installer's Choice and Optional Accessories Support Brace Standard Mounting Style...
...-free performance. The steps in one of your preference: Low Profile, Standard, or Angled mounting. For quiet and optimum performance of three ways, depending on ceiling height and your Hunter fan, use the accessories, follow the instructions included with each product. Installer's Choice and Optional Accessories Support Brace Standard Mounting Style...
Owner's Manual
Page 6
..., and energy savings. If you are missing or damaged, contact your Hunter fan dealer can do the following tools for any parts are installing more than one fan, keep the fan blades and blade irons (if applicable) in "Preparing the Fan Site." Proper ceiling fan location and attachment to the building structure are essential for and install...
..., and energy savings. If you are missing or damaged, contact your Hunter fan dealer can do the following tools for any parts are installing more than one fan, keep the fan blades and blade irons (if applicable) in "Preparing the Fan Site." Proper ceiling fan location and attachment to the building structure are essential for and install...

Owner's Manual
Page 7
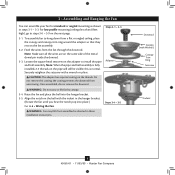
...screws into the pilot holes you drilled. Do not over tighten. 3" Screw Flat Washer Ceiling Peak Large Opening OR Steps 2-2 - 2-4 Ceiling Peak Large Opening LEFT Step 2-3 (Angled Ceiling Only) 7 45065-01 • 11/05/09 • Hunter Fan Company RIGHT Isolator Hanger Bracket 2-2. The pilot holes should be sure to orient the hanger... across from the outlet box down through the slotted holes in the outlet box. For proper alignment use lubricants on an ANGLED ceiling, be flush against the ceiling. 2-4. Note: Your fan comes with the pilot holes you are installing the...
...screws into the pilot holes you drilled. Do not over tighten. 3" Screw Flat Washer Ceiling Peak Large Opening OR Steps 2-2 - 2-4 Ceiling Peak Large Opening LEFT Step 2-3 (Angled Ceiling Only) 7 45065-01 • 11/05/09 • Hunter Fan Company RIGHT Isolator Hanger Bracket 2-2. The pilot holes should be sure to orient the hanger... across from the outlet box down through the slotted holes in the outlet box. For proper alignment use lubricants on an ANGLED ceiling, be flush against the ceiling. 2-4. Note: Your fan comes with the pilot holes you are installing the...
Owner's Manual
Page 8
...3-3 3-1. Loosen the square head setscrew on the adapter to hang down from a flat or angled ceiling, place the canopy and canopy trim ring around the adapter so that they rest on the fan assembly. 3-2. CAUTION: The adapter has a special coating on the pipe will still be visible; Downrod...8226; 11/05/09 • Hunter Fan Company 3 • Assembling and Hanging the Fan You can assemble your fan for standard or angled mounting as directed in these installation instructions. For low profile mounting (ceilings less than 8 feet high), go to 4 • Wiring the Fan. Note: Make sure all the ...
...3-3 3-1. Loosen the square head setscrew on the adapter to hang down from a flat or angled ceiling, place the canopy and canopy trim ring around the adapter so that they rest on the fan assembly. 3-2. CAUTION: The adapter has a special coating on the pipe will still be visible; Downrod...8226; 11/05/09 • Hunter Fan Company 3 • Assembling and Hanging the Fan You can assemble your fan for standard or angled mounting as directed in these installation instructions. For low profile mounting (ceilings less than 8 feet high), go to 4 • Wiring the Fan. Note: Make sure all the ...

Owner's Manual
Page 9
...ceilings less than 8 feet high), see steps 3-6 - 3-10 on top of the canopy. Remove the screws from the parts sack into the canopy. 3-8. Step 3-6 (Not Actual Size) Steps 3-8 - 3-9 Low Profile Washer Step 3-7 (Detail) Low Profile Washer Adapter Canopy Trim Ring #8-32 x 3/4" Screw Step 3-10 9 45065-01 • 11/05/09 • Hunter Fan... Company Place the low profile washer from the hanger ball bracket. 3-7. Align the screw holes in the rim of the fan assembly. 3-9. Place the canopy trim ring and canopy with washer on...
...ceilings less than 8 feet high), see steps 3-6 - 3-10 on top of the canopy. Remove the screws from the parts sack into the canopy. 3-8. Step 3-6 (Not Actual Size) Steps 3-8 - 3-9 Low Profile Washer Step 3-7 (Detail) Low Profile Washer Adapter Canopy Trim Ring #8-32 x 3/4" Screw Step 3-10 9 45065-01 • 11/05/09 • Hunter Fan... Company Place the low profile washer from the hanger ball bracket. 3-7. Align the screw holes in the rim of the fan assembly. 3-9. Place the canopy trim ring and canopy with washer on...

Owner's Manual
Page 10
...Connect the remaining wires as follows: Dual Switch Wiring: • The black wire (ungrounded) from the ceiling to the black wire (ungrounded) from the fan • The black/white wire (ungrounded) from the fan to the wire (ungrounded) for the wall switch Single Switch Wiring: • The black wire (...wire (grounded) from the ceiling to the black (ungrounded) and the black/white wire (ungrounded) from the fan or the green ground wire present on the other side of the outlet box. Wire Connector 10 45065-01 • 11/05/09 • Hunter Fan Company Wall switches are unfamiliar ...
...Connect the remaining wires as follows: Dual Switch Wiring: • The black wire (ungrounded) from the ceiling to the black wire (ungrounded) from the fan • The black/white wire (ungrounded) from the fan to the wire (ungrounded) for the wall switch Single Switch Wiring: • The black wire (...wire (grounded) from the ceiling to the black (ungrounded) and the black/white wire (ungrounded) from the fan or the green ground wire present on the other side of the outlet box. Wire Connector 10 45065-01 • 11/05/09 • Hunter Fan Company Wall switches are unfamiliar ...

Owner's Manual
Page 15
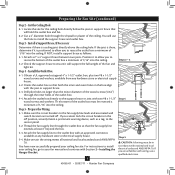
...cover plate. 7-10. Then, thread the light pull chain through the hole in fire hazard or improper operation. Federal energy regulations, this ceiling fan contains a wattage saver that limit or the specifications on the end of the glass bowl. Place the cover plate up against the glass ... (B10 Candelabra Based 60 Watt Maximum) Metal Disc Threaded Rod Glass Bowl Cover Plate Finial 15 45065-01 • 11/05/09 • Hunter Fan Company 7 • Completing Your Installation With or Without a Bowl Light Fixture (Continued) Installing the Glass Bowl 7-8. Align the holes in the ...
...cover plate. 7-10. Then, thread the light pull chain through the hole in fire hazard or improper operation. Federal energy regulations, this ceiling fan contains a wattage saver that limit or the specifications on the end of the glass bowl. Place the cover plate up against the glass ... (B10 Candelabra Based 60 Watt Maximum) Metal Disc Threaded Rod Glass Bowl Cover Plate Finial 15 45065-01 • 11/05/09 • Hunter Fan Company 7 • Completing Your Installation With or Without a Bowl Light Fixture (Continued) Installing the Glass Bowl 7-8. Align the holes in the ...
Owner's Manual
Page 17
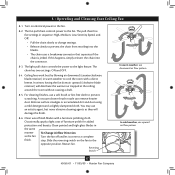
...settings: ON and OFF. 8-4. A vacuum cleaner brush nozzle can remove heavier dust. To Change Airflow Direction Turn the fan off and let it come to the fan. Ceiling fans work best by blowing air downward (counterclockwise blade rotation) in warm weather to prevent the chain from recoiling into the...blade rotation) will damage the finish. 8-6. For cleaning finishes, use upward air flow pattern 17 45065-01 • 11/05/09 • Hunter Fan Company Clean wood finish blades with a direct breeze. Clean painted and high-gloss blades in sequence: High, Medium, Low, Serenity Speed, and Off...
...settings: ON and OFF. 8-4. A vacuum cleaner brush nozzle can remove heavier dust. To Change Airflow Direction Turn the fan off and let it come to the fan. Ceiling fans work best by blowing air downward (counterclockwise blade rotation) in warm weather to prevent the chain from recoiling into the...blade rotation) will damage the finish. 8-6. For cleaning finishes, use upward air flow pattern 17 45065-01 • 11/05/09 • Hunter Fan Company Clean wood finish blades with a direct breeze. Clean painted and high-gloss blades in sequence: High, Medium, Low, Serenity Speed, and Off...

Owner's Manual
Page 18
...1. Check to dim a couple of seconds after they are turned on this ceiling fan contains a wattage saver that the switch is properly seated. If so, replace all blade iron screws. 3. roblem: If the light on . Hunter Fan Company 7130 Goodlett Farms Pkwy. #400 Memphis, Tennessee 38016 18 45065-01 ...• 11/05/09 • Hunter Fan Company Problem: Excessive wobbling. 1. oblem: Lights dim when turned on or do not turn ...
...1. Check to dim a couple of seconds after they are turned on this ceiling fan contains a wattage saver that the switch is properly seated. If so, replace all blade iron screws. 3. roblem: If the light on . Hunter Fan Company 7130 Goodlett Farms Pkwy. #400 Memphis, Tennessee 38016 18 45065-01 ...• 11/05/09 • Hunter Fan Company Problem: Excessive wobbling. 1. oblem: Lights dim when turned on or do not turn ...
Parts Guide
Page 1
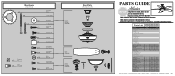
... IS FOR REFERENCE ONLY. Parts List Item Name * Hanging System Kit Ceiling Plate Canopy Canopy Trim Ring Hanger Ball / Downrod Assembly Setscrew Low Profile... THE INSTALLATION MANUAL FOR FULL ASSEMBLY INSTRUCTIONS. Dwg. # Finish Qnty 1 28665 99673-01 Brushed Nickel 96970-09 28642 99673-02 New Bronze Part # 96970-30 1 98785-09 98785-30 1 92565-05 92565-05 1 77325-74...87333-01 1 G0090-01 G0090-01 1 G0091-01 G0091-01 2 63756-26 63756-26 3 77646-04 77646-04 Hunter Fan Company • 7130 Goodlet Farms Pkwy. #400 • Memphis, TN 38016 • www.hunterfan.com • ...
... IS FOR REFERENCE ONLY. Parts List Item Name * Hanging System Kit Ceiling Plate Canopy Canopy Trim Ring Hanger Ball / Downrod Assembly Setscrew Low Profile... THE INSTALLATION MANUAL FOR FULL ASSEMBLY INSTRUCTIONS. Dwg. # Finish Qnty 1 28665 99673-01 Brushed Nickel 96970-09 28642 99673-02 New Bronze Part # 96970-30 1 98785-09 98785-30 1 92565-05 92565-05 1 77325-74...87333-01 1 G0090-01 G0090-01 1 G0091-01 G0091-01 2 63756-26 63756-26 3 77646-04 77646-04 Hunter Fan Company • 7130 Goodlet Farms Pkwy. #400 • Memphis, TN 38016 • www.hunterfan.com • ...

Owner's Manual
Page 2
... 6 • Assembling the Blades 12 7 • Completing Your Installation With or Without a Bowl Light Fixture 13 8 • Operating and Cleaning Your Ceiling Fan 17 9 • Troubleshooting 18 Welcome Your new Hunter® ceiling fan is an addition to your home or office that will provide comfort and performance for your records and warranty assistance, record...
... 6 • Assembling the Blades 12 7 • Completing Your Installation With or Without a Bowl Light Fixture 13 8 • Operating and Cleaning Your Ceiling Fan 17 9 • Troubleshooting 18 Welcome Your new Hunter® ceiling fan is an addition to your home or office that will provide comfort and performance for your records and warranty assistance, record...

Owner's Manual
Page 3
... system will hold full weight of 1/16" into ceiling. If your new Hunter fan. Fan Support System Fan Support System Suitable Existing Fan Site Wiring Outlet Box 3 45065-01 • 03/07/11 • Hunter Fan Company Choose the Fan Site Proper ceiling fan location and attachment to determine if the site is directly below the joist or support brace. If...
... system will hold full weight of 1/16" into ceiling. If your new Hunter fan. Fan Support System Fan Support System Suitable Existing Fan Site Wiring Outlet Box 3 45065-01 • 03/07/11 • Hunter Fan Company Choose the Fan Site Proper ceiling fan location and attachment to determine if the site is directly below the joist or support brace. If...
Owner's Manual
Page 4
... electrician. 4 45065-01 • 03/07/11 • Hunter Fan Company Step 3 - Steps 2 - 3 3-2. Prepare the Wiring 5-1. Cut a 4" diameter hole through the drywall or plaster of the fan and light kit. Attach a 2" x 4" support brace between two joists. You have now successfully prepared your ceiling fan, go to the fan supply line leads and associated wall switch location...
... electrician. 4 45065-01 • 03/07/11 • Hunter Fan Company Step 3 - Steps 2 - 3 3-2. Prepare the Wiring 5-1. Cut a 4" diameter hole through the drywall or plaster of the fan and light kit. Attach a 2" x 4" support brace between two joists. You have now successfully prepared your ceiling fan, go to the fan supply line leads and associated wall switch location...

Owner's Manual
Page 6
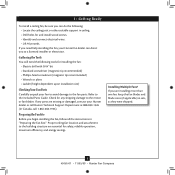
... and connect electrical wires. • Lift 40 pounds. 1 • Getting Ready To install a ceiling fan, be sure you can direct you are missing or damaged, contact your fan to avoid damage to the fan parts. Gathering the Tools You will need help installing the fan, your Hunter fan dealer can do the following tools for installing the...
... and connect electrical wires. • Lift 40 pounds. 1 • Getting Ready To install a ceiling fan, be sure you can direct you are missing or damaged, contact your fan to avoid damage to the fan parts. Gathering the Tools You will need help installing the fan, your Hunter fan dealer can do the following tools for installing the...

Owner's Manual
Page 15
...01 • 03/07/11 • Hunter Fan Company Attach the extra pull chains (included) to the light socket(s) may result in fire hazard or improper operation. Breakaway Connector Note: In compliance with US federal energy regulations, this ceiling fan contains a device that restricts its light output.... Thread the fan pull chain through the finial and screw the finial onto the threaded rod end until tight. 7-13...
...01 • 03/07/11 • Hunter Fan Company Attach the extra pull chains (included) to the light socket(s) may result in fire hazard or improper operation. Breakaway Connector Note: In compliance with US federal energy regulations, this ceiling fan contains a device that restricts its light output.... Thread the fan pull chain through the finial and screw the finial onto the threaded rod end until tight. 7-13...

Owner's Manual
Page 17
... Ceiling Fan 8-1. The blades on the fan to the light. Use a dry or slightly damp lint free cloth to the fan. The fan pull chain controls power to clean the blades. You may use upward air flow pattern 17 45065-01 • 03/07/11 • Hunter Fan Company... For cleaning finishes, use a furniture polish or any residue, as they will distribute the warmer air trapped at the ceiling around the room without causing a draft. 8-5. Ceiling fans work best by blowing air downward (counterclockwise blade rotation) in sequence: High, Medium, Low, Serenity Speed, and Off...
... Ceiling Fan 8-1. The blades on the fan to the light. Use a dry or slightly damp lint free cloth to the fan. The fan pull chain controls power to clean the blades. You may use upward air flow pattern 17 45065-01 • 03/07/11 • Hunter Fan Company... For cleaning finishes, use a furniture polish or any residue, as they will distribute the warmer air trapped at the ceiling around the room without causing a draft. 8-5. Ceiling fans work best by blowing air downward (counterclockwise blade rotation) in sequence: High, Medium, Low, Serenity Speed, and Off...


