
Installation Guide
Page 1
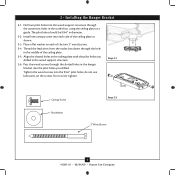
...as specified by wood screws and washers through the outlet box so that the fan supply line extends at least 8 feet high. • e fan blades have now successfully prepared your new Hunter fan. Outlet Box o e outlet box is positioned to allow you want ... or electrical supply house. 5-4. For instructions to install your fan manual and continue with an approved connector, available at least 7 feet above the ceiling hole. Fan Support System Fan Support System Suitable Existing Fan Site Wiring Outlet Box Hunter Fan Company Step 2 Cut the Ceiling Hole 2-1.
...as specified by wood screws and washers through the outlet box so that the fan supply line extends at least 8 feet high. • e fan blades have now successfully prepared your new Hunter fan. Outlet Box o e outlet box is positioned to allow you want ... or electrical supply house. 5-4. For instructions to install your fan manual and continue with an approved connector, available at least 7 feet above the ceiling hole. Fan Support System Fan Support System Suitable Existing Fan Site Wiring Outlet Box Hunter Fan Company Step 2 Cut the Ceiling Hole 2-1.
Owner's Manual
Page 1
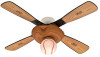
English Type 2 Models Owner's Guide and Installation Manual Form# 41081-01 20090804 ©2009 Hunter Fan Co. Español
English Type 2 Models Owner's Guide and Installation Manual Form# 41081-01 20090804 ©2009 Hunter Fan Co. Español
Owner's Manual
Page 2
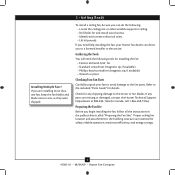
... that will provide comfort and performance for installing and operating your fan. SAVE THESE INSTRUCTIONS. • Use only Hunter replacement parts. • To reduce the risk of personal injury, attach the fan directly to the support structure of fire, electrical shock, or motor... MANUAL CAREFULLY BEFORE BEGINNING INSTALLATION. If you complete instructions for many years. Use only Hunter speed controls. © 2009 Hunter Fan Company 2 41081-01 • 08/04/09 • Hunter Fan Company Model Name Model No. Welcome For Your Records and Warranty Assistance For reference, ...
... that will provide comfort and performance for installing and operating your fan. SAVE THESE INSTRUCTIONS. • Use only Hunter replacement parts. • To reduce the risk of personal injury, attach the fan directly to the support structure of fire, electrical shock, or motor... MANUAL CAREFULLY BEFORE BEGINNING INSTALLATION. If you complete instructions for many years. Use only Hunter speed controls. © 2009 Hunter Fan Company 2 41081-01 • 08/04/09 • Hunter Fan Company Model Name Model No. Welcome For Your Records and Warranty Assistance For reference, ...
Owner's Manual
Page 3
... 8 feet or higher 3 41081-01 • 08/04/09 • Hunter Fan Company Considering Optional Accessories Consider using Hunter's optional accessories, including a wall-mounted speed control. For quiet and optimum performance of your Hunter fan, use remote control speed controls. This fan cannot use only Hunter speed controls. To install and use the accessories, follow the instructions...
... 8 feet or higher 3 41081-01 • 08/04/09 • Hunter Fan Company Considering Optional Accessories Consider using Hunter's optional accessories, including a wall-mounted speed control. For quiet and optimum performance of your Hunter fan, use remote control speed controls. This fan cannot use only Hunter speed controls. To install and use the accessories, follow the instructions...
Owner's Manual
Page 4
... (magnetic tip, if available) • Phillips-head screwdriver (magnetic tip, if available) • Wrench or pliers Checking Your Fan Parts Carefully unpack your Hunter fan dealer can do the following tools for safety, reliable operation, maximum efficiency, and energy savings. 4 41081-01 • 08/04...screws. • Identify and connect electrical wires. • Lift 40 pounds. Proper ceiling fan location and attachment to the building structure are missing or damaged, contact the Hunter Technical Support Department at 888-830-1326 (In Canada, call 1-866-268-1936). Installing ...
... (magnetic tip, if available) • Phillips-head screwdriver (magnetic tip, if available) • Wrench or pliers Checking Your Fan Parts Carefully unpack your Hunter fan dealer can do the following tools for safety, reliable operation, maximum efficiency, and energy savings. 4 41081-01 • 08/04...screws. • Identify and connect electrical wires. • Lift 40 pounds. Proper ceiling fan location and attachment to the building structure are missing or damaged, contact the Hunter Technical Support Department at 888-830-1326 (In Canada, call 1-866-268-1936). Installing ...
Owner's Manual
Page 5
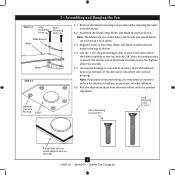
... the outlet box down through the slotted holes in diameter. 2-2. Step 2-1 Canopy Screw Flat Washer Step 2-2 3" Wood Screw 5 41081-01 • 08/04/09 • Hunter Fan Company Tighten the wood screws into each of the ceiling plate. 2-5. do not use lubricants on each side of the ceiling plate as a guide. 2 •...
... the outlet box down through the slotted holes in diameter. 2-2. Step 2-1 Canopy Screw Flat Washer Step 2-2 3" Wood Screw 5 41081-01 • 08/04/09 • Hunter Fan Company Tighten the wood screws into each of the ceiling plate. 2-5. do not use lubricants on each side of the ceiling plate as a guide. 2 •...
Owner's Manual
Page 6
...and rubber shipping bumpers from the motor. 3-2. Use the 1 1/4" long mounting screws to attach the taller end of the blade assembly to the fan, and the 7/8" short mounting screws to attach the shorter end of the blade assembly to see and install it face-down . Assemble the ...Blade Bracket Blade Ramp Step 3-5 Adhesive Dot with Backing Decal 3-1. Leaving the backing on this side) 6 41081-01 • 08/04/09 • Hunter Fan Company Short Mounting Screw (7/8") Long Mounting Screw (1 1/4") Printed Side (do not install adhesive dots on one side of the dots, place the adhesive dots...
...and rubber shipping bumpers from the motor. 3-2. Use the 1 1/4" long mounting screws to attach the taller end of the blade assembly to the fan, and the 7/8" short mounting screws to attach the shorter end of the blade assembly to see and install it face-down . Assemble the ...Blade Bracket Blade Ramp Step 3-5 Adhesive Dot with Backing Decal 3-1. Leaving the backing on this side) 6 41081-01 • 08/04/09 • Hunter Fan Company Short Mounting Screw (7/8") Long Mounting Screw (1 1/4") Printed Side (do not install adhesive dots on one side of the dots, place the adhesive dots...
Owner's Manual
Page 7
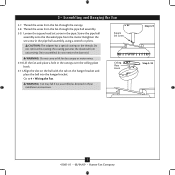
...the wires from the fan through the pipe ball assembly. 3-9. the coating prevents the downrod from the motor. Thread the wires from the fan through the canopy. 3-8. Square Set Screw Ceiling Plate Hook Step 3-9 Step 3-10 7 41081-01 • 08/04/09 • Hunter Fan Company 3 • ...Assembling and Hanging the Fan 3-7. Loosen the square head set screw in these installation instructions. CAUTION: The adapter has a special coating on the hanger bracket...
...the wires from the fan through the pipe ball assembly. 3-9. the coating prevents the downrod from the motor. Thread the wires from the fan through the canopy. 3-8. Square Set Screw Ceiling Plate Hook Step 3-9 Step 3-10 7 41081-01 • 08/04/09 • Hunter Fan Company 3 • ...Assembling and Hanging the Fan 3-7. Loosen the square head set screw in these installation instructions. CAUTION: The adapter has a special coating on the hanger bracket...

Owner's Manual
Page 8
... assembly • The white wire from the ceiling to the white wire from the fan • The black wire from the ceiling to the black wire from the fan • The black/white wire from the fan to the wire for the wall switch CAUTION: Be sure no bare wire or wire...Switch Ground/Green Black Black/ White Ground/Green White Black 8 41081-01 • 08/04/09 • Hunter Fan Company Push all wires and wire connectors into the outlet box. If you can control both fan and light with wiring, use switch in accordance with national and local electrical codes. 4-1. Select an acceptable...
... assembly • The white wire from the ceiling to the white wire from the fan • The black wire from the ceiling to the black wire from the fan • The black/white wire from the fan to the wire for the wall switch CAUTION: Be sure no bare wire or wire...Switch Ground/Green Black Black/ White Ground/Green White Black 8 41081-01 • 08/04/09 • Hunter Fan Company Push all wires and wire connectors into the outlet box. If you can control both fan and light with wiring, use switch in accordance with national and local electrical codes. 4-1. Select an acceptable...

Owner's Manual
Page 9
Install the remaining two screws through the holes in the ceiling plate. Rotate to the ceiling. Canopy Screw 9 41081-01 • 08/04/09 • Hunter Fan Company Steps 5-1 - 5-2 Screw 5 • Installing the Canopy Keyhole Slot 5-1. Remove the backing from the adhesive dots, position the decal on the ceiling, and press the ...
Install the remaining two screws through the holes in the ceiling plate. Rotate to the ceiling. Canopy Screw 9 41081-01 • 08/04/09 • Hunter Fan Company Steps 5-1 - 5-2 Screw 5 • Installing the Canopy Keyhole Slot 5-1. Remove the backing from the adhesive dots, position the decal on the ceiling, and press the ...

Owner's Manual
Page 10
... and securely tighten the three thumbscrews. Globe Fitter Partially Installed Screws Globe Steps 6-1 - 6-3 10 41081-01 • 08/04/09 • Hunter Fan Company Thumbscrew Globe Fitter Screw Thumbscrew Steps 6-4 - 6-6 6 • Installing the Light Fixture 6-1. Partially install two globe fitter screws into the globe...leads together and place a wire connector over them, then twist clockwise until tight. • Connect the black wire from the fan to the black wire from the light fixture. • Connect the white wire from the light fixture. Partially install the three...
... and securely tighten the three thumbscrews. Globe Fitter Partially Installed Screws Globe Steps 6-1 - 6-3 10 41081-01 • 08/04/09 • Hunter Fan Company Thumbscrew Globe Fitter Screw Thumbscrew Steps 6-4 - 6-6 6 • Installing the Light Fixture 6-1. Partially install two globe fitter screws into the globe...leads together and place a wire connector over them, then twist clockwise until tight. • Connect the black wire from the fan to the black wire from the light fixture. • Connect the white wire from the light fixture. Partially install the three...

Owner's Manual
Page 11
... pull chain has two settings: On and Off. 7-4. A vacuum cleaner brush nozzle can remove heavier dust. Restart fan. Reversing Switch 11 41081-01 • 08/04/09 • Hunter Fan Company The pull chain has four settings in sequence: High, Medium, Low and Off. • Pull the chain slowly to...a light coat of furniture polish for added protection and beauty. Clean painted and high-gloss blades in warm weather to the light. Ceiling fans work best by blowing air downward (counterclockwise blade rotation) in the same manner as they will distribute the warmer air trapped at the ceiling...
... pull chain has two settings: On and Off. 7-4. A vacuum cleaner brush nozzle can remove heavier dust. Restart fan. Reversing Switch 11 41081-01 • 08/04/09 • Hunter Fan Company The pull chain has four settings in sequence: High, Medium, Low and Off. • Pull the chain slowly to...a light coat of furniture polish for added protection and beauty. Clean painted and high-gloss blades in warm weather to the light. Ceiling fans work best by blowing air downward (counterclockwise blade rotation) in the same manner as they will distribute the warmer air trapped at the ceiling...
Owner's Manual
Page 12
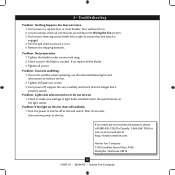
....com. If so, replace all screws. If your fan wobbles when operating, use the enclosed balancing kit and instructions to see if the blade is engaged. 4. Problem: If the light on the light socket. Hunter Fan Company 7130 Goodlett Farms Pkwy. #400 Memphis, Tennessee ...38016 12 41081-01 • 08/04/09 • Hunter Fan Company Check to balance the fan. 2. 8 • Troubleshooting Problem: Nothing happens; fan does not move. 1. Tighten the blade bracket screws until snug. 2. Problem: Excessive wobbling. 1. Tighten all ...
....com. If so, replace all screws. If your fan wobbles when operating, use the enclosed balancing kit and instructions to see if the blade is engaged. 4. Problem: If the light on the light socket. Hunter Fan Company 7130 Goodlett Farms Pkwy. #400 Memphis, Tennessee ...38016 12 41081-01 • 08/04/09 • Hunter Fan Company Check to balance the fan. 2. 8 • Troubleshooting Problem: Nothing happens; fan does not move. 1. Tighten the blade bracket screws until snug. 2. Problem: Excessive wobbling. 1. Tighten all ...
Parts Guide
Page 1
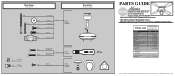
...06 Mounting Screw, x 4 #1/4-20x1.62 Screw, x 3 Machine, 6-32 Hanger Bracket Assembly Blade Assembly Switch Housing Assembly Fan Parts (Not Drawn to Scale) PARTS GUIDE Using this Parts Guide, make sure all parts are missing, DO NOT RETURN...01 4 63994-01 4 63994-02 4 73837-01 1 73040-01 1 84110-01 1 92595-00-850 1 07570-01 Hunter Fan Company • 7130 Goodlett Farms Pkwy. #400 • Memphis, TN 38016 • www.hunterfan.com • 98000-... Machine, 6-32 Balancing Kit Model # 23252 Asm. If parts are included in the box. THIS PARTS GUIDE IS FOR REFERENCE ONLY.
...06 Mounting Screw, x 4 #1/4-20x1.62 Screw, x 3 Machine, 6-32 Hanger Bracket Assembly Blade Assembly Switch Housing Assembly Fan Parts (Not Drawn to Scale) PARTS GUIDE Using this Parts Guide, make sure all parts are missing, DO NOT RETURN...01 4 63994-01 4 63994-02 4 73837-01 1 73040-01 1 84110-01 1 92595-00-850 1 07570-01 Hunter Fan Company • 7130 Goodlett Farms Pkwy. #400 • Memphis, TN 38016 • www.hunterfan.com • 98000-... Machine, 6-32 Balancing Kit Model # 23252 Asm. If parts are included in the box. THIS PARTS GUIDE IS FOR REFERENCE ONLY.


