
Installation Guide
Page 1
... an approved connector, available at any hardware store or electrical supply house. 4-2. o Six inches of the fan and light kit. Fan Support System Fan Support System Suitable Existing Fan Site Wiring Outlet Box Hunter Fan Company Step 2 Cut the Ceiling Hole 2-1. If the joist is secured to the joist or support brace by an approved connector. Drill...
... an approved connector, available at any hardware store or electrical supply house. 4-2. o Six inches of the fan and light kit. Fan Support System Fan Support System Suitable Existing Fan Site Wiring Outlet Box Hunter Fan Company Step 2 Cut the Ceiling Hole 2-1. If the joist is secured to the joist or support brace by an approved connector. Drill...
Owner's Manual
Page 2
... Canopy Trim Ring 8 6 • Assembling the Blades 9 7 • Installing the Switch Housing 10 8 • Operating and Cleaning Your Ceiling Fan 12 9 • Troubleshooting 13 Welcome Your new Hunter® ceiling fan is an addition to your fan, disconnect the power by turning off position, securely fasten a prominent warning device, such as a tag, to the service panel...
... Canopy Trim Ring 8 6 • Assembling the Blades 9 7 • Installing the Switch Housing 10 8 • Operating and Cleaning Your Ceiling Fan 12 9 • Troubleshooting 13 Welcome Your new Hunter® ceiling fan is an addition to your fan, disconnect the power by turning off position, securely fasten a prominent warning device, such as a tag, to the service panel...
Owner's Manual
Page 3
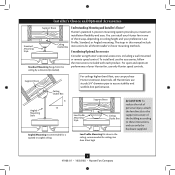
.... For quiet and optimum performance of the building according to assure stability and wobble-free performance. The steps in one of three ways, depending on ceiling height and your Hunter fan, use sturdy 3/4" diameter pipe to these instructions, and use the accessories, follow the instructions included with each product. All...
.... For quiet and optimum performance of the building according to assure stability and wobble-free performance. The steps in one of three ways, depending on ceiling height and your Hunter fan, use sturdy 3/4" diameter pipe to these instructions, and use the accessories, follow the instructions included with each product. All...
Owner's Manual
Page 4
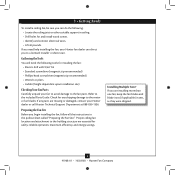
... shipped. 4 41968-01 • 10/02/08 • Hunter Fan Company Installing Multiple Fans? 1 • Getting Ready To install a ceiling fan, be sure you can direct you are installing more than one fan, keep the fan blades and blade irons (if applicable) in the pullout sheet called... "Preparing the Fan Site." Refer to a licensed installer or electrician. Proper ceiling fan location and attachment to the fan parts. Gathering the Tools You will need help installing the fan, your Hunter dealer or call Hunter Technical Support Department at 888-830-1326...
... shipped. 4 41968-01 • 10/02/08 • Hunter Fan Company Installing Multiple Fans? 1 • Getting Ready To install a ceiling fan, be sure you can direct you are installing more than one fan, keep the fan blades and blade irons (if applicable) in the pullout sheet called... "Preparing the Fan Site." Refer to a licensed installer or electrician. Proper ceiling fan location and attachment to the fan parts. Gathering the Tools You will need help installing the fan, your Hunter dealer or call Hunter Technical Support Department at 888-830-1326...
Owner's Manual
Page 5
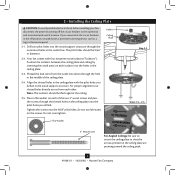
... through the outermost holes in diameter. 2-2. Thread the lead wires from each of the ceiling plate. 2-4. For proper alignment use lubricants on the ceiling plate are pointing toward the ceiling peak. 5 41968-01 • 10/02/08 • Hunter Fan Company Tighten the screws into the wood support structure through the slotted holes in the...
... through the outermost holes in diameter. 2-2. Thread the lead wires from each of the ceiling plate. 2-4. For proper alignment use lubricants on the ceiling plate are pointing toward the ceiling peak. 5 41968-01 • 10/02/08 • Hunter Fan Company Tighten the screws into the wood support structure through the slotted holes in the...
Owner's Manual
Page 6
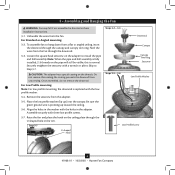
...Place the low profile washer (lip up toward the ceiling. 3-6. Raise the fan and place the hook on the threads. Securely retighten the setscrew with three low profile screws. 3-7. CAUTION: The adapter has a special coating on the ceiling plate through the U-shaped hole in the adapter. Be...Profile Washer Low Profile Screw 6 41968-01 • 10/02/08 • Hunter Fan Company Skip to hang down from a flat or angled ceiling, insert the downrod through the downrod. 3-3. Remove the setscrew from the fan through the canopy and canopy trim ring. Note: When the pipe and ball ...
...Place the low profile washer (lip up toward the ceiling. 3-6. Raise the fan and place the hook on the threads. Securely retighten the setscrew with three low profile screws. 3-7. CAUTION: The adapter has a special coating on the ceiling plate through the U-shaped hole in the adapter. Be...Profile Washer Low Profile Screw 6 41968-01 • 10/02/08 • Hunter Fan Company Skip to hang down from a flat or angled ceiling, insert the downrod through the downrod. 3-3. Remove the setscrew from the fan through the canopy and canopy trim ring. Note: When the pipe and ball ...
Owner's Manual
Page 7
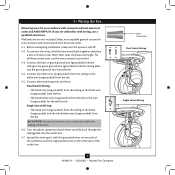
... Connector Dual Switch Wiring Single Switch Wiring 7 41968-01 • 10/02/08 • Hunter Fan Company To connect the wires, hold the bare metal leads together and place a wire connector over them carefully back through the ceiling plate into the outlet box. 4-7. If you are not included. Wall switches are unfamiliar with...
... Connector Dual Switch Wiring Single Switch Wiring 7 41968-01 • 10/02/08 • Hunter Fan Company To connect the wires, hold the bare metal leads together and place a wire connector over them carefully back through the ceiling plate into the outlet box. 4-7. If you are not included. Wall switches are unfamiliar with...
Owner's Manual
Page 8
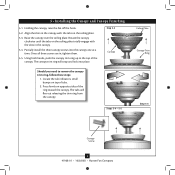
...the top of the canopy. Steps 5-4 - 5-5 Ceiling Plate Canopy Trim Ring Step 5-3 Canopy Screw 8 41968-01 • 10/02/08 • Hunter Fan Company Raise the canopy over the ceiling plate. Rotate the canopy clockwise until the tabs on the ceiling plate totally engage with the slots in the canopy with... the tabs on the ceiling plate. 5-3. The canopy trim ring will flex out releasing...
...the top of the canopy. Steps 5-4 - 5-5 Ceiling Plate Canopy Trim Ring Step 5-3 Canopy Screw 8 41968-01 • 10/02/08 • Hunter Fan Company Raise the canopy over the ceiling plate. Rotate the canopy clockwise until the tabs on the ceiling plate totally engage with the slots in the canopy with... the tabs on the ceiling plate. 5-3. The canopy trim ring will flex out releasing...
Owner's Manual
Page 11
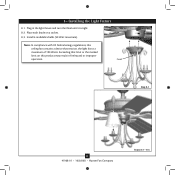
Install 4 candelabra bulbs (40 Watt maximum). Note: In compliance with US federal energy regulations, this ceiling fan contains a device that limit or the marked limit on a socket. 8-3. Exceeding that restricts the light kit to a maximum of 190 Watts. Finial Step 8-1 11 41968-01 • 10/02/08 • Hunter Fan Company Steps 8-2 - 8-3 8 • Installing the Light Fixture 8-1. Plug in fire hazard or improper operation. Place each shade on this product may result in the light fixture and turn the finial until it is tight. 8-2.
Install 4 candelabra bulbs (40 Watt maximum). Note: In compliance with US federal energy regulations, this ceiling fan contains a device that limit or the marked limit on a socket. 8-3. Exceeding that restricts the light kit to a maximum of 190 Watts. Finial Step 8-1 11 41968-01 • 10/02/08 • Hunter Fan Company Steps 8-2 - 8-3 8 • Installing the Light Fixture 8-1. Plug in fire hazard or improper operation. Place each shade on this product may result in the light fixture and turn the finial until it is tight. 8-2.
Owner's Manual
Page 12
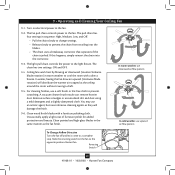
... will distribute the warmer air trapped at the ceiling around the room without causing a draft. 9-5. Restart fan. Reversing Switch 12 41968-01 • 10/02/08 • Hunter Fan Company 9 • Operating and Cleaning Your Ceiling Fan 9-1. The pull chain has four settings in warm weather to the fan. 9-2. Ceiling fans work best by blowing air downward (counterclockwise blade...
... will distribute the warmer air trapped at the ceiling around the room without causing a draft. 9-5. Restart fan. Reversing Switch 12 41968-01 • 10/02/08 • Hunter Fan Company 9 • Operating and Cleaning Your Ceiling Fan 9-1. The pull chain has four settings in warm weather to the fan. 9-2. Ceiling fans work best by blowing air downward (counterclockwise blade...
Parts Guide
Page 1
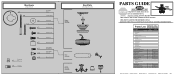
...04-000 1 97637-00-860 4 86920-04-000 1 74940-10-432 1 07570-01-000 Hunter Fan Company • 2500 Frisco Avenue • Memphis, TN 38114 • www.hunterfan.com &#...GUIDE IS FOR REFERENCE ONLY. Parts List Item Name * Hanger Bracket Assembly Ceiling Plate Canopy Canopy Trim Ring Hanger Ball / Downrod Assembly Setscrew Low Profile Washer... Iron Armature Light Kit Assembly * Hardware Kit Blade Grommet Blade Assembly Screw Wire Nut Globe/Shade Finial, Switch Housing Switch Housing Cover Model # 22720 Asm. Hardware (Drawn to Scale) x 1 x 2 x 4 x 2 x 3 x 4 x 1 x 5 Balancing x 1 ...
...04-000 1 97637-00-860 4 86920-04-000 1 74940-10-432 1 07570-01-000 Hunter Fan Company • 2500 Frisco Avenue • Memphis, TN 38114 • www.hunterfan.com &#...GUIDE IS FOR REFERENCE ONLY. Parts List Item Name * Hanger Bracket Assembly Ceiling Plate Canopy Canopy Trim Ring Hanger Ball / Downrod Assembly Setscrew Low Profile Washer... Iron Armature Light Kit Assembly * Hardware Kit Blade Grommet Blade Assembly Screw Wire Nut Globe/Shade Finial, Switch Housing Switch Housing Cover Model # 22720 Asm. Hardware (Drawn to Scale) x 1 x 2 x 4 x 2 x 3 x 4 x 1 x 5 Balancing x 1 ...


