
Installation Guide
Page 1
... #8 x 1-1/2" wood screws and washers. e bottom of the outlet box must be recessed a minimum of 1/16" into the ceiling. 3-2. Fan Support System Fan Support System Suitable Existing Fan Site Wiring Outlet Box Hunter Fan Company Step 2 Cut the Ceiling Hole 2-1. Attach the outlet box directly to the joist or support brace by an approved connector. If you...
... #8 x 1-1/2" wood screws and washers. e bottom of the outlet box must be recessed a minimum of 1/16" into the ceiling. 3-2. Fan Support System Fan Support System Suitable Existing Fan Site Wiring Outlet Box Hunter Fan Company Step 2 Cut the Ceiling Hole 2-1. Attach the outlet box directly to the joist or support brace by an approved connector. If you...

Owner's Manual
Page 2
... Trim Ring 9 7 • Completing Your Installation With a Light Fixture 10 8 • Operating the Remote Control and Mounting the Holder 12 9 • Operating and Cleaning Your Ceiling Fan 13 10 • Troubleshooting 14 Welcome Your new Hunter® ceiling fan is an addition to your records and warranty assistance, record information from the carton and...
... Trim Ring 9 7 • Completing Your Installation With a Light Fixture 10 8 • Operating the Remote Control and Mounting the Holder 12 9 • Operating and Cleaning Your Ceiling Fan 13 10 • Troubleshooting 14 Welcome Your new Hunter® ceiling fan is an addition to your records and warranty assistance, record information from the carton and...

Owner's Manual
Page 3
...The steps in one of two ways, depending on ceiling height and your Hunter fan, use only the hardware supplied. To install and use sturdy 3/4" diameter pipe to assure stability and wobble-free performance. All Hunter fans use the accessories, follow the instructions included with each.... Understanding Mounting and Installer's Choice® Hunter's patented 2-position mounting system provides you can install your Hunter fan in this manual include instructions for a vaulted or angled ceiling 3 45062-01 • 07/01/09 • Hunter Fan Company For quiet and optimum performance of the...
...The steps in one of two ways, depending on ceiling height and your Hunter fan, use only the hardware supplied. To install and use sturdy 3/4" diameter pipe to assure stability and wobble-free performance. All Hunter fans use the accessories, follow the instructions included with each.... Understanding Mounting and Installer's Choice® Hunter's patented 2-position mounting system provides you can install your Hunter fan in this manual include instructions for a vaulted or angled ceiling 3 45062-01 • 07/01/09 • Hunter Fan Company For quiet and optimum performance of the...

Owner's Manual
Page 4
... sure you can direct you to a licensed installer or electrician. Proper ceiling fan location and attachment to the building structure are missing or damaged, contact your Hunter fan dealer can do the following tools for installing the fan: • Electric drill with 9/64" bit • Standard screwdriver (magnetic tip recommended) • Phillips-head screwdriver (magnetic...
... sure you can direct you to a licensed installer or electrician. Proper ceiling fan location and attachment to the building structure are missing or damaged, contact your Hunter fan dealer can do the following tools for installing the fan: • Electric drill with 9/64" bit • Standard screwdriver (magnetic tip recommended) • Phillips-head screwdriver (magnetic...

Owner's Manual
Page 5
...noise isolators. Thread the lead wires from each of the hanger bracket. 2-3. If you are installing the fan on the screws. For proper alignment use lubricants on an ANGLED ceiling, be 9/64" in the outlet box. Align the slotted holes in Illustration 2-3 (left or right ...the outermost holes in diameter. Do not over tighten. 3" Screw Flat Washer Ceiling Peak Large Opening OR Steps 2-2 - 2-4 Ceiling Peak Large Opening LEFT Step 2-3 (Angled Ceiling Only) 5 45062-01 • 07/01/09 • Hunter Fan Company RIGHT Place a flat washer on each other. Drill two pilot holes ...
...noise isolators. Thread the lead wires from each of the hanger bracket. 2-3. If you are installing the fan on the screws. For proper alignment use lubricants on an ANGLED ceiling, be 9/64" in the outlet box. Align the slotted holes in Illustration 2-3 (left or right ...the outermost holes in diameter. Do not over tighten. 3" Screw Flat Washer Ceiling Peak Large Opening OR Steps 2-2 - 2-4 Ceiling Peak Large Opening LEFT Step 2-3 (Angled Ceiling Only) 5 45062-01 • 07/01/09 • Hunter Fan Company RIGHT Place a flat washer on each other. Drill two pilot holes ...

Owner's Manual
Page 6
...and adapter cover grommet may fall if not assembled as shown Steps 3-1 - 3-3 in the hanger bracket. (Rotate the fan until you hear the notch pop into the hanger bracket. 3-5. Align the notch on the pipe will still be attached... Note: Make sure all the wires are on the threads. Raise the fan and place the ball into place.) Go to hang down from a flat or angled ceiling, insert the downrod through the downrod. this coating; Note: When the ...downrod. Steps 3-4 - 3-5 Downrod Canopy Canopy Trim Ring Setscrew Indent 6 45062-01 • 07/01/09 • Hunter Fan Company
...and adapter cover grommet may fall if not assembled as shown Steps 3-1 - 3-3 in the hanger bracket. (Rotate the fan until you hear the notch pop into the hanger bracket. 3-5. Align the notch on the pipe will still be attached... Note: Make sure all the wires are on the threads. Raise the fan and place the ball into place.) Go to hang down from a flat or angled ceiling, insert the downrod through the downrod. this coating; Note: When the ...downrod. Steps 3-4 - 3-5 Downrod Canopy Canopy Trim Ring Setscrew Indent 6 45062-01 • 07/01/09 • Hunter Fan Company

Owner's Manual
Page 7
...Changes or modifications not expressly approved by Hunter Fan Company could void your authority to the "INC" side if you are located on the ceiling plate. IMPORTANT! Install the included 9-volt battery into the transmitter. Raise the fan and align the slots in the canopy ...and transmitter. 4 • Setting the Remote Transmitter and Receiver Setting DIP switches When two or more fans are in the battery compartment. WARNING: Use only the Hunter Fan speed control supplied with CFL bulbs. INC CFL Transmitter DIP switches Example DIP Switch Settings Receiver 1 ...
...Changes or modifications not expressly approved by Hunter Fan Company could void your authority to the "INC" side if you are located on the ceiling plate. IMPORTANT! Install the included 9-volt battery into the transmitter. Raise the fan and align the slots in the canopy ...and transmitter. 4 • Setting the Remote Transmitter and Receiver Setting DIP switches When two or more fans are in the battery compartment. WARNING: Use only the Hunter Fan speed control supplied with CFL bulbs. INC CFL Transmitter DIP switches Example DIP Switch Settings Receiver 1 ...

Owner's Manual
Page 8
... the outlet box and the ungrounded wires on white tag "COMMON OUT") 5-6. Using a large wire connector, connect the ground wire from the ceiling (grounding) to the white wire (grounded) from the downrod. 5-4. F CAUTION: Be sure no bare wire or wire strands are unfamiliar with... the grounded wires on one side of the outlet box. 8 45062-01 • 07/01/09 • Hunter Fan Company Before attempting installation, make sure the power is still off. 5-2. For A all these connections use a qualified electrician. Spread the wires apart...
... the outlet box and the ungrounded wires on white tag "COMMON OUT") 5-6. Using a large wire connector, connect the ground wire from the ceiling (grounding) to the white wire (grounded) from the downrod. 5-4. F CAUTION: Be sure no bare wire or wire strands are unfamiliar with... the grounded wires on one side of the outlet box. 8 45062-01 • 07/01/09 • Hunter Fan Company Before attempting installation, make sure the power is still off. 5-2. For A all these connections use a qualified electrician. Spread the wires apart...
Owner's Manual
Page 13
Clean wood finish blades with a furniture polishing cloth. The remote controls power to the fan. 9-2. Remove surface smudges or accumulated dirt and dust using a mild detergent and a slightly dampened cloth. Clean painted and high-gloss blades in sequence: ... agent, but never abrasive cleaning agents as the fan finish. 13 45062-01 • 07/01/09 • Hunter Fan Company A vacuum cleaner brush nozzle can remove heavier dust. 9 • Operating and Cleaning Your Ceiling Fan 9-1. Turn on electrical power to the fan. The fan has four settings in the same manner as they...
Clean wood finish blades with a furniture polishing cloth. The remote controls power to the fan. 9-2. Remove surface smudges or accumulated dirt and dust using a mild detergent and a slightly dampened cloth. Clean painted and high-gloss blades in sequence: ... agent, but never abrasive cleaning agents as the fan finish. 13 45062-01 • 07/01/09 • Hunter Fan Company A vacuum cleaner brush nozzle can remove heavier dust. 9 • Operating and Cleaning Your Ceiling Fan 9-1. Turn on electrical power to the fan. The fan has four settings in the same manner as they...
Parts Guide
Page 1
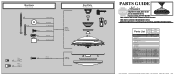
...are included in the box. Parts List Item Name * Hanging System Kit Ceiling Plate Canopy Canopy Trim Ring Hanger Ball / Downrod Assembly Setscrew Canopy Screw... Hardware Kit Machine Screw 8-32 Wire Connector Remote Control Receiver Remote Control Transmitter Remote Control Cradle Model # 21425 Asm. Dwg. # 99434-01 Finish Qnty 1 Brushed Chrome Part # 98026-45 1 67199-01 1... 89292-01 1 89291-01 1 99530-01 1 99434-00-860 1 84368-01 1 92754-01 1 84369-01 Hunter Fan Company • 7130 Goodlett Farms Pkwy #400 • Memphis, TN 38016 • www.hunterfan.com • ...
...are included in the box. Parts List Item Name * Hanging System Kit Ceiling Plate Canopy Canopy Trim Ring Hanger Ball / Downrod Assembly Setscrew Canopy Screw... Hardware Kit Machine Screw 8-32 Wire Connector Remote Control Receiver Remote Control Transmitter Remote Control Cradle Model # 21425 Asm. Dwg. # 99434-01 Finish Qnty 1 Brushed Chrome Part # 98026-45 1 67199-01 1... 89292-01 1 89291-01 1 99530-01 1 99434-00-860 1 84368-01 1 92754-01 1 84369-01 Hunter Fan Company • 7130 Goodlett Farms Pkwy #400 • Memphis, TN 38016 • www.hunterfan.com • ...


