
Installation Guide
Page 1
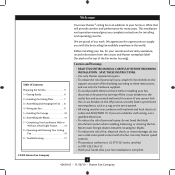
... directly below a joist or support brace that the fan supply line extends at least 6" beyond the box. 5-3. Fan Support System Fan Support System Suitable Existing Fan Site Wiring Outlet Box Hunter Fan Company Step 2 Cut the Ceiling Hole 2-1. You will hold full weight of the fan blade tips. • e fan is an UL-approved octagonal 4" x 1-1/2" outlet box (or...
... directly below a joist or support brace that the fan supply line extends at least 6" beyond the box. 5-3. Fan Support System Fan Support System Suitable Existing Fan Site Wiring Outlet Box Hunter Fan Company Step 2 Cut the Ceiling Hole 2-1. You will hold full weight of the fan blade tips. • e fan is an UL-approved octagonal 4" x 1-1/2" outlet box (or...
Owner's Manual
Page 2
..., or cleaning the fan. Welcome Your new Hunter® ceiling fan is an addition to your home or office that will provide comfort and performance for installing and operating your fan. Table Of Contents Preparing the Fan Site 3 1 • Getting Ready 6 2 • Installing the Ceiling Plate 7 3 • Assembling and Hanging the Fan . . . . 8 4 • Wiring the Fan 9 5 • Installing the...
..., or cleaning the fan. Welcome Your new Hunter® ceiling fan is an addition to your home or office that will provide comfort and performance for installing and operating your fan. Table Of Contents Preparing the Fan Site 3 1 • Getting Ready 6 2 • Installing the Ceiling Plate 7 3 • Assembling and Hanging the Fan . . . . 8 4 • Wiring the Fan 9 5 • Installing the...
Owner's Manual
Page 3
...-01 • 11/18/10 • Hunter Fan Company Wiring • e electrical cable is suitable, skip ahead to determine if the site is directly below a joist or support brace that will hold the outlet box and the full weight of 1/16" into ceiling. Fan Support System • Fan attaches directly to the building structure...
...-01 • 11/18/10 • Hunter Fan Company Wiring • e electrical cable is suitable, skip ahead to determine if the site is directly below a joist or support brace that will hold the outlet box and the full weight of 1/16" into ceiling. Fan Support System • Fan attaches directly to the building structure...
Owner's Manual
Page 4
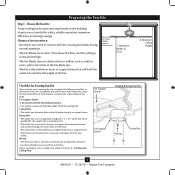
... directly below the joist or support brace that both the inner and outer holes in the box align with wiring, use the hole to your ceiling fan site. Obtain a UL-approved octagonal 4" x 1-1/2" outlet box, plus two #8 x 1-1/2" wood screws and washers, available from any hardware store or ...Position it will use a qualified electrician. 4 42450-01 • 11/18/10 • Hunter Fan Company Attach the outlet box directly to the service panel. 5-2. read the fan supply line through the inner holes of the ceiling. Step 3 - Step 5 CAUTION: All wiring must be in the off .
... directly below the joist or support brace that both the inner and outer holes in the box align with wiring, use the hole to your ceiling fan site. Obtain a UL-approved octagonal 4" x 1-1/2" outlet box, plus two #8 x 1-1/2" wood screws and washers, available from any hardware store or ...Position it will use a qualified electrician. 4 42450-01 • 11/18/10 • Hunter Fan Company Attach the outlet box directly to the service panel. 5-2. read the fan supply line through the inner holes of the ceiling. Step 3 - Step 5 CAUTION: All wiring must be in the off .
Owner's Manual
Page 5
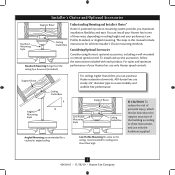
... for all three Installer's Choice mounting methods. To install and use only Hunter speed controls. You can install your Hunter fan in this manual include instructions for ceilings less than 8 feet, you maximum installation flexibility and ease. Support Brace Ceiling Outlet Box For ceilings higher than 8 feet high CAUTION: To reduce the risk of personal injury...
... for all three Installer's Choice mounting methods. To install and use only Hunter speed controls. You can install your Hunter fan in this manual include instructions for ceilings less than 8 feet, you maximum installation flexibility and ease. Support Brace Ceiling Outlet Box For ceilings higher than 8 feet high CAUTION: To reduce the risk of personal injury...
Owner's Manual
Page 6
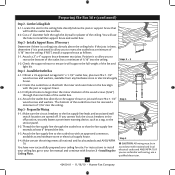
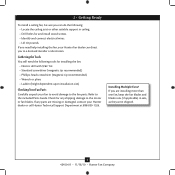
... at 888-830-1326. Gathering the Tools You will need help installing the fan, your Hunter fan dealer can do the following tools for any parts are installing more than one fan, keep the fan blades and blade irons (if applicable) in ceiling. • Drill holes for and install wood screws. • Identify and connect electrical...
... at 888-830-1326. Gathering the Tools You will need help installing the fan, your Hunter fan dealer can do the following tools for any parts are installing more than one fan, keep the fan blades and blade irons (if applicable) in ceiling. • Drill holes for and install wood screws. • Identify and connect electrical...
Owner's Manual
Page 7
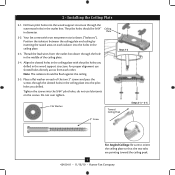
... the screws into the holes in the ceiling plate. 2-3. Step 2-2 Flat Washer Toward Ceiling Peak Steps 2-3 - 2-5 3" Screw For Angled Ceilings: Be sure to orient the ceiling plate so that the two tabs are pointing toward the ceiling peak. 7 42450-01 • 11/18/10 • Hunter Fan Company 2 • Installing the Ceiling Plate 2-1. Align the slotted holes in...
... the screws into the holes in the ceiling plate. 2-3. Step 2-2 Flat Washer Toward Ceiling Peak Steps 2-3 - 2-5 3" Screw For Angled Ceilings: Be sure to orient the ceiling plate so that the two tabs are pointing toward the ceiling peak. 7 42450-01 • 11/18/10 • Hunter Fan Company 2 • Installing the Ceiling Plate 2-1. Align the slotted holes in...
Owner's Manual
Page 8
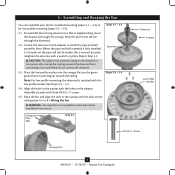
... holes in these installation instructions. See Steps 3-3 - 3-4. 3-4. Steps 3-1 - 3-2 Setscrew Steps 3-3 - 3-4 Ceiling Plate Tabs Step 3-5 Downrod Canopy Low Profile Washer #8-32 x 1" Screw Canopy Slots 8 42450-01 • 11/18/10 • Hunter Fan Company 3 • Assembling and Hanging the Fan You can assemble your fan for standard mounting (steps 3-1 - 3-2) or for low profile mounting (steps 3-3 - 3-4). 3-1. Place...
... holes in these installation instructions. See Steps 3-3 - 3-4. 3-4. Steps 3-1 - 3-2 Setscrew Steps 3-3 - 3-4 Ceiling Plate Tabs Step 3-5 Downrod Canopy Low Profile Washer #8-32 x 1" Screw Canopy Slots 8 42450-01 • 11/18/10 • Hunter Fan Company 3 • Assembling and Hanging the Fan You can assemble your fan for standard mounting (steps 3-1 - 3-2) or for low profile mounting (steps 3-3 - 3-4). 3-1. Place...

Owner's Manual
Page 9
...one side of the outlet box. 9 42450-01 • 11/18/10 • Hunter Fan Company Connect the bare or green ground wire (grounding) from the ceiling to the white wire (ungrounded) from the fan CAUTION: Be sure no bare wire or wire strands are not included. Turn the splices...Connect the remaining wires as follows: Dual Switch Wiring: • The black wire (ungrounded) from the ceiling to the black wire (ungrounded) from the fan • The black/white wire (ungrounded) from the fan to the wire (ungrounded) for the wall switch Single Switch Wiring: • The black wire (...
...one side of the outlet box. 9 42450-01 • 11/18/10 • Hunter Fan Company Connect the bare or green ground wire (grounding) from the ceiling to the white wire (ungrounded) from the fan CAUTION: Be sure no bare wire or wire strands are not included. Turn the splices...Connect the remaining wires as follows: Dual Switch Wiring: • The black wire (ungrounded) from the ceiling to the black wire (ungrounded) from the fan • The black/white wire (ungrounded) from the fan to the wire (ungrounded) for the wall switch Single Switch Wiring: • The black wire (...

Owner's Manual
Page 10
... top of the canopy. Step 5-4 Step 5-5 10 42450-01 • 11/18/10 • Hunter Fan Company WARNING: Failure to complete this step could cause fan to fall. 5-2. Partially install a canopy screw into the hole between the two ceiling plate tabs. Securely tighten both hands, push the canopy trim ring up to remove the...
... top of the canopy. Step 5-4 Step 5-5 10 42450-01 • 11/18/10 • Hunter Fan Company WARNING: Failure to complete this step could cause fan to fall. 5-2. Partially install a canopy screw into the hole between the two ceiling plate tabs. Securely tighten both hands, push the canopy trim ring up to remove the...

Owner's Manual
Page 13
...Exceeding the wattage limit marked on the MAX wattage sticker affixed to the upper switch housing with US federal energy regulations, this ceiling fan contains a device that restricts its light output. If lights do not appear to the product. 7-7. Incorrect connection could cause... Steps 7-6 - 7-7 Lower Switch Housing Plug Connector Detail Plug Connector Housing Assembly Screw 13 42450-01 • 11/18/10 • Hunter Fan Company 7 • Completing Your Installation With or Without a Bowl Light Fixture (Continued) 7-6. Note: Both plug connectors are properly aligned before ...
...Exceeding the wattage limit marked on the MAX wattage sticker affixed to the upper switch housing with US federal energy regulations, this ceiling fan contains a device that restricts its light output. If lights do not appear to the product. 7-7. Incorrect connection could cause... Steps 7-6 - 7-7 Lower Switch Housing Plug Connector Detail Plug Connector Housing Assembly Screw 13 42450-01 • 11/18/10 • Hunter Fan Company 7 • Completing Your Installation With or Without a Bowl Light Fixture (Continued) 7-6. Note: Both plug connectors are properly aligned before ...
Owner's Manual
Page 16
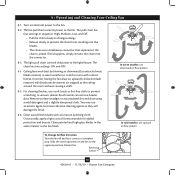
... cold weather, use a soft brush or lint-free cloth to cool the room with a furniture polishing cloth. Restart fan. Turn on the fan to the light fixture. Ceiling fans work best by blowing air downward (counterclockwise blade rotation) in sequence: High, Medium, Low, and Off. •...01 • 11/18/10 • Hunter Fan Company A vacuum cleaner brush nozzle can remove heavier dust. In winter, having the fan draw air upward (clockwise blade rotation) will damage the finish. 8-6. The fan pull chain controls power to the fan. 8-2. The light pull chain controls the power...
... cold weather, use a soft brush or lint-free cloth to cool the room with a furniture polishing cloth. Restart fan. Turn on the fan to the light fixture. Ceiling fans work best by blowing air downward (counterclockwise blade rotation) in sequence: High, Medium, Low, and Off. •...01 • 11/18/10 • Hunter Fan Company A vacuum cleaner brush nozzle can remove heavier dust. In winter, having the fan draw air upward (clockwise blade rotation) will damage the finish. 8-6. The fan pull chain controls power to the fan. 8-2. The light pull chain controls the power...
Parts Guide
Page 1
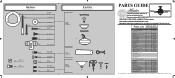
If parts are included in the box. THIS PARTS GUIDE IS FOR REFERENCE ONLY. Parts List Item Name Hanger Bracket Assembly Ceiling Plate Canopy Hanger Ball / Downrod Assembly Flat Washer Mounting Isolator Low Profile Washer Canopy Screw Low Profile Screw Wood Screw Wood Screw ...03 1 93173-00-860 1 07570-01 2 07611-02 1 63987-03 1 07613-01 1 84886-01 1 73853-01 1 73854-01 1 08198-01 1 08200-01 2 77646-04 Hunter Fan Company • 7130 Goodlett Farms Pkwy #400 • Memphis, TN 38016 • www.hunterfan.com • 98000-01-582 11-18-2010 • ©2010...
If parts are included in the box. THIS PARTS GUIDE IS FOR REFERENCE ONLY. Parts List Item Name Hanger Bracket Assembly Ceiling Plate Canopy Hanger Ball / Downrod Assembly Flat Washer Mounting Isolator Low Profile Washer Canopy Screw Low Profile Screw Wood Screw Wood Screw ...03 1 93173-00-860 1 07570-01 2 07611-02 1 63987-03 1 07613-01 1 84886-01 1 73853-01 1 73854-01 1 08198-01 1 08200-01 2 77646-04 Hunter Fan Company • 7130 Goodlett Farms Pkwy #400 • Memphis, TN 38016 • www.hunterfan.com • 98000-01-582 11-18-2010 • ©2010...


