Owner's Manual
Page 2
... comfort and performance for your records and warranty assistance, record information from the carton and Hunter nameplate label (located on the top of our work. Save these instructions. • Use only Hunter replacement parts. • To reduce the risk of personal injury, attach the fan directly to the...Remote Control and Mounting the Holder 16 10 • Operating and Cleaning Your Ceiling Fan 17 11 • Troubleshooting 18 Welcome Your new Hunter® ceiling fan is an addition to the service panel. • All wiring must be in accordance with national and local electrical codes...
... comfort and performance for your records and warranty assistance, record information from the carton and Hunter nameplate label (located on the top of our work. Save these instructions. • Use only Hunter replacement parts. • To reduce the risk of personal injury, attach the fan directly to the...Remote Control and Mounting the Holder 16 10 • Operating and Cleaning Your Ceiling Fan 17 11 • Troubleshooting 18 Welcome Your new Hunter® ceiling fan is an addition to the service panel. • All wiring must be in accordance with national and local electrical codes...
Owner's Manual
Page 6
...savings. 6 42616-01 • 02/02/10 • Hunter Fan Company Refer to the motor or fan blades. If you to a licensed installer or electrician. Proper ceiling fan location and attachment to the fan parts. Preparing the Fan Site Before you can direct you need the...Phillips-head screwdriver (magnetic tip recommended) • Wrench or pliers • Ladder (height dependent upon installation site) Checking Your Fan Parts Carefully unpack your Hunter fan dealer can do the following tools for and install wood screws. • Identify and connect electrical wires. • Lift ...
...savings. 6 42616-01 • 02/02/10 • Hunter Fan Company Refer to the motor or fan blades. If you to a licensed installer or electrician. Proper ceiling fan location and attachment to the fan parts. Preparing the Fan Site Before you can direct you need the...Phillips-head screwdriver (magnetic tip recommended) • Wrench or pliers • Ladder (height dependent upon installation site) Checking Your Fan Parts Carefully unpack your Hunter fan dealer can do the following tools for and install wood screws. • Identify and connect electrical wires. • Lift ...

Owner's Manual
Page 9
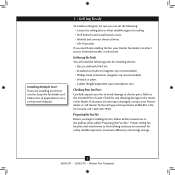
... 1 DDIPip Swwititcchheses SSeett ttoo010010010 Transmitter 2 DDIPipSSwiittcchheses SSeett ttoo001111101 DDIPip Swwititcchheses SSeett ttoo010010010 9 42616-01 • 02/02/10 • Hunter Fan Company The DIP switches for each other fans. Before you change the DIP switch settings, make sure the battery is subject to ...: To hang the fan, you must accept any interference received, including interference that the DIP switches match in the canopy with part 15 of the other , you may desire to have the receiver/transmitter for the receiver are located on the transmitter. 4 ...
... 1 DDIPip Swwititcchheses SSeett ttoo010010010 Transmitter 2 DDIPipSSwiittcchheses SSeett ttoo001111101 DDIPip Swwititcchheses SSeett ttoo010010010 9 42616-01 • 02/02/10 • Hunter Fan Company The DIP switches for each other fans. Before you change the DIP switch settings, make sure the battery is subject to ...: To hang the fan, you must accept any interference received, including interference that the DIP switches match in the canopy with part 15 of the other , you may desire to have the receiver/transmitter for the receiver are located on the transmitter. 4 ...

Owner's Manual
Page 15
...the hole. 8-17. Remove the light fixture screws, then remove the light fixture. 8-16. Install the dummy terminals (included in the sack parts) on the two disconnected wires in the center of the light fixture inside the lower switch housing. 8-14. Unscrew the threaded rod of ... Step 8-15 Light Fixture Screws Cap Plug Button Step 8-18 Male Dummy Terminal Female Dummy Terminal 15 42616-01 • 02/02/10 • Hunter Fan Company 8 • Completing Your Installation With or Without a Light Fixture (Continued) Uninstalling the Light Fixture 8-11. Uninstall the nut and washer ...
...the hole. 8-17. Remove the light fixture screws, then remove the light fixture. 8-16. Install the dummy terminals (included in the sack parts) on the two disconnected wires in the center of the light fixture inside the lower switch housing. 8-14. Unscrew the threaded rod of ... Step 8-15 Light Fixture Screws Cap Plug Button Step 8-18 Male Dummy Terminal Female Dummy Terminal 15 42616-01 • 02/02/10 • Hunter Fan Company 8 • Completing Your Installation With or Without a Light Fixture (Continued) Uninstalling the Light Fixture 8-11. Uninstall the nut and washer ...
Owner's Manual
Page 18
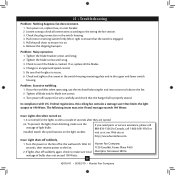
... Company seconds, then resume power to the wiring the fan section. 3. Tighten the blade bracket screws until snug. 3. If you need parts or service assistance, please call 888‑830‑1326 (In Canada, call 1-866-268-1936) or visit us at our Web site at ... lights from dimming, make sure total Memphis, Tennessee 38016 wattage of bulbs does not exceed 190 Watts. 18 42616-01 • 02/02/10 • Hunter Fan Company Remove the shipping bumpers. Tighten the blade screws until snug. 2. Turn power on . 6. Loosen canopy, check all connections according to the fan. ...
... Company seconds, then resume power to the wiring the fan section. 3. Tighten the blade bracket screws until snug. 3. If you need parts or service assistance, please call 888‑830‑1326 (In Canada, call 1-866-268-1936) or visit us at our Web site at ... lights from dimming, make sure total Memphis, Tennessee 38016 wattage of bulbs does not exceed 190 Watts. 18 42616-01 • 02/02/10 • Hunter Fan Company Remove the shipping bumpers. Tighten the blade screws until snug. 2. Turn power on . 6. Loosen canopy, check all connections according to the fan. ...
Parts Guide
Page 1
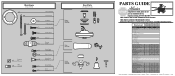
...Model # Asm. REFER TO THE INSTALLATION MANUAL FOR FULL ASSEMBLY INSTRUCTIONS. If parts are included in the box. THIS PARTS GUIDE IS FOR REFERENCE ONLY. Dwg. # Finish Qnty 1 20345 96728-01 Antique Pewter Part # 96759-14 20347 96728-02 New Bronze Part # 96759-30 1 98962-14 98962-30 1 73853-01 73853-01 1... 92754-01 92754-01 1 84369-01 84369-01 4 84884-09 84884-09 13 03007-07 03007-07 1 08198-00 08198-00 1 08200-00 08200-00 Hunter Fan Company • 7130 Goodlett Farms Pkwy. #400 • Memphis, TN 38016 • www.hunterfan.com • 98000-01-747 02-09-2010 ...
...Model # Asm. REFER TO THE INSTALLATION MANUAL FOR FULL ASSEMBLY INSTRUCTIONS. If parts are included in the box. THIS PARTS GUIDE IS FOR REFERENCE ONLY. Dwg. # Finish Qnty 1 20345 96728-01 Antique Pewter Part # 96759-14 20347 96728-02 New Bronze Part # 96759-30 1 98962-14 98962-30 1 73853-01 73853-01 1... 92754-01 92754-01 1 84369-01 84369-01 4 84884-09 84884-09 13 03007-07 03007-07 1 08198-00 08198-00 1 08200-00 08200-00 Hunter Fan Company • 7130 Goodlett Farms Pkwy. #400 • Memphis, TN 38016 • www.hunterfan.com • 98000-01-747 02-09-2010 ...


