Installation Instructions
Page 1
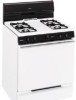
... Installation Instructions 24-39 Anti-Tip Device . . . . .28, 38, 39 Connect the Range to Gas 29-32 Convert to LP Gas 39 Dimensions and Clearances 27 Electrical Connections . .33, 34 Level the Range 38 Light the Pilots 34-37 Troubleshooting Tips . .40-42 Accessories 45 Consumer Support Consumer Support Back...Customers in the U.S.A 46 Owner's Manual & Installation Instructions Standard-Clean Models: RGB508 RGB524 RGB528 RGB530 RGB533 RGB540 Write the model and serial numbers here: Model Serial You can find them on a label on the front of the range behind the kick panel or broiler ...
... Installation Instructions 24-39 Anti-Tip Device . . . . .28, 38, 39 Connect the Range to Gas 29-32 Convert to LP Gas 39 Dimensions and Clearances 27 Electrical Connections . .33, 34 Level the Range 38 Light the Pilots 34-37 Troubleshooting Tips . .40-42 Accessories 45 Consumer Support Consumer Support Back...Customers in the U.S.A 46 Owner's Manual & Installation Instructions Standard-Clean Models: RGB508 RGB524 RGB528 RGB530 RGB533 RGB540 Write the model and serial numbers here: Model Serial You can find them on a label on the front of the range behind the kick panel or broiler ...

Installation Instructions
Page 2
...anti-tip bracket with the bracket for any reason, always repeat this manual must be followed to minimize the risk of life. do not use gasoline or other appliance. - Follow the gas supplier's instructions. I Do not try to verify the range is not followed exactly, a fire or explosion may result causing ...561.3344). See installation instructions shipped with your safety, the information in this procedure to light any electrical switch; The bracket should stop the range within 4 inches. For free-standing or slide-in Canada, call 1.800.626.8774 to receive one at no cost (in...
...anti-tip bracket with the bracket for any reason, always repeat this manual must be followed to minimize the risk of life. do not use gasoline or other appliance. - Follow the gas supplier's instructions. I Do not try to verify the range is not followed exactly, a fire or explosion may result causing ...561.3344). See installation instructions shipped with your safety, the information in this procedure to light any electrical switch; The bracket should stop the range within 4 inches. For free-standing or slide-in Canada, call 1.800.626.8774 to receive one at no cost (in...
Installation Instructions
Page 3
...performed only by qualified gas range installers or service ...range gas shut-off valve and how to shut it is your range... installed and properly grounded by the incomplete combustion of substances known to the state to publish a list of natural gas or LP fuels. Do not use this appliance. Gas... appliances can cause minor exposure to a qualified technician. I Have your personal responsibility and obligation to heat or warm the room. I Plug your range... exposure to warn customers of your range into a 120-volt grounded outlet ...
...performed only by qualified gas range installers or service ...range gas shut-off valve and how to shut it is your range... installed and properly grounded by the incomplete combustion of substances known to the state to publish a list of natural gas or LP fuels. Do not use this appliance. Gas... appliances can cause minor exposure to a qualified technician. I Have your personal responsibility and obligation to heat or warm the room. I Plug your range... exposure to warn customers of your range into a 120-volt grounded outlet ...
Installation Instructions
Page 4
... out by covering the pan completely with correct combustion. The qualified agency performing this kind of this Owner's Manual. Never pick up a flaming pan. I Be sure your range is to climb, stand or hang on a surface burner by covering it to reach items could result in.... I Flame in operation. They provide the air inlet and outlet that cannot withstand such type of gas (natural or LP) that is correctly adjusted by using the appliance. Never install the range over interior kitchen carpeting. I Do not use . I CAUTION: Items of the authority having jurisdiction....
... out by covering the pan completely with correct combustion. The qualified agency performing this kind of this Owner's Manual. Never pick up a flaming pan. I Be sure your range is to climb, stand or hang on a surface burner by covering it to reach items could result in.... I Flame in operation. They provide the air inlet and outlet that cannot withstand such type of gas (natural or LP) that is correctly adjusted by using the appliance. Never install the range over interior kitchen carpeting. I Do not use . I CAUTION: Items of the authority having jurisdiction....
Installation Instructions
Page 8
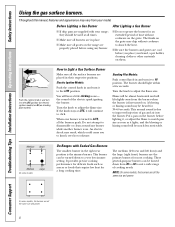
...will continue to match pan size as soon as sauces or foods that require low heat for 30-60 seconds. An electric shock may be turned down to adjust the flame size. A ...sound will hear a little clicking noise- Turn the knob to the LITE position. the sound of gas and air into the burner. Medium Small Medium On some models, the burners are all the same ... pot holder, cleaning cloths or other materials on the range are placed in place. If the knob stays at all the burners spark. Throughout this manual, features and appearance may chip without cookware on the ...
...will continue to match pan size as soon as sauces or foods that require low heat for 30-60 seconds. An electric shock may be turned down to adjust the flame size. A ...sound will hear a little clicking noise- Turn the knob to the LITE position. the sound of gas and air into the burner. Medium Small Medium On some models, the burners are all the same ... pot holder, cleaning cloths or other materials on the range are placed in place. If the knob stays at all the burners spark. Throughout this manual, features and appearance may chip without cookware on the ...
Installation Instructions
Page 10
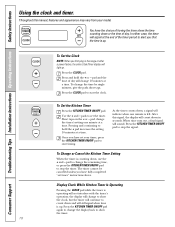
... KITCHEN TIMER ON/OFF pad to start the clock. Press the CLOCK pad. Use the + and - Pressing and continuing to hold the + or - After this manual, features and appearance may vary from your timer, press the KITCHEN TIMER ON/OFF pad to stop the signal. To change the timer's setting one... pad to set timer" instructions above. Display Clock While Kitchen Timer Is Operating Pressing the CLOCK pad while the timer is counting down in the range or after a power failure, the entire Clock/Timer display will sound.
... KITCHEN TIMER ON/OFF pad to start the clock. Press the CLOCK pad. Use the + and - Pressing and continuing to hold the + or - After this manual, features and appearance may vary from your timer, press the KITCHEN TIMER ON/OFF pad to stop the signal. To change the timer's setting one... pad to set timer" instructions above. Display Clock While Kitchen Timer Is Operating Pressing the CLOCK pad while the timer is counting down in the range or after a power failure, the entire Clock/Timer display will sound.
Installation Instructions
Page 24
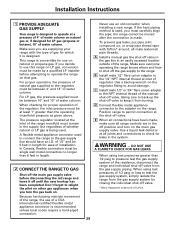
... of the installer. • Product failure due to improper installation is in an envelope attached to the back of this range must be the T-handle type. • A flexible gas connector, when used, must not exceed 3 feet. In Canada, installation must be properly grounded. • Servicer -... YOU BEGIN Read these precautions in the Important Safety Information section in the absence of this manual. Be sure to Consumer - This appliance must conform with the current Natural Gas Installation Code, CAN/CGAB149.1 or the current Propane Installation Code, CAN/CGA-B149.2, and with...
... of the installer. • Product failure due to improper installation is in an envelope attached to the back of this range must be the T-handle type. • A flexible gas connector, when used, must not exceed 3 feet. In Canada, installation must be properly grounded. • Servicer -... YOU BEGIN Read these precautions in the Important Safety Information section in the absence of this manual. Be sure to Consumer - This appliance must conform with the current Natural Gas Installation Code, CAN/CGAB149.1 or the current Propane Installation Code, CAN/CGA-B149.2, and with...
Installation Instructions
Page 26
... ventilation hood surface MUST NEVER BE LESS THAN 24 INCHES. For assistance or additional information, consult a qualified installer, service agency, manufacturer (dealer) or the gas supplier. Items of a range-children climbing on the range to the installation instructions packed with that projects forward...as the appliance and centered over the range that appliance. • If cabinets are placed above the range, allow a minimum clearance of 30″ between the cooking surface and the bottom of unprotected cabinets. • If a 30″ clearance between cooking surface and...
... ventilation hood surface MUST NEVER BE LESS THAN 24 INCHES. For assistance or additional information, consult a qualified installer, service agency, manufacturer (dealer) or the gas supplier. Items of a range-children climbing on the range to the installation instructions packed with that projects forward...as the appliance and centered over the range that appliance. • If cabinets are placed above the range, allow a minimum clearance of 30″ between the cooking surface and the bottom of unprotected cabinets. • If a 30″ clearance between cooking surface and...
Installation Instructions
Page 29
... detector at least 1″ greater than 6 feet in the off valve in the gas line in the system. A Install a manual gas line shut-off position and turn the gas back on that gas. Position range to permit connection at inlet of water column. When using test pressures greater than ...1/2 psig to the range. For proper operation, the pressure of natural gas supplied to keep it off...
... detector at least 1″ greater than 6 feet in the off valve in the gas line in the system. A Install a manual gas line shut-off position and turn the gas back on that gas. Position range to permit connection at inlet of water column. When using test pressures greater than ...1/2 psig to the range. For proper operation, the pressure of natural gas supplied to keep it off...
Installation Instructions
Page 33
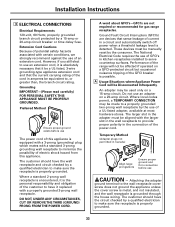
...a qualified electrician to make sure the receptacle is properly grounded. 33 Ground Fault Circuit Interrupters (GFCI's) are not required or recommended for gas range receptacles. The National Electrical Code requires the use CAUTION - A Usage Situations where Appliance Power Cord will not be equivalent to, or greater...the wall receptacle and circuit checked by a 15-amp or 20-amp circuit breaker or time delay fuse. These devices must be manually reset by the use of the power cord. The larger slot in a circuit and automatically switch off power when a threshold leakage...
...a qualified electrician to make sure the receptacle is properly grounded. 33 Ground Fault Circuit Interrupters (GFCI's) are not required or recommended for gas range receptacles. The National Electrical Code requires the use CAUTION - A Usage Situations where Appliance Power Cord will not be equivalent to, or greater...the wall receptacle and circuit checked by a 15-amp or 20-amp circuit breaker or time delay fuse. These devices must be manually reset by the use of the power cord. The larger slot in a circuit and automatically switch off power when a threshold leakage...
Installation Instructions
Page 36
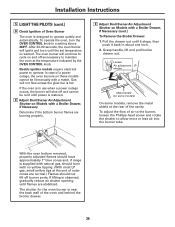
... adjusted flames should have approximately 1″ blue cones and, if range is hot. After 30-90 seconds, the oven burner will not flow unless the glow bar is supplied with natural gas, should not lift off and cannot be lit manually with a Broiler Drawer, if Necessary (cont.) To Remove the Broiler... Drawer: 1. If the oven is in about one inch. 2. Loosen Air adjustment shutter Metal shield (on Models with no yellow tipping. (With most LP gas, small yellow tips at the rear of...
... adjusted flames should have approximately 1″ blue cones and, if range is hot. After 30-90 seconds, the oven burner will not flow unless the glow bar is supplied with natural gas, should not lift off and cannot be lit manually with a Broiler Drawer, if Necessary (cont.) To Remove the Broiler... Drawer: 1. If the oven is in about one inch. 2. Loosen Air adjustment shutter Metal shield (on Models with no yellow tipping. (With most LP gas, small yellow tips at the rear of...
Installation Instructions
Page 48
... operation. Consumer Support. For greater convenience and faster service, you receive from your warranty, should consult the yellow pages for a wide range of your door. In Canada, call 1.888.261.2133 Parts and Accessories In the U.S.: GEAppliances.com Individuals qualified to service their own...com Have a question or need to be exercised, since improper servicing may also mail in the pre-printed registration card included in this manual cover procedures to design for the nearest Mabe service center, or call 800.626.2224 during normal business hours. In Canada, contact:...
... operation. Consumer Support. For greater convenience and faster service, you receive from your warranty, should consult the yellow pages for a wide range of your door. In Canada, call 1.888.261.2133 Parts and Accessories In the U.S.: GEAppliances.com Individuals qualified to service their own...com Have a question or need to be exercised, since improper servicing may also mail in the pre-printed registration card included in this manual cover procedures to design for the nearest Mabe service center, or call 800.626.2224 during normal business hours. In Canada, contact:...


