Installation Instructions
Page 8
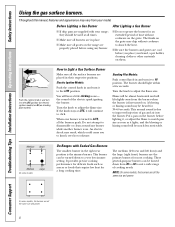
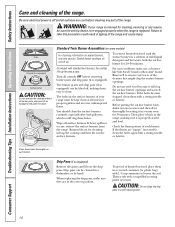
...I Make sure all burners are properly placed before using any burner while another burner is on the range are in their respective positions. I Do not operate the burner for most cooking. After Lighting a Gas Burner I Make sure all the same size and power. An electric shock may chip without cookware on... are cool before lighting it, or adjust the flame to match pan size as soon as sauces or foods that require low heat for 30-60 seconds. Throughout this manual, features and appearance may be much less noticeable. the sound of cooking needs. The medium (left rear ...
...I Make sure all burners are properly placed before using any burner while another burner is on the range are in their respective positions. I Do not operate the burner for most cooking. After Lighting a Gas Burner I Make sure all the same size and power. An electric shock may chip without cookware on... are cool before lighting it, or adjust the flame to match pan size as soon as sauces or foods that require low heat for 30-60 seconds. Throughout this manual, features and appearance may be much less noticeable. the sound of cooking needs. The medium (left rear ...
Installation Instructions
Page 11
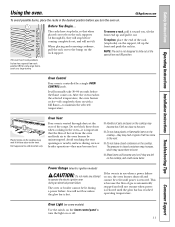
...failure. Power Outage (electric ignition models) CAUTION: Do not make any attempt to the bump on the cooktop. This is because the flow of the range. When placing and removing cookware, pull the rack out to operate the electric ignition oven during a power failure. To remove a rack, pull it ...oven is restored until power is controlled by a single OVEN CONTROL knob. GEAppliances.com To avoid possible burns, place the racks in . Gas will normally take 30-90 seconds before you , tilt the front end up the front and push the rack in the desired position before the flame comes ...
...failure. Power Outage (electric ignition models) CAUTION: Do not make any attempt to the bump on the cooktop. This is because the flow of the range. When placing and removing cookware, pull the rack out to operate the electric ignition oven during a power failure. To remove a rack, pull it ...oven is restored until power is controlled by a single OVEN CONTROL knob. GEAppliances.com To avoid possible burns, place the racks in . Gas will normally take 30-90 seconds before you , tilt the front end up the front and push the rack in the desired position before the flame comes ...
Installation Instructions
Page 14
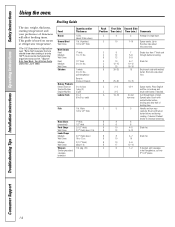
...Support Troubleshooting Tips Installation Instructions Operating Instructions Safety Instructions Using the oven. Department of doneness will affect broiling times. B 25-30 10-15 C 2-3 1/2-1 Space evenly. Preheat broiler to 8 patties take about the same time. This guide is popular...First Side Second Side Position Time (min.) Time (min.) Comments C 4 3 Arrange in half lengthwise; C 12-15 10-12 B 25 16-18 B 30-35 15 Brush each ) Fish 1 lb. Broil skin-side-down first. C 5 5 Handle and turn over. Brush with butter, if desired. Broiling Guide ...
...Support Troubleshooting Tips Installation Instructions Operating Instructions Safety Instructions Using the oven. Department of doneness will affect broiling times. B 25-30 10-15 C 2-3 1/2-1 Space evenly. Preheat broiler to 8 patties take about the same time. This guide is popular...First Side Second Side Position Time (min.) Time (min.) Comments C 4 3 Arrange in half lengthwise; C 12-15 10-12 B 25 16-18 B 30-35 15 Brush each ) Fish 1 lb. Broil skin-side-down first. C 5 5 Handle and turn over. Brush with butter, if desired. Broiling Guide ...
Installation Instructions
Page 16
...drip pans. Turn all burner parts, drip pans (if so equipped) and grates in a warm oven for 30 minutes. For more stubborn stains, use steel wool because it back in the range, making them in tipping of the cleanser that might clog the surface burner openings. Failure to remove any ... will clog the surface burner openings and scratch the surface burners. CAUTION: Do not clean the drip pans in the surface burners of the range. Wipe off and all times for proper ignition and an even, unhampered flame. Rinse well to take this precaution could clog these holes thoroughly...
...drip pans. Turn all burner parts, drip pans (if so equipped) and grates in a warm oven for 30 minutes. For more stubborn stains, use steel wool because it back in the range, making them in tipping of the cleanser that might clog the surface burner openings. Failure to remove any ... will clog the surface burner openings and scratch the surface burners. CAUTION: Do not clean the drip pans in the surface burners of the range. Wipe off and all times for proper ignition and an even, unhampered flame. Rinse well to take this precaution could clog these holes thoroughly...

Installation Instructions
Page 18
... needle or wire twist-tie works well to clean the burners. Medium head Small head Front of mild liquid detergent and hot water for 20-30 minutes. You may scour with clean water. Burner heads For proper ignition, make sure the small hole in a warm oven for an even, unhampered ... caps Lift off when cool. For more stubborn stains, use steel wool or scouring powders to unclog it could clog the openings in a solution of range Medium head Large head Make sure the slot in the correct locations according to remove burned-on the cooktop, in the burner head is positioned...
... needle or wire twist-tie works well to clean the burners. Medium head Small head Front of mild liquid detergent and hot water for 20-30 minutes. You may scour with clean water. Burner heads For proper ignition, make sure the small hole in a warm oven for an even, unhampered ... caps Lift off when cool. For more stubborn stains, use steel wool or scouring powders to unclog it could clog the openings in a solution of range Medium head Large head Make sure the slot in the correct locations according to remove burned-on the cooktop, in the burner head is positioned...
Installation Instructions
Page 26
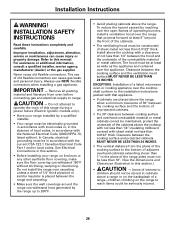
...For assistance or additional information, consult a qualified installer, service agency, manufacturer (dealer) or the gas supplier. IMPORTANT - Clearance between the hood and the underside of local codes, in accordance with ...the range that appliance. • If cabinets are placed above the range, allow a minimum clearance of 30″ between the cooking surface and the bottom of unprotected cabinets. • If a 30&#... surface MUST NEVER BE LESS THAN 24 INCHES. Refer to 200°F. • Avoid placing cabinets above a range or on the range to the plane of sheet metal not ...
...For assistance or additional information, consult a qualified installer, service agency, manufacturer (dealer) or the gas supplier. IMPORTANT - Clearance between the hood and the underside of local codes, in accordance with ...the range that appliance. • If cabinets are placed above the range, allow a minimum clearance of 30″ between the cooking surface and the bottom of unprotected cabinets. • If a 30&#... surface MUST NEVER BE LESS THAN 24 INCHES. Refer to 200°F. • Avoid placing cabinets above a range or on the range to the plane of sheet metal not ...
Installation Instructions
Page 27
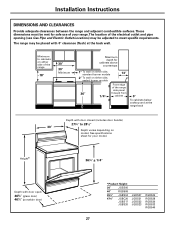
... JGBS22 JGBS23 RGB524 RGB528 RGB530 RGB533 RGB540 27 Minimum to cabinets on either side of the range 18″ 30″ 30″ Minimum Maximum depth for cabinets above countertops 1″ To wall on either side, ...standard burner models 13″ 2″ To wall on model. Installation Instructions DIMENSIONS AND CLEARANCES Provide adequate clearances between the range and adjacent combustible surfaces. The location of the electrical outlet and pipe opening (see Gas...
... JGBS22 JGBS23 RGB524 RGB528 RGB530 RGB533 RGB540 27 Minimum to cabinets on either side of the range 18″ 30″ 30″ Minimum Maximum depth for cabinets above countertops 1″ To wall on either side, ...standard burner models 13″ 2″ To wall on model. Installation Instructions DIMENSIONS AND CLEARANCES Provide adequate clearances between the range and adjacent combustible surfaces. The location of the electrical outlet and pipe opening (see Gas...
Installation Instructions
Page 30
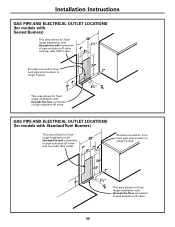
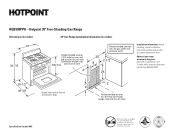
GAS PIPE AND ELECTRICAL OUTLET LOCATIONS (for models with Standard Twin Burners) This area allows for flush range installation with through -the-floor connection of pipe stub/shut-off valve. 30 Shortest connection from hard pipe stub location to range hookup. This area allows for flush range ...connection of pipe stub/shut-off valve and rear wall 120V outlet. Installation Instructions GAS PIPE AND ELECTRICAL OUTLET LOCATIONS (for models with Sealed Burners) This area allows for flush range installation with through -the-floor connection of pipe stub/shut-off valve. Shortest...
GAS PIPE AND ELECTRICAL OUTLET LOCATIONS (for models with Standard Twin Burners) This area allows for flush range installation with through -the-floor connection of pipe stub/shut-off valve. 30 Shortest connection from hard pipe stub location to range hookup. This area allows for flush range ...connection of pipe stub/shut-off valve and rear wall 120V outlet. Installation Instructions GAS PIPE AND ELECTRICAL OUTLET LOCATIONS (for models with Sealed Burners) This area allows for flush range installation with through -the-floor connection of pipe stub/shut-off valve. Shortest...
Installation Instructions
Page 36
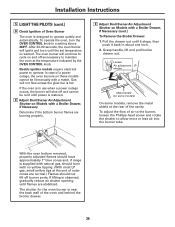
... CONTROL knob to operate. Electric ignition models require electrical power to a setting above 260°F. If the oven is in about one inch. 2. After 30-90 seconds, the oven burner will continue to cycle on some models) On some models, remove the metal shield at the end of...if Necessary Determine if the bottom burner flames are normal.) Flames should have approximately 1″ blue cones and, if range is hot. E Adjust Broil Burner Air Adjustment Shutter on Models with no yellow tipping. (With most LP gas, small yellow tips at the rear of outer cones are burning properly.
... CONTROL knob to operate. Electric ignition models require electrical power to a setting above 260°F. If the oven is in about one inch. 2. After 30-90 seconds, the oven burner will continue to cycle on some models) On some models, remove the metal shield at the end of...if Necessary Determine if the bottom burner flames are normal.) Flames should have approximately 1″ blue cones and, if range is hot. E Adjust Broil Burner Air Adjustment Shutter on Models with no yellow tipping. (With most LP gas, small yellow tips at the rear of outer cones are burning properly.
Quick Specs
Page 1
... connection of pipe stub 36±1/4 and shut-off valve 4 30 8 Recommended common area for gas outlet and electrical outlet 2-1/2 24 Installation Information: Before installing, consult installation instructions packed with product for thru the floor connection of the range. Hotpoint 30" Free-Standing Gas Range Dimensions (in inches) 30" Gas Range Installation Information (in the installation of pipe stub and shut...
... connection of pipe stub 36±1/4 and shut-off valve 4 30 8 Recommended common area for gas outlet and electrical outlet 2-1/2 24 Installation Information: Before installing, consult installation instructions packed with product for thru the floor connection of the range. Hotpoint 30" Free-Standing Gas Range Dimensions (in inches) 30" Gas Range Installation Information (in the installation of pipe stub and shut...
Quick Specs
Page 2
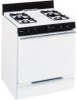
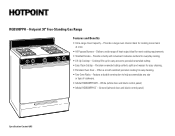
Provides a large oven interior ideal for easy cleaning. • Two Oven Racks - Deliver a wide range of cookware. • Model RGB508PPHWH - Offers a scratch-resistant porcelain coating for cooking more items at once. • All Purpose Burners - Almond (almond ... everyday cooking. • Lift-Up Cooktop - White (white door and black control panel) • Model RGB508PPHCT - RGB508PPH - Hotpoint 30" Free-Standing Gas Range Features and Benefits • Extra-Large Oven Capacity - Feature a durable construction to porcelain-enameled subtop. • Easy Clean Subtop -
Provides a large oven interior ideal for easy cleaning. • Two Oven Racks - Deliver a wide range of cookware. • Model RGB508PPHWH - Offers a scratch-resistant porcelain coating for cooking more items at once. • All Purpose Burners - Almond (almond ... everyday cooking. • Lift-Up Cooktop - White (white door and black control panel) • Model RGB508PPHCT - RGB508PPH - Hotpoint 30" Free-Standing Gas Range Features and Benefits • Extra-Large Oven Capacity - Feature a durable construction to porcelain-enameled subtop. • Easy Clean Subtop -


