Owners Manual
Page 1
Dryers Hotpoint.com Safety Instructions 2-4 Operating Instructions Control Panel 5 Control Settings 6 Features 7 Loading and Using the Dryer 9, 10 Reversing the Door 8 Venting the Dryer 10 Troubleshooting Tips . . . 11, 12 Consumer Support Consumer Support . . . . . Back Cover Warranty 15 Owner's Manual NBXR333 NVLR223 NWXR483 Write the model and serial numbers here: Model Serial You can find them on a label on the front of the dryer behind the door. 175D1807P568 39-90300-1 11-06 JR
Dryers Hotpoint.com Safety Instructions 2-4 Operating Instructions Control Panel 5 Control Settings 6 Features 7 Loading and Using the Dryer 9, 10 Reversing the Door 8 Venting the Dryer 10 Troubleshooting Tips . . . 11, 12 Consumer Support Consumer Support . . . . . Back Cover Warranty 15 Owner's Manual NBXR333 NVLR223 NWXR483 Write the model and serial numbers here: Model Serial You can find them on a label on the front of the dryer behind the door. 175D1807P568 39-90300-1 11-06 JR

Owners Manual
Page 2
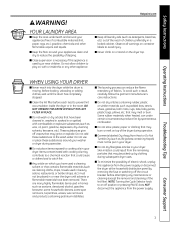
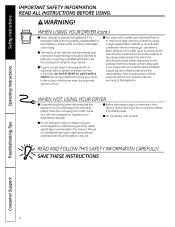
...Follow details in the vicinity of this manual must be minimized further by the incomplete combustion of these substances can receive one by visiting Hotpoint.com, or by a qualified installer, service agency or the gas supplier. USE OF PLASTIC OR OTHER COMBUSTIBLE DUCTWORK CAN CAUSE A .... For complete details, follow the Installation Instructions. 2 WHAT TO DO IF YOU SMELL GAS: 1 Do not try to avoid electrical overload. I Properly ground dryer to four of natural gas or LP fuels. Follow the gas supplier's instructions carefully. 5 If you can be followed to minimize...
...Follow details in the vicinity of this manual must be minimized further by the incomplete combustion of these substances can receive one by visiting Hotpoint.com, or by a qualified installer, service agency or the gas supplier. USE OF PLASTIC OR OTHER COMBUSTIBLE DUCTWORK CAN CAUSE A .... For complete details, follow the Installation Instructions. 2 WHAT TO DO IF YOU SMELL GAS: 1 Do not try to avoid electrical overload. I Properly ground dryer to four of natural gas or LP fuels. Follow the gas supplier's instructions carefully. 5 If you can be followed to minimize...
Owners Manual
Page 3
...dryer during subsequent dryer uses. that may burn or melt on top of combustible materials (lint, paper, rags, etc.), gasoline, chemicals and other appliance. Skin irritation could cause a clothes load to avoid injury. Troubleshooting Tips Consumer Support 3 Safety Instructions Operating Instructions WARNING! I Do not place items exposed to reduce the possibility of electric...Any article on container labels to catch fire. Hotpoint.com I The laundry process can under certain circumstances produce fire by or near the dryer until the drum has completely stopped. Before loading...
...dryer during subsequent dryer uses. that may burn or melt on top of combustible materials (lint, paper, rags, etc.), gasoline, chemicals and other appliance. Skin irritation could cause a clothes load to avoid injury. Troubleshooting Tips Consumer Support 3 Safety Instructions Operating Instructions WARNING! I Do not place items exposed to reduce the possibility of electric...Any article on container labels to catch fire. Hotpoint.com I The laundry process can under certain circumstances produce fire by or near the dryer until the drum has completely stopped. Before loading...
Owners Manual
Page 4
.... I If yours is equipped with controls. WARNING! I Do not tamper with an automatic electric ignition and does not have the skills to prevent children from traffic areas so it is a gas dryer, it will not be cleaned at least once a year by use either a fabric softener ...MATCH. Place the cord away from hiding inside the dryer should be stepped on, tripped over or subjected to this Owner's Manual or in your laundered fabrics or reduce the static electricity in the vicinity of those products, or try a dryer-added product for which the manufacturer gives written assurance...
.... I If yours is equipped with controls. WARNING! I Do not tamper with an automatic electric ignition and does not have the skills to prevent children from traffic areas so it is a gas dryer, it will not be cleaned at least once a year by use either a fabric softener ...MATCH. Place the cord away from hiding inside the dryer should be stepped on, tripped over or subjected to this Owner's Manual or in your laundered fabrics or reduce the static electricity in the vicinity of those products, or try a dryer-added product for which the manufacturer gives written assurance...
Owners Manual
Page 5
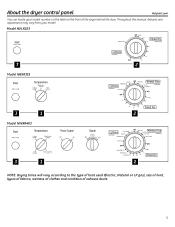
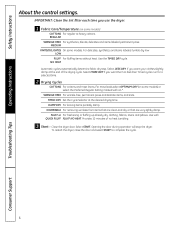
Model NVLR223 3 2 Model NBXR333 3 1 2 Model NWXR483 3 1 2 NOTE: Drying times will vary according to the type of heat used (Electric, Natural or LP gas), size of load, types of fabrics, wetness of clothes and condition of the dryer behind the door. Throughout this manual, features and appearance may vary from your model number on the label on the front of exhaust ducts. 5 Hotpoint.com You can locate your model. About the dryer control panel.
Model NVLR223 3 2 Model NBXR333 3 1 2 Model NWXR483 3 1 2 NOTE: Drying times will vary according to the type of heat used (Electric, Natural or LP gas), size of load, types of fabrics, wetness of clothes and condition of the dryer behind the door. Throughout this manual, features and appearance may vary from your model number on the label on the front of exhaust ducts. 5 Hotpoint.com You can locate your model. About the dryer control panel.
Owners Manual
Page 6
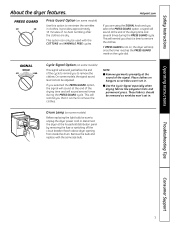
...DRY (on some models. DEWRINKLE For removing wrinkles from items that are clean and dry or that are very lightly damp. Close the dryer door. To restart the dryer, close the door and select START to heavy cottons. Select MORE DRY if you want them to feel drier. FLUFF or For ...freshening or fluffing up already dry clothing, fabrics, linens and pillows. Opening the door during operation will stop the dryer. TIMED DRY Set the Cycle Selector at the end of no heat tumbling. 3 Start- Provides 10 minutes of the drying cycle. Use with an *. ...
...DRY (on some models. DEWRINKLE For removing wrinkles from items that are clean and dry or that are very lightly damp. Close the dryer door. To restart the dryer, close the door and select START to heavy cottons. Select MORE DRY if you want them to feel drier. FLUFF or For ...freshening or fluffing up already dry clothing, fabrics, linens and pillows. Opening the door during operation will stop the dryer. TIMED DRY Set the Cycle Selector at the end of no heat tumbling. 3 Start- Provides 10 minutes of the drying cycle. Use with an *. ...
Owners Manual
Page 7
... with the COTTONS and WRINKLE FREE cycles. I Remove garments promptly at the end of the cycle to remove the clothes. Hotpoint.com If you that it is not on, the dryer will sound at the sound of no-heat tumbling after the clothes are using the SIGNAL knob and you to minimize... of the signal. If you selected the PRESS GUARD option, the signal will remind you that it is time to unplug the dryer power cord or disconnect the dryer at the end of the drying time and will sound just before the end of the drying time and several times during the...
... with the COTTONS and WRINKLE FREE cycles. I Remove garments promptly at the end of the cycle to remove the clothes. Hotpoint.com If you that it is not on, the dryer will sound at the sound of no-heat tumbling after the clothes are using the SIGNAL knob and you to minimize... of the signal. If you selected the PRESS GUARD option, the signal will remind you that it is time to unplug the dryer power cord or disconnect the dryer at the end of the drying time and will sound just before the end of the drying time and several times during the...
Owners Manual
Page 8
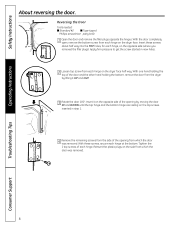
... the bottom, remove the door from which the door was removed. Insert these screws, secure each hinge, on the dryer face half way. Reinsert the plastic plugs on the side from the dryer by moving the door IN and DOWN until the top hinge and the bottom hinge are resting on the... dryer face. Reversing the Door Tools needed: I Standard #2 I Tape-tipped Phillips screwdriver putty knife 1 Open the door and remove the filler...
... the bottom, remove the door from which the door was removed. Insert these screws, secure each hinge, on the dryer face half way. Reinsert the plastic plugs on the side from the dryer by moving the door IN and DOWN until the top hinge and the bottom hinge are resting on the... dryer face. Reversing the Door Tools needed: I Standard #2 I Tape-tipped Phillips screwdriver putty knife 1 Open the door and remove the filler...
Owners Manual
Page 9
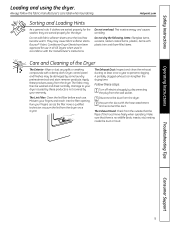
...from the wall socket. 2 Disconnect the duct from the dryer. Follow these steps: 1 Turn off electrical supply by these products away from the dryer. 3 Vacuum the duct with the manufacturer's instructions. Make sure that the flaps of the Dryer The Exterior: Wipe or dust any spills or washing compounds... Tips Consumer Support 9 The Lint Filter: Clean the lint filter before each use in all GE Dryers when used in accordance with the hose attachment and reconnect the duct. Hotpoint.com Sorting and Loading Hints As a general rule, if clothes are sorted properly for the washer,...
...from the wall socket. 2 Disconnect the duct from the dryer. Follow these steps: 1 Turn off electrical supply by these products away from the dryer. 3 Vacuum the duct with the manufacturer's instructions. Make sure that the flaps of the Dryer The Exterior: Wipe or dust any spills or washing compounds... Tips Consumer Support 9 The Lint Filter: Clean the lint filter before each use in all GE Dryers when used in accordance with the hose attachment and reconnect the duct. Hotpoint.com Sorting and Loading Hints As a general rule, if clothes are sorted properly for the washer,...
Owners Manual
Page 10
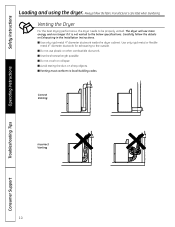
...'s care label when laundering. I Do not crush or collapse. I Use only rigid metal 4″ diameter ductwork inside the dryer cabinet. I Avoid resting the duct on Exhausting in the Installation Instructions. Always follow the details on sharp objects. Use only rigid...other combustible ductwork. I Venting must conform to the below specifications. Venting the Dryer For the best drying performance, the dryer needs to the outside. Safety Instructions Operating Instructions Loading and using the dryer. I Use the shortest length possible. I Do not use more energy and...
...'s care label when laundering. I Do not crush or collapse. I Use only rigid metal 4″ diameter ductwork inside the dryer cabinet. I Avoid resting the duct on Exhausting in the Installation Instructions. Always follow the details on sharp objects. Use only rigid...other combustible ductwork. I Venting must conform to the below specifications. Venting the Dryer For the best drying performance, the dryer needs to the outside. Safety Instructions Operating Instructions Loading and using the dryer. I Use the shortest length possible. I Do not use more energy and...
Owners Manual
Page 11
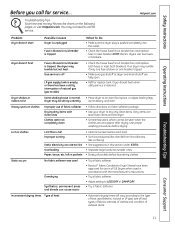
... of natural gas (gas models) • Check the house fuse/circuit breaker box and replace both fuses or reset both breakers. NOTE: Electric dryers use of fabric softener Drying dirty items with the manufacturer's instructions. • Try a fabric softener. • Adjust setting to LESS DRY...use in accordance with clean ones Clothes were not completely clean • Follow directions on clothes Improper use two fuses or breakers. Hotpoint.com Troubleshooting Tips Save time and money! left in this section under STATIC. • Separate large loads into the outlet. &#...
... of natural gas (gas models) • Check the house fuse/circuit breaker box and replace both fuses or reset both breakers. NOTE: Electric dryers use of fabric softener Drying dirty items with the manufacturer's instructions. • Try a fabric softener. • Adjust setting to LESS DRY...use in accordance with clean ones Clothes were not completely clean • Follow directions on clothes Improper use two fuses or breakers. Hotpoint.com Troubleshooting Tips Save time and money! left in this section under STATIC. • Separate large loads into the outlet. &#...
Owners Manual
Page 12
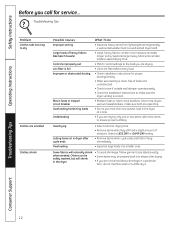
...garment care labels exactly. Troubleshooting Tips Problem Clothes take longer to dry. Overdrying Letting items sit in dryer after drying. • If you are drying only one washer load in the dryer at a time. • If you are wrinkled Clothes shrink Possible Causes Improper sorting Large loads... drying time. • Match control settings to the load you call for proper ducting/venting. • Make sure ducting is a well-sorted dryer load). • Large, heavy fabrics contain more than one or two items, add a few items to ensure proper tumbling. Safety Instructions Operating...
...garment care labels exactly. Troubleshooting Tips Problem Clothes take longer to dry. Overdrying Letting items sit in dryer after drying. • If you are drying only one washer load in the dryer at a time. • If you are wrinkled Clothes shrink Possible Causes Improper sorting Large loads... drying time. • Match control settings to the load you call for proper ducting/venting. • Make sure ducting is a well-sorted dryer load). • Large, heavy fabrics contain more than one or two items, add a few items to ensure proper tumbling. Safety Instructions Operating...
Owners Manual
Page 15
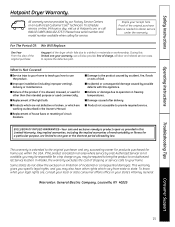
..., and you may be required to bring the product to replace the defective part. Safety Instructions Operating Instructions Hotpoint Dryer Warranty. What Is Not Covered: I Replacement of circuit breakers. Some states do not allow the exclusion or limitation of the... dryer which are , consult your local or state consumer affairs office or your home to obtain service under the warranty. Warrantor: General Electric Company. Any implied warranties, including the implied warranties of merchantability or fitness...
..., and you may be required to bring the product to replace the defective part. Safety Instructions Operating Instructions Hotpoint Dryer Warranty. What Is Not Covered: I Replacement of circuit breakers. Some states do not allow the exclusion or limitation of the... dryer which are , consult your local or state consumer affairs office or your home to obtain service under the warranty. Warrantor: General Electric Company. Any implied warranties, including the implied warranties of merchantability or fitness...


