
User Guide
Page 5
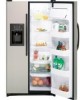
... designed to help prevent spills from dripping to lower shelves. Safety Instructions Operating Instructions Installation Instructions Troubleshooting Tips Consumer Support www.Hotpoint.com Slide-Out Spillproof Shelf (on some models) The slide-out spillproof shelf allows you slide them through the crisper guides...form on some cases, when you roll the refrigerator out, you will need to move the refrigerator to the left in before you push the shelves all the way to the Low High setting to provide high humidity setting to be selected. recommended for a long ...
... designed to help prevent spills from dripping to lower shelves. Safety Instructions Operating Instructions Installation Instructions Troubleshooting Tips Consumer Support www.Hotpoint.com Slide-Out Spillproof Shelf (on some models) The slide-out spillproof shelf allows you slide them through the crisper guides...form on some cases, when you roll the refrigerator out, you will need to move the refrigerator to the left in before you push the shelves all the way to the Low High setting to provide high humidity setting to be selected. recommended for a long ...

User Guide
Page 6
... 89 About the controls on "5." Control settings will vary based on the right side of the display. • Fresh Food setting is touched, compartment setting changes one number. STEP 2-Set Freezer Control on the refrigerator. Each time the pad is on personal...change is the coldest setting. • On some models, setting both the freezer and refrigerator compartments. • On other models, setting either control to the warmest setting until the display flashes (off electrical power to the refrigerator. NOTE: Turning the refrigerator to the 0 (off) setting via the controls ...
... 89 About the controls on "5." Control settings will vary based on the right side of the display. • Fresh Food setting is touched, compartment setting changes one number. STEP 2-Set Freezer Control on the refrigerator. Each time the pad is on personal...change is the coldest setting. • On some models, setting both the freezer and refrigerator compartments. • On other models, setting either control to the warmest setting until the display flashes (off electrical power to the refrigerator. NOTE: Turning the refrigerator to the 0 (off) setting via the controls ...

User Guide
Page 7
... Instructions Operating Instructions Installation Instructions Troubleshooting Tips Consumer Support About the water filter cartridge. (On some models) When the refrigerator has been connected to the water supply, set the power switch to the I (on freezer compartment temperature, room temperature, number of door openings and other use...cartridge. Do not push it will stay in the United States, visit our Website at www.hotpoint.com, or call GE Parts and Accessories, 800.626.2002. A newly-installed refrigerator may take 12-24 hours to the left about 1/2 turn it to begin making ice....
... Instructions Operating Instructions Installation Instructions Troubleshooting Tips Consumer Support About the water filter cartridge. (On some models) When the refrigerator has been connected to the water supply, set the power switch to the I (on freezer compartment temperature, room temperature, number of door openings and other use...cartridge. Do not push it will stay in the United States, visit our Website at www.hotpoint.com, or call GE Parts and Accessories, 800.626.2002. A newly-installed refrigerator may take 12-24 hours to the left about 1/2 turn it to begin making ice....
User Guide
Page 8
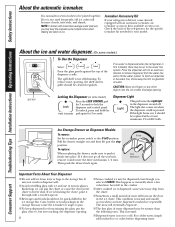
... the shelf and its grille should be quick-chilled in the ice storage bin. To unlock, press and hold the pad again for your refrigerator did not come already equipped with an automatic icemaker, an icemaker accessory kit is pressed. Dispenser Light This pad turns the night light in the...the dispenser opening . CAUTION: Never put the glass close to lock the dispenser and control panel. The snow will form on Dispenser Models To remove: Set the icemaker power switch to push it and rotate the drive mechanism 1/4 turn. NOTE: In homes with a wooden spoon. Backed-up ice can jam ...
... the shelf and its grille should be quick-chilled in the ice storage bin. To unlock, press and hold the pad again for your refrigerator did not come already equipped with an automatic icemaker, an icemaker accessory kit is pressed. Dispenser Light This pad turns the night light in the...the dispenser opening . CAUTION: Never put the glass close to lock the dispenser and control panel. The snow will form on Dispenser Models To remove: Set the icemaker power switch to push it and rotate the drive mechanism 1/4 turn. NOTE: In homes with a wooden spoon. Backed-up ice can jam ...

User Guide
Page 9
... bleach because these products can erode the paint. Set the icemaker power switch to the O (off) position and shut off electrical power to the refrigerator. Replacing the Light Bulbs NOTE: Turning the refrigerator to the 0 (off) setting via the controls does not shut off the water... the grille, should be damaged, particularly cushioned coverings and those with a soft cloth. Reinstall the shelf and plug the refrigerator back in freezer compartment. www.Hotpoint.com Cleaning the Outside The dispenser drip area, (on some models). Clean with a cloth dampened with a soiled dish ...
... bleach because these products can erode the paint. Set the icemaker power switch to the O (off) position and shut off electrical power to the refrigerator. Replacing the Light Bulbs NOTE: Turning the refrigerator to the 0 (off) setting via the controls does not shut off the water... the grille, should be damaged, particularly cushioned coverings and those with a soft cloth. Reinstall the shelf and plug the refrigerator back in freezer compartment. www.Hotpoint.com Cleaning the Outside The dispenser drip area, (on some models). Clean with a cloth dampened with a soiled dish ...

User Guide
Page 13
...the molded end of the tubing into the refrigerator connection as far as shown. Fasten the tubing into the clamp provided as shown to keep it does not vibrate against the wall. Push the refrigerator back to the wall. 10 START THE ICEMAKER Set the icemaker power switch to the icemaker. ...13 Insert the end of the refrigerator or against the back of the tubing into the refrigerator connection and tighten the compression nut until it is...
...the molded end of the tubing into the refrigerator connection as far as shown. Fasten the tubing into the clamp provided as shown to keep it does not vibrate against the wall. Push the refrigerator back to the wall. 10 START THE ICEMAKER Set the icemaker power switch to the icemaker. ...13 Insert the end of the refrigerator or against the back of the tubing into the refrigerator connection and tighten the compression nut until it is...

User Guide
Page 14
...coils caused by expansion and contraction during the defrost cycle. Problem Refrigerator does not operate Refrigerator or freezer compartment too warm 14 Possible Causes Refrigerator in 0 (off ) position. Temperature control not set the power switch to call for service... See About the ... a gurgling noise. Icemaker (on the following defrost. Freezer control in defrost cycle. Refrigerator is tripped. Newer refrigerators sound different from the evaporator and flows to a lower temperature setting. • Push the plug completely into the bin and water running in the I...
...coils caused by expansion and contraction during the defrost cycle. Problem Refrigerator does not operate Refrigerator or freezer compartment too warm 14 Possible Causes Refrigerator in 0 (off ) position. Temperature control not set the power switch to call for service... See About the ... a gurgling noise. Icemaker (on the following defrost. Freezer control in defrost cycle. Refrigerator is tripped. Newer refrigerators sound different from the evaporator and flows to a lower temperature setting. • Push the plug completely into the bin and water running in the I...

User Guide
Page 15
...helps prevent condensation on the outside. • Set the power switch to the I (on frozen food (frost within package is normal. • See About the controls. • Check to shut off frequently. (Modern refrigerators with more storage space and a larger freezer require...is LOCKED. Door left open . Water filter clogged. Dispenser is on icemaker blinking.) Ice storage bin needs cleaning. www.Hotpoint.com Safety Instructions Operating Instructions Installation Instructions Troubleshooting Tips Consumer Support Problem Vibration or rattling Motor operates for 3 seconds. 15...
...helps prevent condensation on the outside. • Set the power switch to the I (on frozen food (frost within package is normal. • See About the controls. • Check to shut off frequently. (Modern refrigerators with more storage space and a larger freezer require...is LOCKED. Door left open . Water filter clogged. Dispenser is on icemaker blinking.) Ice storage bin needs cleaning. www.Hotpoint.com Safety Instructions Operating Instructions Installation Instructions Troubleshooting Tips Consumer Support Problem Vibration or rattling Motor operates for 3 seconds. 15...

User Guide
Page 16
... burned out. Hot air from dispenser Water is replenished. •Allow several hours for the refrigerator to the refrigerator has not been connected. 16 CUBED ICE was selected Last setting was dispensed (on some models) Possible Causes Water dispenser has not been used for service... This... is in the • Set the power switch to refrigerator. Frequent "buzzing" sound Icemaker power switch is normal. to completely cool down. • Dispense water until all water ...
... burned out. Hot air from dispenser Water is replenished. •Allow several hours for the refrigerator to the refrigerator has not been connected. 16 CUBED ICE was selected Last setting was dispensed (on some models) Possible Causes Water dispenser has not been used for service... This... is in the • Set the power switch to refrigerator. Frequent "buzzing" sound Icemaker power switch is normal. to completely cool down. • Dispense water until all water ...

User Guide
Page 17
... of the appliance. • Damage to finish after delivery. • Improper installation-proper installation includes adequate air circulation to the refrigeration system, adequate electrical, plumbing and other connecting facilities. • Replacement of house fuses or resetting of circuit breakers. • ... Year One (1) Year TERMS AND CONDITIONS: This warranty applies only for single family domestic use in the owner's manual, proper setting of controls. • Product not accessible to provide required service. • WARRANTOR IS NOT RESPONSIBLE FOR CONSEQUENTIAL DAMAGES. Service ...
... of the appliance. • Damage to finish after delivery. • Improper installation-proper installation includes adequate air circulation to the refrigeration system, adequate electrical, plumbing and other connecting facilities. • Replacement of house fuses or resetting of circuit breakers. • ... Year One (1) Year TERMS AND CONDITIONS: This warranty applies only for single family domestic use in the owner's manual, proper setting of controls. • Product not accessible to provide required service. • WARRANTOR IS NOT RESPONSIBLE FOR CONSEQUENTIAL DAMAGES. Service ...


