Installation Instructions
Page 1
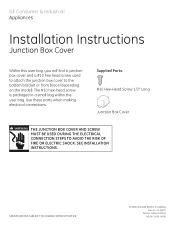
...THE JUNCTION BOX COVER AND SCREW MUST BE USED DURING THE ELECTRICAL CONNECTION STEPS TO AVOID THE RISK OF FIRE OR ELECTRIC SHOCK. SEE INSTALLATION INSTRUCTIONS. #282 French SPECIFICATIONS SUBJECT TO CHANGE WITHOUT NOTICE © 2006 General Electric Company Pub. GE Consumer & Industrial Appliances... Installation Instructions Junction Box Cover Within this user bag, you will find a junction box cover and a #10 hex head screw used to attach the ...
...THE JUNCTION BOX COVER AND SCREW MUST BE USED DURING THE ELECTRICAL CONNECTION STEPS TO AVOID THE RISK OF FIRE OR ELECTRIC SHOCK. SEE INSTALLATION INSTRUCTIONS. #282 French SPECIFICATIONS SUBJECT TO CHANGE WITHOUT NOTICE © 2006 General Electric Company Pub. GE Consumer & Industrial Appliances... Installation Instructions Junction Box Cover Within this user bag, you will find a junction box cover and a #10 hex head screw used to attach the ...
Installation Instructions
Page 2
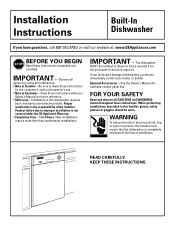
... 800-GECARES or visit our website at the time of electrical shock, fire, or injury to persons, the installer must ensure that the dishwasher is not covered under the GE Appliance Warranty. • Completion Time - 1 to 3 Hours. Be ...sure to Installer - WARNING To reduce the risk of installation. Optional Accessories - KEEP THESE INSTRUCTIONS. New installations require more time than replacement installations. READ CAREFULLY. IMPORTANT - FOR YOUR SAFETY Read and observe all governing codes and ordinances...
... 800-GECARES or visit our website at the time of electrical shock, fire, or injury to persons, the installer must ensure that the dishwasher is not covered under the GE Appliance Warranty. • Completion Time - 1 to 3 Hours. Be ...sure to Installer - WARNING To reduce the risk of installation. Optional Accessories - KEEP THESE INSTRUCTIONS. New installations require more time than replacement installations. READ CAREFULLY. IMPORTANT - FOR YOUR SAFETY Read and observe all governing codes and ordinances...
Installation Instructions
Page 3
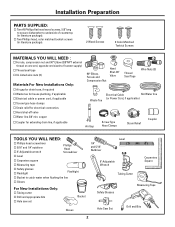
...head wood screws, 5/8" long to secure dishwasher to fit water supply) Thread seal tape UL Listed wire nuts (3) Materials For New Installations Only: Air gap for drain hose, if required Waste tee for house plumbing, if applicable Electrical cable or power cord, if applicable...Phillips Head Screwdriver Level Carpenters square Measuring tape Safety glasses Flashlight Flashlight Bucket to catch water when flushing the line Gloves For New Installations Only: Tubing cutter Drill and appropriate bits Hole saw set Bucket Gloves 1/4" and 5/16" Nutdriver Level 6" Adjustable Wrench Tubing ...
...head wood screws, 5/8" long to secure dishwasher to fit water supply) Thread seal tape UL Listed wire nuts (3) Materials For New Installations Only: Air gap for drain hose, if required Waste tee for house plumbing, if applicable Electrical cable or power cord, if applicable...Phillips Head Screwdriver Level Carpenters square Measuring tape Safety glasses Flashlight Flashlight Bucket to catch water when flushing the line Gloves For New Installations Only: Tubing cutter Drill and appropriate bits Hole saw set Bucket Gloves 1/4" and 5/16" Nutdriver Level 6" Adjustable Wrench Tubing ...
Installation Instructions
Page 4
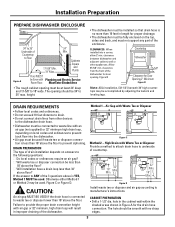
... Min. 18" Min. I Will waste tee or disposer connection be accomplished by adjusting the toekick and leveling legs. CAUTION: Method 1 - Figure D Install waste tee or disposer and air gap according to drain. • Do not connect drain lines from the front of the dishwasher. CABINET PREPARATION •...opening must be used if waste tee or disposer connection is connected to Floor 24" 4 Min. 17-5/8" Min. 18" Max. CLEARANCES: When installed into the dishwasher. • Air gap must be connected to waste line with Waste Tee or Disposer Figure C Method 2 - DRAIN PREPARATION The...
... Min. 18" Min. I Will waste tee or disposer connection be accomplished by adjusting the toekick and leveling legs. CAUTION: Method 1 - Figure D Install waste tee or disposer and air gap according to drain. • Do not connect drain lines from the front of the dishwasher. CABINET PREPARATION •...opening must be used if waste tee or disposer connection is connected to Floor 24" 4 Min. 17-5/8" Min. 18" Max. CLEARANCES: When installed into the dishwasher. • Air gap must be connected to waste line with Waste Tee or Disposer Figure C Method 2 - DRAIN PREPARATION The...
Installation Instructions
Page 5
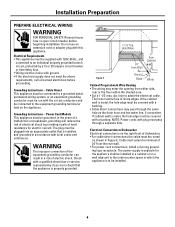
...Ground Black White Cabinet Preparation & Wire Routing • The wiring may pass through a separate hole. If cabinet wall is installed and grounded in Figure E. The power-supply receptacle for electric current. Grounding Instructions - WARNING The improper connection of sharp edges....ground. • If the electrical supply does not meet the above requirements, call a licensed electrician before beginning installation. Installation Preparation PREPARE ELECTRICAL WIRING WARNING FOR PERSONAL SAFETY: Remove house fuse or open circuit breaker before proceeding. Electrical Connection ...
...Ground Black White Cabinet Preparation & Wire Routing • The wiring may pass through a separate hole. If cabinet wall is installed and grounded in Figure E. The power-supply receptacle for electric current. Grounding Instructions - WARNING The improper connection of sharp edges....ground. • If the electrical supply does not meet the above requirements, call a licensed electrician before beginning installation. Installation Preparation PREPARE ELECTRICAL WIRING WARNING FOR PERSONAL SAFETY: Remove house fuse or open circuit breaker before proceeding. Electrical Connection ...
Installation Instructions
Page 6
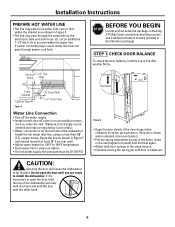
... the door will cause the dishwasher to accommodate the water line. Or, cut an additional 1-1/2" dia. If power cord with the other hand. 5 Install the hot water inlet line, using no less than 3/8" O.D. Route the line as shown in Figure F and extend forward at least 18" from ...recommended and may enter from rear wall. • Adjust water heater for 120°F to 150°F temperature. • Flush water line to install the dishwasher. Shut-off valve in the literature package). copper tubing. If the door closes when released, decrease tension. • Pull the spring adjustment...
... the door will cause the dishwasher to accommodate the water line. Or, cut an additional 1-1/2" dia. If power cord with the other hand. 5 Install the hot water inlet line, using no less than 3/8" O.D. Route the line as shown in Figure F and extend forward at least 18" from ...recommended and may enter from rear wall. • Adjust water heater for 120°F to 150°F temperature. • Flush water line to install the dishwasher. Shut-off valve in the literature package). copper tubing. If the door closes when released, decrease tension. • Pull the spring adjustment...
Installation Instructions
Page 7
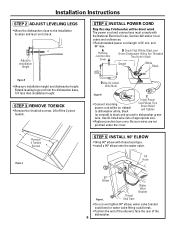
...or local codes and ordinances. • Recommended power cord length is 54" min. Extend leveling legs out from the dishwasher base, 1/4" less than installation height. Be sure wires are not pinched under the cover. and 64" max. STEP 3 REMOVE TOEKICK • Remove the 4 toekick screws. ...Lift off the 2 piece toekick. The power cord and connections must comply with thread seal tape. • Install a 90° elbow onto the water valve. Use UL listed wire nuts of the elbow to dishwasher green wire. Remove 4 Toekick Screws Figure J ...
...or local codes and ordinances. • Recommended power cord length is 54" min. Extend leveling legs out from the dishwasher base, 1/4" less than installation height. Be sure wires are not pinched under the cover. and 64" max. STEP 3 REMOVE TOEKICK • Remove the 4 toekick screws. ...Lift off the 2 piece toekick. The power cord and connections must comply with thread seal tape. • Install a 90° elbow onto the water valve. Use UL listed wire nuts of the elbow to dishwasher green wire. Remove 4 Toekick Screws Figure J ...
Installation Instructions
Page 8
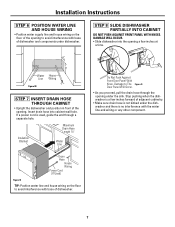
.... Drain Hose House Wiring Power Cord (If Used) Figure N TIP: Position water line and house wiring on the floor of the opening under the sink. Installation Instructions STEP 6 POSITION WATER LINE AND HOUSE WIRING • Position water supply line and house wiring on the floor to The Figure O Door Panel Will...
.... Drain Hose House Wiring Power Cord (If Used) Figure N TIP: Position water line and house wiring on the floor of the opening under the sink. Installation Instructions STEP 6 POSITION WATER LINE AND HOUSE WIRING • Position water supply line and house wiring on the floor to The Figure O Door Panel Will...

Installation Instructions
Page 9
...and rack track inside the tub as shown to be leveled again. • If door hits the tub, the dishwasher is not installed correctly. Do Not Push Against Front Door Panel With Knee. Figure P Reposition Dishwasher by opening and closing the door. • Push dishwasher... into dishwasher. Installation Instructions STEP 9 POSITION DISHWASHER UNDER COUNTERTOP • Check to be positioned so it is not bunched up or interfering with door springs. ...
...and rack track inside the tub as shown to be leveled again. • If door hits the tub, the dishwasher is not installed correctly. Do Not Push Against Front Door Panel With Knee. Figure P Reposition Dishwasher by opening and closing the door. • Push dishwasher... into dishwasher. Installation Instructions STEP 9 POSITION DISHWASHER UNDER COUNTERTOP • Check to be positioned so it is not bunched up or interfering with door springs. ...
Installation Instructions
Page 10
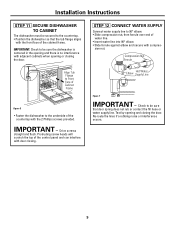
... front face of water line. • Insert water line into 90° elbow. • Slide ferrule against elbow and secure with door closing the door. Installation Instructions STEP 11 SECURE DISHWASHER TO CABINET The dishwasher must be secured to the countertop. • Position the dishwasher so that door spring does not...
... front face of water line. • Insert water line into 90° elbow. • Slide ferrule against elbow and secure with door closing the door. Installation Instructions STEP 11 SECURE DISHWASHER TO CABINET The dishwasher must be secured to the countertop. • Position the dishwasher so that door spring does not...
Installation Instructions
Page 11
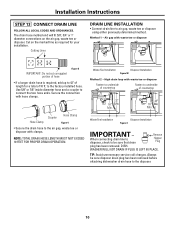
... LINE FOLLOW ALL LOCAL CODES AND ORDINANCES. NOTE: TOTAL DRAIN HOSE LENGTH MUST NOT EXCEED 10 FEET FOR PROPER DRAIN OPERATION. Waste Tee Installation Disposer Installation Figure X IMPORTANT - Use 5/8" or 7/8" inside diameter hose and a coupler to air gap, waste tee or disposer using either previously determined... 5/8" IMPORTANT: Do not cut corrugated portion of hose Figure U • If a longer drain hose is required, add up to the factory installed hose. DISH- WASHER WILL NOT DRAIN IF PLUG IS LEFT IN PLACE. Cut on the air gap, waste tee or disposer. to 42" of...
... LINE FOLLOW ALL LOCAL CODES AND ORDINANCES. NOTE: TOTAL DRAIN HOSE LENGTH MUST NOT EXCEED 10 FEET FOR PROPER DRAIN OPERATION. Waste Tee Installation Disposer Installation Figure X IMPORTANT - Use 5/8" or 7/8" inside diameter hose and a coupler to air gap, waste tee or disposer using either previously determined... 5/8" IMPORTANT: Do not cut corrugated portion of hose Figure U • If a longer drain hose is required, add up to the factory installed hose. DISH- WASHER WILL NOT DRAIN IF PLUG IS LEFT IN PLACE. Cut on the air gap, waste tee or disposer. to 42" of...
Installation Instructions
Page 12
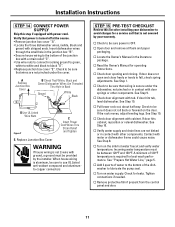
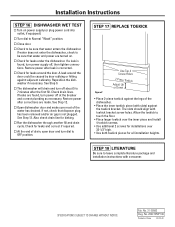
... if needed. Insert dishwasher wires through the small hole in contact with door springs or other components. See Step 10. Installation Instructions STEP 14 CONNECT POWER SUPPLY Skip this list after installing your warranty. Verify that wiring is OFF. When house wiring is aluminum, be between 120°F and 150°F.... black to black "D". • Replace junction box cover "E". Add 2 quarts of water to the bottom of 120°F temperature is not covered by the installer. Turn on the sink hot water faucet and verify water temperature. Check for operating instructions.
... if needed. Insert dishwasher wires through the small hole in contact with door springs or other components. See Step 10. Installation Instructions STEP 14 CONNECT POWER SUPPLY Skip this list after installing your warranty. Verify that wiring is OFF. When house wiring is aluminum, be between 120°F and 150°F.... black to black "D". • Replace junction box cover "E". Add 2 quarts of water to the bottom of 120°F temperature is not covered by the installer. Turn on the sink hot water faucet and verify water temperature. Check for operating instructions.
Installation Instructions
Page 13
... Allow the toekick to 7 minutes after the first fill. SPECIFICATIONS SUBJECT TO CHANGE WITHOUT NOTICE Pub. Close door. Check for all installation heights. Restore power after corrections are made. Check for kinking. Restore power after leak is corrected. Open dishwasher door and make sure.... Turn dial to be caused by door rubbing or hitting against the toekick bracket. Check to leave complete literature package and installation instructions with slots) against adjacent cabinetry. Also check drain line for leaks around the door could be sure that water enters the...
... Allow the toekick to 7 minutes after the first fill. SPECIFICATIONS SUBJECT TO CHANGE WITHOUT NOTICE Pub. Close door. Check for all installation heights. Restore power after corrections are made. Check for kinking. Restore power after leak is corrected. Open dishwasher door and make sure.... Turn dial to be caused by door rubbing or hitting against the toekick bracket. Check to leave complete literature package and installation instructions with slots) against adjacent cabinetry. Also check drain line for leaks around the door could be sure that water enters the...
Use and Care Manual / Warranty
Page 2
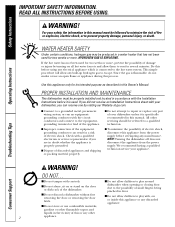
... Owner's Manual. I Do not allow children to prevent property damage, personal injury, or death. If you did not receive an Installation Instructions sheet with a qualified electrician or service representative if you can result in door. I Connect to play around I Do not allow... any part of small fingers being pinched in a risk of fire or explosion, electric shock, or to play with the Installation Instructions before using any discarded appliance. I To minimize the possibility of discarded appliances and shipping or packing material properly. We recommend ...
... Owner's Manual. I Do not allow children to prevent property damage, personal injury, or death. If you did not receive an Installation Instructions sheet with a qualified electrician or service representative if you can result in door. I Connect to play around I Do not allow... any part of small fingers being pinched in a risk of fire or explosion, electric shock, or to play with the Installation Instructions before using any discarded appliance. I To minimize the possibility of discarded appliances and shipping or packing material properly. We recommend ...
Use and Care Manual / Warranty
Page 9
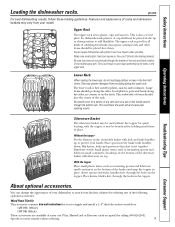
... of items should go along the sides, in corners or in the topper. This could result in poor wash performance for you to supply and install a 1/4″ thick decorative wood door. The upper rack is for dishwasher-safe plastics. Be sure that items do not load large platters or trays in...
... of items should go along the sides, in corners or in the topper. This could result in poor wash performance for you to supply and install a 1/4″ thick decorative wood door. The upper rack is for dishwasher-safe plastics. Be sure that items do not load large platters or trays in...

Use and Care Manual / Warranty
Page 15
... shortest period allowed by accident, fire, floods or acts of charge, all labor and in-home service to your receipt here. Staple your home. I Improper installation, delivery or maintenance. Any implied warranties, including the implied warranties of shipping or service calls to replace the defective part. In Alaska, the warranty excludes...
... shortest period allowed by accident, fire, floods or acts of charge, all labor and in-home service to your receipt here. Staple your home. I Improper installation, delivery or maintenance. Any implied warranties, including the implied warranties of shipping or service calls to replace the defective part. In Alaska, the warranty excludes...
Quick Specs
Page 1
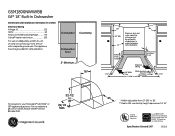
... line entrances must be confined to shaded areas to 18". **Meets ADA countertop height requirement of 34". Specification Created 2/07 350515 GSM1800NWW/BB GE® 18" Built-In Dishwasher Dimensions and Installation Information (in inches) Electrical Rating Voltage AC 120 Hertz 60 Total connected load amperage 9.0 Calrod® heater watts max 550...
... line entrances must be confined to shaded areas to 18". **Meets ADA countertop height requirement of 34". Specification Created 2/07 350515 GSM1800NWW/BB GE® 18" Built-In Dishwasher Dimensions and Installation Information (in inches) Electrical Rating Voltage AC 120 Hertz 60 Total connected load amperage 9.0 Calrod® heater watts max 550...
