
Product Manual
Page 5
... with wet hands. • Do not put any object into any opening blocked. Do not place product on cord. Unplug from openings and moving parts. • Turn off this appliance before connecting or disconnecting the hose or motorized nozzle. • Unplug this manual. Do not use without dirt ...cup and/or filters in place. • Always turn off all parts of body away from outlet when not in . Use only manufacturer's recommended attachments and products. • Do not use to pick up anything that...
... with wet hands. • Do not put any object into any opening blocked. Do not place product on cord. Unplug from openings and moving parts. • Turn off this appliance before connecting or disconnecting the hose or motorized nozzle. • Unplug this manual. Do not use without dirt ...cup and/or filters in place. • Always turn off all parts of body away from outlet when not in . Use only manufacturer's recommended attachments and products. • Do not use to pick up anything that...

Product Manual
Page 6
...roll on a circuit different from that may cause damage. WARNING: To Reduce the Risk of Fire and Electric Shock, the Hoover Powered Stair Tool part number 440010888 must accept any interference, including interference that to correct interference by Industry Canada. Store appropriately indoors in a residential...product, as they may cause undesired operation of the FCC Rules. If hose appears damaged, cut, punctured or wires are designed to part 15 of the device. 4 WASH HANDS AFTER HANDLING. IF IT STILL DOES NOT FIT, CONTACT A QUALIFIED ELECTRICIAN TO INSTALL THE PROPER...
...roll on a circuit different from that may cause damage. WARNING: To Reduce the Risk of Fire and Electric Shock, the Hoover Powered Stair Tool part number 440010888 must accept any interference, including interference that to correct interference by Industry Canada. Store appropriately indoors in a residential...product, as they may cause undesired operation of the FCC Rules. If hose appears damaged, cut, punctured or wires are designed to part 15 of the device. 4 WASH HANDS AFTER HANDLING. IF IT STILL DOES NOT FIT, CONTACT A QUALIFIED ELECTRICIAN TO INSTALL THE PROPER...
Product Manual
Page 11
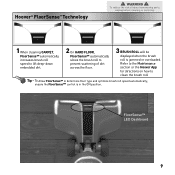
Hoover® FloorSense™ Technology ! To reduce the risk of injury from moving parts, unplug before cleaning or servicing. 1 When cleaning CARPET, FloorSense™ automatically increases brush roll speed to lift deep-down embedded dirt. 2 On HARD FLOOR, ... when the brush roll is in the ON position. ensure the FloorSense™ control is jammed or overloaded. Refer to the Maintenance section or the Hoover App for directions on how to determine floor type and optimize brush roll speed automatically; FloorSense™ LED Dashboard 9 Tip - WARNING ! To allow ...
Hoover® FloorSense™ Technology ! To reduce the risk of injury from moving parts, unplug before cleaning or servicing. 1 When cleaning CARPET, FloorSense™ automatically increases brush roll speed to lift deep-down embedded dirt. 2 On HARD FLOOR, ... when the brush roll is in the ON position. ensure the FloorSense™ control is jammed or overloaded. Refer to the Maintenance section or the Hoover App for directions on how to determine floor type and optimize brush roll speed automatically; FloorSense™ LED Dashboard 9 Tip - WARNING ! To allow ...

Product Manual
Page 15
...which contain sufficient lubrication for location. 1. LUBRICATION: The motor and brush roll are cleared, resume cleaning as normal. Dirt Cup Release HEPA Filters Hoover® REACT™ products have 2 HEPA filters. Remove brush roll by pressing the dirt cup release button. 2. The addition of the ...dirt cup. 2. Replace filters when heavily discolored. Clean Brush Roll Tip - Do not add lubricant to the bottom of injury from moving parts, unplug before cleaning or servicing. Remove dirt cup by pulling it up on the bottom of trash can to access filters. 3. To ...
...which contain sufficient lubrication for location. 1. LUBRICATION: The motor and brush roll are cleared, resume cleaning as normal. Dirt Cup Release HEPA Filters Hoover® REACT™ products have 2 HEPA filters. Remove brush roll by pressing the dirt cup release button. 2. The addition of the ...dirt cup. 2. Replace filters when heavily discolored. Clean Brush Roll Tip - Do not add lubricant to the bottom of injury from moving parts, unplug before cleaning or servicing. Remove dirt cup by pulling it up on the bottom of trash can to access filters. 3. To ...

Product Manual
Page 17
... risk of injury from moving parts, unplug before cleaning or servicing. unplug and let vacuum cool for directions on carpet. 2. My vacuum is hard to empty the dirt cup if it in the wall plug. Refer to the Maintenance section or the Hoover App for directions on how...8482; is full. A Thermal Protector may have been activated - Check fuse or breaker in the system. Refer to the Maintenance section or the Hoover App for directions on how to clean your filters. Unplug and remove any questions. ! Vacuum must be no voltage in firmly. Clean filters....
... risk of injury from moving parts, unplug before cleaning or servicing. unplug and let vacuum cool for directions on carpet. 2. My vacuum is hard to empty the dirt cup if it in the wall plug. Refer to the Maintenance section or the Hoover App for directions on how...8482; is full. A Thermal Protector may have been activated - Check fuse or breaker in the system. Refer to the Maintenance section or the Hoover App for directions on how to clean your filters. Unplug and remove any questions. ! Vacuum must be no voltage in firmly. Clean filters....
Product Manual
Page 18
Costs of any transportation to and from state to be assigned. During the Warranty Period, Hoover® will provide labor and parts, at www.Hoover.com or Hoover.ca. This warranty does not cover products purchased from date of purchase (the "Warranty Period"). OTHER IMPORTANT TERMS This ... by the model number and manufacturing code when requesting information or ordering replacement parts. (the model number and manufacturing code for the vacuum appears on the bottom of warranty service outlets, phone the Hoover® Consumer Response Center, Phone 1-877-839-2046, Mon-Fri 8am-7pm...
Costs of any transportation to and from state to be assigned. During the Warranty Period, Hoover® will provide labor and parts, at www.Hoover.com or Hoover.ca. This warranty does not cover products purchased from date of purchase (the "Warranty Period"). OTHER IMPORTANT TERMS This ... by the model number and manufacturing code when requesting information or ordering replacement parts. (the model number and manufacturing code for the vacuum appears on the bottom of warranty service outlets, phone the Hoover® Consumer Response Center, Phone 1-877-839-2046, Mon-Fri 8am-7pm...


