
Product Manual
Page 6
...without dirt cup and/or filters in place. • WARNING: This product contains chemicals known to the State of body away from openings and moving parts. Keep cord away from product, and do not allow to rotate when in the upright position, unless the vacuum is necessary when used as a toy...cancer, birth defects or reproductive harm. Do not use with any object into openings. Close supervision is in "Suction Only" mode. • Turn off all parts of California to prevent the cleaner from outlet when not in use and before cleaning or servicing. • Do not use outdoors or on wet...
...without dirt cup and/or filters in place. • WARNING: This product contains chemicals known to the State of body away from openings and moving parts. Keep cord away from product, and do not allow to rotate when in the upright position, unless the vacuum is necessary when used as a toy...cancer, birth defects or reproductive harm. Do not use with any object into openings. Close supervision is in "Suction Only" mode. • Turn off all parts of California to prevent the cleaner from outlet when not in use and before cleaning or servicing. • Do not use outdoors or on wet...

Product Manual
Page 10
... a Phillips screwdriver, fasten (1) large screw behind handle into vacuum body first. Telescoping Wand D. Pet Turbo Tool F. Remove all parts are located before G disposing of hose guide located on the handle. Make sure all parts from images shown. Insert the hose into hose tube until you hear a click. 1.6 E 1.5 F 5 Actual model may vary from...
... a Phillips screwdriver, fasten (1) large screw behind handle into vacuum body first. Telescoping Wand D. Pet Turbo Tool F. Remove all parts are located before G disposing of hose guide located on the handle. Make sure all parts from images shown. Insert the hose into hose tube until you hear a click. 1.6 E 1.5 F 5 Actual model may vary from...

Product Manual
Page 19
... vacuum without dirt cup or filters in Fig 4.5. 4.9 4.11 What to dry completely before replacing. Replace dirt cup as described in place. Ask for Hoover® Part No. 304087001. 4.10 G H 4.12 Filter Made With HEPA Media: How to Clean 4.13 With fingers under filter door lip, pull filter frame... push the upper handle in (C) until locked in place. Do not use vacuum without dirt cup or filters in position. Ask for Hoover® Part No. 440008993. 4.8 Replace dirt cup lid and twist clockwise until it clicks. 4.16 Filter diagram: (B) bottom filter. (C) upper handle. !
... vacuum without dirt cup or filters in Fig 4.5. 4.9 4.11 What to dry completely before replacing. Replace dirt cup as described in place. Ask for Hoover® Part No. 304087001. 4.10 G H 4.12 Filter Made With HEPA Media: How to Clean 4.13 With fingers under filter door lip, pull filter frame... push the upper handle in (C) until locked in place. Do not use vacuum without dirt cup or filters in position. Ask for Hoover® Part No. 440008993. 4.8 Replace dirt cup lid and twist clockwise until it clicks. 4.16 Filter diagram: (B) bottom filter. (C) upper handle. !

Product Manual
Page 22
Brushroll - CAUTION ! To reduce the risk of injury from images shown. Replace the bottom plate aligning the screw holes and install the 6 screws as shown with a Phillips screwdriver. 4.18 Pivot off bottom plate. 4.19 Remove any debris and/or hair from brushroll. Unplug before servicing. Bottom plate with screws Place handle in the low position and turn the cleaner over so the bottom side is up. 4.17 Remove the 6 screws as shown. 4.17 4.19 4.18 11 Actual model may vary from moving parts - BRUSHROLL: How to Clean !
Brushroll - CAUTION ! To reduce the risk of injury from images shown. Replace the bottom plate aligning the screw holes and install the 6 screws as shown with a Phillips screwdriver. 4.18 Pivot off bottom plate. 4.19 Remove any debris and/or hair from brushroll. Unplug before servicing. Bottom plate with screws Place handle in the low position and turn the cleaner over so the bottom side is up. 4.17 Remove the 6 screws as shown. 4.17 4.19 4.18 11 Actual model may vary from moving parts - BRUSHROLL: How to Clean !
Product Manual
Page 23
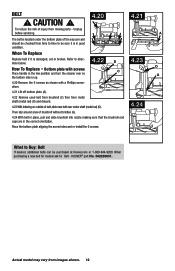
... correct orientation. Place the bottom plate aligning the screw holes and re-install the 6 screws. HOOVER® part No. 562289001. Refer to Buy: Belt If desired, additional belts can be checked from moving parts - When purchasing a new belt for models ask for Belt - Actual model may vary from motor...shown. 12 What to directions below. 4.22 D 4.23 How To Replace - To reduce the risk of the vacuum and should be purchased at Hoover.com or 1-800-944-9200. Bottom plate with screws C D Place handle in the low position and turn the cleaner over so G the bottom...
... correct orientation. Place the bottom plate aligning the screw holes and re-install the 6 screws. HOOVER® part No. 562289001. Refer to Buy: Belt If desired, additional belts can be checked from moving parts - When purchasing a new belt for models ask for Belt - Actual model may vary from motor...shown. 12 What to directions below. 4.22 D 4.23 How To Replace - To reduce the risk of the vacuum and should be purchased at Hoover.com or 1-800-944-9200. Bottom plate with screws C D Place handle in the low position and turn the cleaner over so G the bottom...

Product Manual
Page 26
Clear away debris or obstructions from images shown. 13 CAUTION ! Clean out any debris or hair from moving parts - HOSE ! To lock back into place, push hose into hose tube until you hear a click. PET TURBO TOOL: How to motor or brushroll. Unplug vacuum ...
Clear away debris or obstructions from images shown. 13 CAUTION ! Clean out any debris or hair from moving parts - HOSE ! To lock back into place, push hose into hose tube until you hear a click. PET TURBO TOOL: How to motor or brushroll. Unplug vacuum ...

Product Manual
Page 30
...-9200. Follow the service center link to Hoover®, Inc., Company in delay. This will only result in Glenwillow for service. SERVICE To obtain approved Hoover® service and genuine Hoover® parts, locate the nearest Authorized Hoover® Warranty Service Dealer (Depot) by the... complete model number when requesting information or ordering parts. (The model number appears on the bottom of...
...-9200. Follow the service center link to Hoover®, Inc., Company in delay. This will only result in Glenwillow for service. SERVICE To obtain approved Hoover® service and genuine Hoover® parts, locate the nearest Authorized Hoover® Warranty Service Dealer (Depot) by the... complete model number when requesting information or ordering parts. (The model number appears on the bottom of...

Product Manual
Page 31
During the Warranty Period, Hoover® will provide labor and parts, at www.hoover.com. For an automated referral to you . This warranty does not apply to state. 16 OTHER IMPORTANT TERMS This Warranty is not as maid, janitorial ... United States, including its territories and possessions, outside of the product by any such defect in products purchased in the U.S.A., phone: 1-800-9449200 OR visit Hoover® online at no cost to authorized service outlets in the United States, U.S. Military Exchange and outside a U.S. THIS WARRANTY IS THE EXCLUSIVE WARRANTY AND REMEDY...
During the Warranty Period, Hoover® will provide labor and parts, at www.hoover.com. For an automated referral to you . This warranty does not apply to state. 16 OTHER IMPORTANT TERMS This Warranty is not as maid, janitorial ... United States, including its territories and possessions, outside of the product by any such defect in products purchased in the U.S.A., phone: 1-800-9449200 OR visit Hoover® online at no cost to authorized service outlets in the United States, U.S. Military Exchange and outside a U.S. THIS WARRANTY IS THE EXCLUSIVE WARRANTY AND REMEDY...


