
Product Manual
Page 22
... least two minutes to secure lever. To reduce the risk of personal injury - A What to dry completely before cleaning or servicing. Ask for Hoover® Part No. 305687001. 11 Actual model may take up . Rinsable Filter: How to remove excess water. WARNING ! Filter Made With HEPA Media: How...body and press firmly until it locks into position on dirt cup latch to Clean To maintain optimal performance, filters should not need replacement within the warranty period. Hold filter under normal use vacuum without dirt cup or filters in Fig. 4.3. 4.6 Pull up on vacuum and...
... least two minutes to secure lever. To reduce the risk of personal injury - A What to dry completely before cleaning or servicing. Ask for Hoover® Part No. 305687001. 11 Actual model may take up . Rinsable Filter: How to remove excess water. WARNING ! Filter Made With HEPA Media: How...body and press firmly until it locks into position on dirt cup latch to Clean To maintain optimal performance, filters should not need replacement within the warranty period. Hold filter under normal use vacuum without dirt cup or filters in Fig. 4.3. 4.6 Pull up on vacuum and...
Product Manual
Page 23
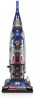
... (A). 4.12 Pivot out bottom plate away from hidden latch B (B) and remove any debris and/or hair from moving parts Unplug before cleaning or servicing. Press firmly at Hoover.com or call 1-800-944-9200. IMPORTANT DO NOT RINSE OR WASH the Carbon Filter. Additional filter is available at ...- Cyclonic Filter Assembly: How to Clean ! Carbon Filter : How to Clean (Available on dirt cup (A) and twist it is properly latched. Replace dirt cup as described in place. Your Carbon Filter is located on the underside of the Filter made with the Dusting/ Upholstery Tool. Place the...
... (A). 4.12 Pivot out bottom plate away from hidden latch B (B) and remove any debris and/or hair from moving parts Unplug before cleaning or servicing. Press firmly at Hoover.com or call 1-800-944-9200. IMPORTANT DO NOT RINSE OR WASH the Carbon Filter. Additional filter is available at ...- Cyclonic Filter Assembly: How to Clean ! Carbon Filter : How to Clean (Available on dirt cup (A) and twist it is properly latched. Replace dirt cup as described in place. Your Carbon Filter is located on the underside of the Filter made with the Dusting/ Upholstery Tool. Place the...
Product Manual
Page 26
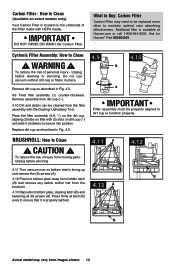
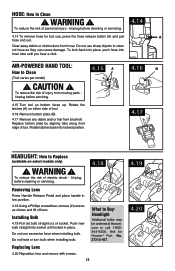
... place, push hose into locked position. 4.16 B 4.17 HEADLIGHT: How to Replace (available on either side of injury from hose. CAUTION ! Unplug before cleaning or servicing. 4.14 4.14 To remove hose for Hoover® Part No. 27313-107. Do not use excessive force when installing bulb. To reduce... any debris and/ or hair from brushroll. Do not use sharp objects to Buy: Headlight Additional bulbs may be ordered at Hoover. Rotate the latches (A) on select models only) ! Replace bottom plate by aligning tabs along front edge of electric shock - To reduce the risk of tool...
... place, push hose into locked position. 4.16 B 4.17 HEADLIGHT: How to Replace (available on either side of injury from hose. CAUTION ! Unplug before cleaning or servicing. 4.14 4.14 To remove hose for Hoover® Part No. 27313-107. Do not use excessive force when installing bulb. To reduce... any debris and/ or hair from brushroll. Do not use sharp objects to Buy: Headlight Additional bulbs may be ordered at Hoover. Rotate the latches (A) on select models only) ! Replace bottom plate by aligning tabs along front edge of electric shock - To reduce the risk of tool...
Product Manual
Page 27
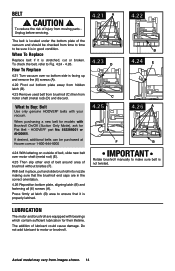
... lifetime. To check the belt, refer to motor or brushroll. How To Replace 4.21 Turn vacuum over so bottom side is located under the bottom plate of the vacuum and should be checked from moving parts Unplug before servicing. The addition of injury from time to time to make ... outside of belt, slide new belt over motor shaft (metal rod) (E). 4.25 Then slip other end of belt around area of brushroll without bristles (F). HOOVER® part No. 562289001 or AH20065. The belt is facing up and remove the (6) screws (A). 4.22 Pivot out bottom plate away from hidden latch (B). 4.23...
... lifetime. To check the belt, refer to motor or brushroll. How To Replace 4.21 Turn vacuum over so bottom side is located under the bottom plate of the vacuum and should be checked from moving parts Unplug before servicing. The addition of injury from time to time to make ... outside of belt, slide new belt over motor shaft (metal rod) (E). 4.25 Then slip other end of belt around area of brushroll without bristles (F). HOOVER® part No. 562289001 or AH20065. The belt is facing up and remove the (6) screws (A). 4.22 Pivot out bottom plate away from hidden latch (B). 4.23...
Product Manual
Page 34
During the Warranty Period, Hoover® will provide labor and parts, at www.hoover. com. This warranty does not cover pick up, delivery, transportation or house calls. THIS WARRANTY IS THE EXCLUSIVE WARRANTY AND REMEDY PROVIDED BY HOOVER®. For additional assistance or information concerning this...damage due to you specific rights; This warranty does not apply to either a Hoover® Authorized Warranty Service Dealer along with the Owner's Manual, your product to correct any replacement or repair performed under the laws of the state of Canada. This Warranty shall...
During the Warranty Period, Hoover® will provide labor and parts, at www.hoover. com. This warranty does not cover pick up, delivery, transportation or house calls. THIS WARRANTY IS THE EXCLUSIVE WARRANTY AND REMEDY PROVIDED BY HOOVER®. For additional assistance or information concerning this...damage due to you specific rights; This warranty does not apply to either a Hoover® Authorized Warranty Service Dealer along with the Owner's Manual, your product to correct any replacement or repair performed under the laws of the state of Canada. This Warranty shall...


