Product Manual
Page 6
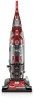
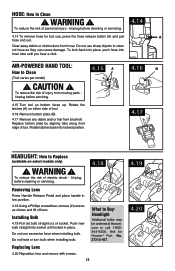
...-Powered Hand Tool. • Do not pick up flammable or combustible liquids, such as described in this manual. Unplug from openings and moving parts. • Turn off all parts of body away from outlet when not in areas where they may reduce air flow. • Keep hair, loose clothing, fingers, and all...
...-Powered Hand Tool. • Do not pick up flammable or combustible liquids, such as described in this manual. Unplug from openings and moving parts. • Turn off all parts of body away from outlet when not in areas where they may reduce air flow. • Keep hair, loose clothing, fingers, and all...
Product Manual
Page 10
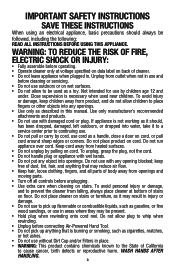
... carton and identify each item shown. Air-Powered Hand Tool* D D. Dirt cup is secure when you hear a click. 1.4 POSITION TOOLS (varies per model Remove all parts are located before disposing of dirt cup into vacuum body first. Crevice Tool G E. Push down firmly. 1.3 Using a Phillips screwdriver, fasten (1) screw behind handle into tool... area on left back side (B) of vacuum and place Upholstery Tool on right back side (C) of vacuum as shown. 1.5 A 1.6 C B 5 Actual model may be ordered at Hoover.com or call 1-800-944-9200. Telescoping Wand A F.
... carton and identify each item shown. Air-Powered Hand Tool* D D. Dirt cup is secure when you hear a click. 1.4 POSITION TOOLS (varies per model Remove all parts are located before disposing of dirt cup into vacuum body first. Crevice Tool G E. Push down firmly. 1.3 Using a Phillips screwdriver, fasten (1) screw behind handle into tool... area on left back side (B) of vacuum and place Upholstery Tool on right back side (C) of vacuum as shown. 1.5 A 1.6 C B 5 Actual model may be ordered at Hoover.com or call 1-800-944-9200. Telescoping Wand A F.

Product Manual
Page 22
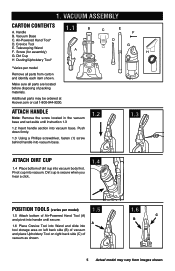
...When to Clean Remove dirt cup as described in Fig. 4.3. 4.6 Pull up on dirt cup latch to open dirt cup door (C). Ask for Hoover® Part No. 305687001. 11 Actual model may take up . C B 4.5 Place bottom of filter. Rinsable Filter: How to Clean To maintain optimal...What to dry completely before cleaning or servicing. If desired, additional filter is available at least every two months under running water for Hoover® Part No. 303903001. Hold filter under normal use. Hold filter over trash receptacle, push dirt cup door release lever (B) to remove ...
...When to Clean Remove dirt cup as described in Fig. 4.3. 4.6 Pull up on dirt cup latch to open dirt cup door (C). Ask for Hoover® Part No. 305687001. 11 Actual model may take up . C B 4.5 Place bottom of filter. Rinsable Filter: How to Clean To maintain optimal...What to dry completely before cleaning or servicing. If desired, additional filter is available at least every two months under running water for Hoover® Part No. 303903001. Hold filter under normal use. Hold filter over trash receptacle, push dirt cup door release lever (B) to remove ...
Product Manual
Page 23
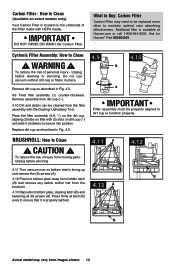
... in Fig. 4.3. 4.9 Twist filter assembly (B) counter-clockwise. CAUTION ! To reduce the risk of injury from moving parts Unplug before cleaning or servicing. Press firmly at Hoover.com or call 1-800-944-9200. Ask for Hoover® Part 902404001. . B Actual model may need to be properly aligned to dirt cup to function properly. Do not...
... in Fig. 4.3. 4.9 Twist filter assembly (B) counter-clockwise. CAUTION ! To reduce the risk of injury from moving parts Unplug before cleaning or servicing. Press firmly at Hoover.com or call 1-800-944-9200. Ask for Hoover® Part 902404001. . B Actual model may need to be properly aligned to dirt cup to function properly. Do not...
Product Manual
Page 26
AIR-POWERED HAND TOOL: How to Buy: Headlight Additional bulbs may be ordered at Hoover. CAUTION ! Replace bottom plate by aligning tabs along front edge of electric shock - What to Clean (Tool varies per model) ! Ask for tool use sharp ... Release Pedal and place handle in place. Installing Bulb 4.19 Pull old bulb straight out of injury from moving parts Unplug before cleaning or servicing. 4.14 4.14 To remove hose for Hoover® Part No. 27313-107. com or call 1-800944-9200. Clear away debris or obstructions from brushroll. Do not twist or...
AIR-POWERED HAND TOOL: How to Buy: Headlight Additional bulbs may be ordered at Hoover. CAUTION ! Replace bottom plate by aligning tabs along front edge of electric shock - What to Clean (Tool varies per model) ! Ask for tool use sharp ... Release Pedal and place handle in place. Installing Bulb 4.19 Pull old bulb straight out of injury from moving parts Unplug before cleaning or servicing. 4.14 4.14 To remove hose for Hoover® Part No. 27313-107. com or call 1-800944-9200. Clear away debris or obstructions from brushroll. Do not twist or...
Product Manual
Page 27
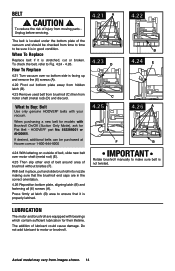
...25 Then slip other end of belt around area of belt, slide new belt over so bottom side is not twisted. HOOVER® part No. 562289001 or AH20065. Press firmly at Hoover.com or 1-800-944-9200 4.24 With lettering on outside of brushroll without bristles (F). Do not add lubricant to Buy...: Belt Use only genuine HOOVER® belts with your vacuum. When purchasing a new belt for models with bearings which ...
...25 Then slip other end of belt around area of belt, slide new belt over so bottom side is not twisted. HOOVER® part No. 562289001 or AH20065. Press firmly at Hoover.com or 1-800-944-9200 4.24 With lettering on outside of brushroll without bristles (F). Do not add lubricant to Buy...: Belt Use only genuine HOOVER® belts with your vacuum. When purchasing a new belt for models with bearings which ...

Product Manual
Page 31
... DO NOT RETURN THIS PRODUCT TO THE STORE. 16 SERVICE To obtain approved Hoover® service and genuine Hoover® parts, locate the nearest Authorized Hoover® Warranty Service Dealer (Depot) by the complete model number when requesting information or ordering parts. (The model number appears on the bottom of authorized service outlet locations call...
... DO NOT RETURN THIS PRODUCT TO THE STORE. 16 SERVICE To obtain approved Hoover® service and genuine Hoover® parts, locate the nearest Authorized Hoover® Warranty Service Dealer (Depot) by the complete model number when requesting information or ordering parts. (The model number appears on the bottom of authorized service outlet locations call...
Product Manual
Page 34
... to products purchased outside the United States, including its territories and possessions, outside of purchase (the "Warranty Period"). This warranty does not apply to either a Hoover® Authorized Warranty Service Dealer along with the Owner's Manual, your product to you specific rights; ALL OTHER WARRANTIES, EXPRESSED OR IMPLIED, INCLUDING WARRANTIES OF... use outside the country in accordance with proof of consequential damages, so the above exclusion may not be paid one way. During the Warranty Period, Hoover® will provide labor and parts, at www.hoover. com.
... to products purchased outside the United States, including its territories and possessions, outside of purchase (the "Warranty Period"). This warranty does not apply to either a Hoover® Authorized Warranty Service Dealer along with the Owner's Manual, your product to you specific rights; ALL OTHER WARRANTIES, EXPRESSED OR IMPLIED, INCLUDING WARRANTIES OF... use outside the country in accordance with proof of consequential damages, so the above exclusion may not be paid one way. During the Warranty Period, Hoover® will provide labor and parts, at www.hoover. com.


