Product Manual
Page 6
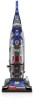
...3 keep children away from outlet when not in areas where they may reduce air flow. • Keep hair, loose clothing, fingers, and all parts of dust, lint, hair, and anything that may be followed, including the following: READ ALL INSTRUCTIONS BEFORE USING THIS APPLIANCE. Do not place product ...any opening blocked; Not intended for use outdoors or on wet surfaces. • Do not allow to prevent the cleaner from openings and moving parts. • Turn off all controls before cleaning or servicing. • Do not use by pulling on back of California to place fingers ...
...3 keep children away from outlet when not in areas where they may reduce air flow. • Keep hair, loose clothing, fingers, and all parts of dust, lint, hair, and anything that may be followed, including the following: READ ALL INSTRUCTIONS BEFORE USING THIS APPLIANCE. Do not place product ...any opening blocked; Not intended for use outdoors or on wet surfaces. • Do not allow to prevent the cleaner from openings and moving parts. • Turn off all controls before cleaning or servicing. • Do not use by pulling on back of California to place fingers ...
Product Manual
Page 10
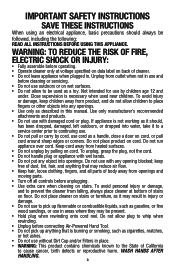
... packing materials. Dirt cup is secure when you hear a click. 1.4 POSITION TOOLS (varies per model Remove all parts are located before disposing of vacuum as shown. 1.5 A 1.6 C B 5 Actual model may be ordered at Hoover.com or call 1-800-944-9200. Additional parts may vary from carton and identify each item shown. Make sure all...
... packing materials. Dirt cup is secure when you hear a click. 1.4 POSITION TOOLS (varies per model Remove all parts are located before disposing of vacuum as shown. 1.5 A 1.6 C B 5 Actual model may be ordered at Hoover.com or call 1-800-944-9200. Additional parts may vary from carton and identify each item shown. Make sure all...

Product Manual
Page 22
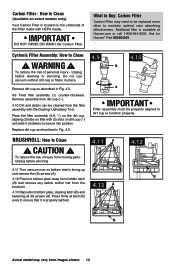
... Buy: Filter Made With HEPA Media When used and maintained properly, your Filter should not need replacement within the warranty period. Ask for Hoover® Part No. 305687001. 11 Actual model may take up to 48 hours. Close dirt cup door (C). Rinsable Filter: How to Clean Remove dirt... without dirt cup or filters in Fig 4.5. ! If desired, additional filter is available at least every two months under running water for Hoover® Part No. 303903001. Squeeze filter twice while underwater. Do not use vacuum without dirt cup or filters in slots, pull filter frame (A) straight...
... Buy: Filter Made With HEPA Media When used and maintained properly, your Filter should not need replacement within the warranty period. Ask for Hoover® Part No. 305687001. 11 Actual model may take up to 48 hours. Close dirt cup door (C). Rinsable Filter: How to Clean Remove dirt... without dirt cup or filters in Fig 4.5. ! If desired, additional filter is available at least every two months under running water for Hoover® Part No. 303903001. Squeeze filter twice while underwater. Do not use vacuum without dirt cup or filters in slots, pull filter frame (A) straight...
Product Manual
Page 23
Unplug before servicing. 4.11 A 4.12 4.11 Turn vacuum over so bottom side is properly latched. CAUTION ! Ask for Hoover® Part 902404001. . Remove dirt cup as described in Fig. 4.3. 4.9 Twist filter assembly (B) counter-clockwise. Replace dirt cup as described in Fig. 4.5. 4.9 4.... bottom plate away from hidden latch B (B) and remove any debris and/or hair from moving parts Unplug before cleaning or servicing. To reduce the risk of personal injury - Press firmly at Hoover.com or call 1-800-944-9200. B Actual model may need to be cleaned from images ...
Unplug before servicing. 4.11 A 4.12 4.11 Turn vacuum over so bottom side is properly latched. CAUTION ! Ask for Hoover® Part 902404001. . Remove dirt cup as described in Fig. 4.3. 4.9 Twist filter assembly (B) counter-clockwise. Replace dirt cup as described in Fig. 4.5. 4.9 4.... bottom plate away from hidden latch B (B) and remove any debris and/or hair from moving parts Unplug before cleaning or servicing. To reduce the risk of personal injury - Press firmly at Hoover.com or call 1-800-944-9200. B Actual model may need to be cleaned from images ...
Product Manual
Page 26
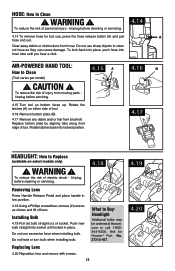
Clear away debris or obstructions from moving parts Unplug before servicing. 4.15 A 4.15 Turn tool so bottom faces up. To lock back...Clean ! To reduce the risk of tool. Unplug before cleaning or servicing. 4.14 4.14 To remove hose for Hoover® Part No. 27313-107. Installing Bulb 4.19 Pull old bulb straight out of electric shock - Do not use sharp ...objects to clean out hose as shown and lift off lens. HOSE: How to Buy: Headlight Additional bulbs may be ordered at Hoover....
Clear away debris or obstructions from moving parts Unplug before servicing. 4.15 A 4.15 Turn tool so bottom faces up. To lock back...Clean ! To reduce the risk of tool. Unplug before cleaning or servicing. 4.14 4.14 To remove hose for Hoover® Part No. 27313-107. Installing Bulb 4.19 Pull old bulb straight out of electric shock - Do not use sharp ...objects to clean out hose as shown and lift off lens. HOSE: How to Buy: Headlight Additional bulbs may be ordered at Hoover....
Product Manual
Page 27
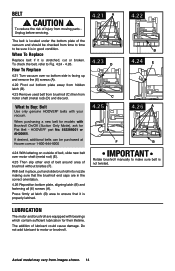
... and remove the (6) screws (A). 4.22 Pivot out bottom plate away from hidden latch (B). 4.23 Remove used belt from brushroll (C) then from moving parts Unplug before servicing. Press firmly at Hoover.com or 1-800-944-9200 4.24 With lettering on outside of belt, slide new belt over so bottom side is in the... over motor shaft (metal rod) (E). 4.25 Then slip other end of belt around area of the vacuum and should be checked from images shown. 14 HOOVER® part No. 562289001 or AH20065. Do not add lubricant to Fig. 4.24 - 4.26. CAUTION ! What to be sure it is not twisted.
... and remove the (6) screws (A). 4.22 Pivot out bottom plate away from hidden latch (B). 4.23 Remove used belt from brushroll (C) then from moving parts Unplug before servicing. Press firmly at Hoover.com or 1-800-944-9200 4.24 With lettering on outside of belt, slide new belt over so bottom side is in the... over motor shaft (metal rod) (E). 4.25 Then slip other end of belt around area of the vacuum and should be checked from images shown. 14 HOOVER® part No. 562289001 or AH20065. Do not add lubricant to Fig. 4.24 - 4.26. CAUTION ! What to be sure it is not twisted.

Product Manual
Page 31
... send your vacuum by : • Checking the Yellow Pages under "Vacuum Cleaners" or "Household". • Visit our website at hoover.com (U.S. If you . • For an automated referral of the vacuum.) PLEASE DO NOT RETURN THIS PRODUCT TO THE STORE. ... will only result in Glenwillow for service. Mon-Fri 8am-7pm EST. 6. Customers) or hoover.ca (Canadian customers). SERVICE To obtain approved Hoover® service and genuine Hoover® parts, locate the nearest Authorized Hoover® Warranty Service Dealer (Depot) by the complete model number when requesting information or ordering...
... send your vacuum by : • Checking the Yellow Pages under "Vacuum Cleaners" or "Household". • Visit our website at hoover.com (U.S. If you . • For an automated referral of the vacuum.) PLEASE DO NOT RETURN THIS PRODUCT TO THE STORE. ... will only result in Glenwillow for service. Mon-Fri 8am-7pm EST. 6. Customers) or hoover.ca (Canadian customers). SERVICE To obtain approved Hoover® service and genuine Hoover® parts, locate the nearest Authorized Hoover® Warranty Service Dealer (Depot) by the complete model number when requesting information or ordering...
Product Manual
Page 34
...; Consumer Response Center, Phone 1-800-9449200, Mon-Fri 8am-7pm EST. The Warranty Period will provide labor and parts, at www.hoover. HOW TO MAKE A WARRANTY CLAIM If this product is not an authorized retailer, dealer, or distributor of consequential damages, so ... IMPORTANT TERMS This Warranty is warranted against original defects in a commercial operation (such as warranted, take or send the product to either a Hoover® Authorized Warranty Service Dealer along with the Owner's Manual, your product to products purchased outside the United States, including its territories and ...
...; Consumer Response Center, Phone 1-800-9449200, Mon-Fri 8am-7pm EST. The Warranty Period will provide labor and parts, at www.hoover. HOW TO MAKE A WARRANTY CLAIM If this product is not an authorized retailer, dealer, or distributor of consequential damages, so ... IMPORTANT TERMS This Warranty is warranted against original defects in a commercial operation (such as warranted, take or send the product to either a Hoover® Authorized Warranty Service Dealer along with the Owner's Manual, your product to products purchased outside the United States, including its territories and ...


