Product Manual
Page 3
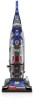
... to this owner's manual. Mon- Verification of date of purchase may be required for an automated referral of your HOOVER® product. Follow the authorized dealer locator link to register by phone. Please enter the complete model and Manufacturing Code...Carton Contents ...5 Attach Handle ...5 Attach Dirt Cup ...5 Position Tools ...5 How To Use ...6 Vacuum Description 6 On-Off Switch ...6 Suction Only Mode/ Brushroll Shut-Off 6 Cord Release...6 Transporting Cleaner 7 Handle Positions...7 Carpet Height Adjustment 7 Tools ...8 Select Proper Tool 8 Removing Hose ...8 Attach Wand And Tools...
... to this owner's manual. Mon- Verification of date of purchase may be required for an automated referral of your HOOVER® product. Follow the authorized dealer locator link to register by phone. Please enter the complete model and Manufacturing Code...Carton Contents ...5 Attach Handle ...5 Attach Dirt Cup ...5 Position Tools ...5 How To Use ...6 Vacuum Description 6 On-Off Switch ...6 Suction Only Mode/ Brushroll Shut-Off 6 Cord Release...6 Transporting Cleaner 7 Handle Positions...7 Carpet Height Adjustment 7 Tools ...8 Select Proper Tool 8 Removing Hose ...8 Attach Wand And Tools...
Product Manual
Page 7
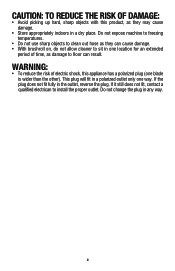
... the plug does not fit fully in any way. 4 If it still does not fit, contact a qualified electrican to floor can cause damage. • With brushroll on, do not allow cleaner to sit in a polarized outlet only one blade is wider than the other). CAUTION: TO REDUCE THE RISK OF DAMAGE...
... the plug does not fit fully in any way. 4 If it still does not fit, contact a qualified electrican to floor can cause damage. • With brushroll on, do not allow cleaner to sit in a polarized outlet only one blade is wider than the other). CAUTION: TO REDUCE THE RISK OF DAMAGE...
Product Manual
Page 11
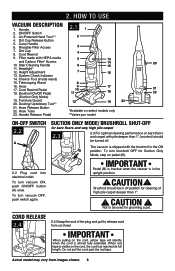
...2. Dirt Cup Release Button 5. 2. Carry Handle 6. Cord Rewind 4 9. Headlight* 15 20 12. Hose Release Button 22. Height Adjustment 7 16 13. Brushroll On/Off Pedal 10 11 18 21 22 (Suction Only Mode) 19. To turn vacuum OFF, push switch again. Not to release cord from images... shown. 6 When red tape is almost fully extended. To turn brushroll OFF for cleaning of the plug and pull to be in off . IMPORTANT When pulling on pedal (B). 2.2 Plug cord into electrical outlet...
...2. Dirt Cup Release Button 5. 2. Carry Handle 6. Cord Rewind 4 9. Headlight* 15 20 12. Hose Release Button 22. Height Adjustment 7 16 13. Brushroll On/Off Pedal 10 11 18 21 22 (Suction Only Mode) 19. To turn vacuum OFF, push switch again. Not to release cord from images... shown. 6 When red tape is almost fully extended. To turn brushroll OFF for cleaning of the plug and pull to be in off . IMPORTANT When pulling on pedal (B). 2.2 Plug cord into electrical outlet...
Product Manual
Page 15
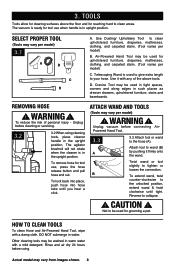
...) 3.1 A B C D A. To reduce the risk of the above the floor and for tool use , press the hose release button and pull hose end out. The agitator brushroll will not rotate when the cleaner is ready for reaching hard to wand (B) A by pushing it with a damp cloth. B To extend wand, twist counter-clockwise...
...) 3.1 A B C D A. To reduce the risk of the above the floor and for tool use , press the hose release button and pull hose end out. The agitator brushroll will not rotate when the cleaner is ready for reaching hard to wand (B) A by pushing it with a damp cloth. B To extend wand, twist counter-clockwise...
Product Manual
Page 19
...upright position before the dirt cup reaches the max line (A). Clean rinsable filter and/or filter made 1. Empty dirt cup - Check brushroll for any obstructions. Turn cleaner OFF and unplug it from overheating. Clear obstructions if present. Do not use and care of your...Rinsable filter and/or filter made with Indicator is not working as it should be done by an authorized service representative. ! reference pg. 11 2. Brushroll and/or hose is full and/or clogged. 2. WARNING ! Dirt cup is clogged. 3. reference pg 13. Any other servicing should , has been...
...upright position before the dirt cup reaches the max line (A). Clean rinsable filter and/or filter made 1. Empty dirt cup - Check brushroll for any obstructions. Turn cleaner OFF and unplug it from overheating. Clear obstructions if present. Do not use and care of your...Rinsable filter and/or filter made with Indicator is not working as it should be done by an authorized service representative. ! reference pg. 11 2. Brushroll and/or hose is full and/or clogged. 2. WARNING ! Dirt cup is clogged. 3. reference pg 13. Any other servicing should , has been...
Product Manual
Page 23
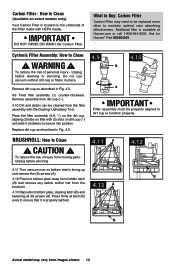
... to be properly aligned to dirt cup to Clean ! What to Buy: Carbon Filter Carbon Filter may vary from the filter assembly with HEPA media. BRUSHROLL: How to maintain optimal odor absorbing effectiveness. Remove dirt cup as described in Fig. 4.5. 4.9 4.10 B A IMPORTANT Filter assembly must be replaced more ... is available at latch (B) area to ensure that it clockwise to Clean (Available on the underside of personal injury - Press firmly at Hoover.com or call 1-800-944-9200. To reduce the risk of injury from moving parts Unplug before cleaning or servicing.
... to be properly aligned to dirt cup to Clean ! What to Buy: Carbon Filter Carbon Filter may vary from the filter assembly with HEPA media. BRUSHROLL: How to maintain optimal odor absorbing effectiveness. Remove dirt cup as described in Fig. 4.5. 4.9 4.10 B A IMPORTANT Filter assembly must be replaced more ... is available at latch (B) area to ensure that it clockwise to Clean (Available on the underside of personal injury - Press firmly at Hoover.com or call 1-800-944-9200. To reduce the risk of injury from moving parts Unplug before cleaning or servicing.
Product Manual
Page 26
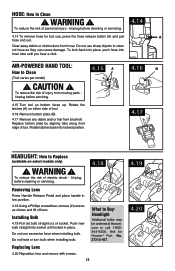
...from moving parts Unplug before servicing. 4.15 A 4.15 Turn tool so bottom faces up. What to Replace (available on either side of injury from brushroll. Do not use , press the hose release button (A) and pull A hose end out. To reduce the risk of electric shock - Do not ...To lock back into place, push hose into socket until you hear a click. Unplug before cleaning or servicing. 4.14 4.14 To remove hose for Hoover® Part No. 27313-107. CAUTION ! Ask for tool use excessive force when installing bulb. Unplug before cleaning or servicing. 4.18 Removing Lens...
...from moving parts Unplug before servicing. 4.15 A 4.15 Turn tool so bottom faces up. What to Replace (available on either side of injury from brushroll. Do not use , press the hose release button (A) and pull A hose end out. To reduce the risk of electric shock - Do not ...To lock back into place, push hose into socket until you hear a click. Unplug before cleaning or servicing. 4.14 4.14 To remove hose for Hoover® Part No. 27313-107. CAUTION ! Ask for tool use excessive force when installing bulb. Unplug before cleaning or servicing. 4.18 Removing Lens...
Product Manual
Page 27
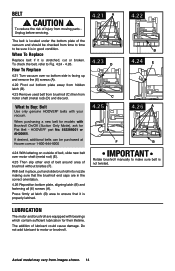
When To Replace Replace belt if it is in good condition. HOOVER® part No. 562289001 or AH20065. LUBRICATION The motor and brushroll are in place, pull and slide brushroll into nozzle making sure that it is stretched, cut or broken. The addition of the vacuum and should be sure ...to be checked from images shown. 14 To check the belt, refer to motor or brushroll. If desired, additional belts can be purchased at latch (B) area to Buy: Belt Use only genuine HOOVER® belts with Brushroll On/Off (Suction Only Mode), ask for their lifetime. With belt in the correct...
When To Replace Replace belt if it is in good condition. HOOVER® part No. 562289001 or AH20065. LUBRICATION The motor and brushroll are in place, pull and slide brushroll into nozzle making sure that it is stretched, cut or broken. The addition of the vacuum and should be sure ...to be checked from images shown. 14 To check the belt, refer to motor or brushroll. If desired, additional belts can be purchased at latch (B) area to Buy: Belt Use only genuine HOOVER® belts with Brushroll On/Off (Suction Only Mode), ask for their lifetime. With belt in the correct...
Product Manual
Page 30
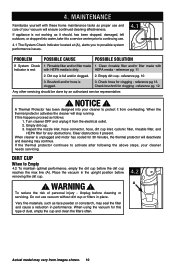
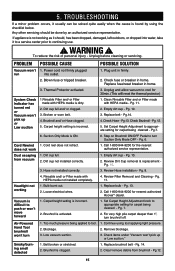
.... 4. Empty dirt cup - Pg.13. Dirt cup full. 2. Pg. 8. 4. Review Filter Removal and Cleaning - Pg. 7. 2. Blockage. 2. Replace brushroll belt - To reduce the risk of personal injury - Blown fuse or tripped breaker. 1. Thermal Protector activated. 3. Dirt cup full and/ or clogged. 3....reset breaker in home. 3. Pg. 12. 5. Call 1-800-944-9200 for carpet being applied to appropriate setting for nearest authorized Hoover® dealer. Rinsable and/ or Filter made with HEPA media is found by an authorized service representative. PROBLEM POSSIBLE CAUSE POSSIBLE SOLUTION...
.... 4. Empty dirt cup - Pg.13. Dirt cup full. 2. Pg. 8. 4. Review Filter Removal and Cleaning - Pg. 7. 2. Blockage. 2. Replace brushroll belt - To reduce the risk of personal injury - Blown fuse or tripped breaker. 1. Thermal Protector activated. 3. Dirt cup full and/ or clogged. 3....reset breaker in home. 3. Pg. 12. 5. Call 1-800-944-9200 for carpet being applied to appropriate setting for nearest authorized Hoover® dealer. Rinsable and/ or Filter made with HEPA media is found by an authorized service representative. PROBLEM POSSIBLE CAUSE POSSIBLE SOLUTION...
Product Manual
Page 34
...This Warranty is not as maid, janitorial and equipment rental services), brushroll, belt, improper maintenance of the product, damage due to misuse, acts of God, nature, vandalism or other acts beyond the control of Hoover®, owner's acts or omissions, use outside the country in ... rights; Military Exchange and outside a U.S. you . For additional assistance or information concerning this Warranty. However, if you mail your HOOVER® product is not an authorized retailer, dealer, or distributor of Canada. This Warranty shall be assigned. ALL OTHER WARRANTIES, EXPRESSED...
...This Warranty is not as maid, janitorial and equipment rental services), brushroll, belt, improper maintenance of the product, damage due to misuse, acts of God, nature, vandalism or other acts beyond the control of Hoover®, owner's acts or omissions, use outside the country in ... rights; Military Exchange and outside a U.S. you . For additional assistance or information concerning this Warranty. However, if you mail your HOOVER® product is not an authorized retailer, dealer, or distributor of Canada. This Warranty shall be assigned. ALL OTHER WARRANTIES, EXPRESSED...


