Product Manual
Page 6
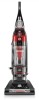
...8226; Do not use by children age 12 and under. To avoid personal injury or damage, and to prevent the cleaner from openings and moving parts. If appliance is not working as it should always be followed, including the following: READ ALL INSTRUCTIONS BEFORE USING THIS APPLIANCE. Do not place ... edges or corners. Keep cord away from product, and do not allow plug to rotate when in the upright position. • Turn off all parts of cleaner. • Do not leave appliance when plugged in. Brushroll continues to whip when rewinding (cord rewind available on floor. Do not allow...
...8226; Do not use by children age 12 and under. To avoid personal injury or damage, and to prevent the cleaner from openings and moving parts. If appliance is not working as it should always be followed, including the following: READ ALL INSTRUCTIONS BEFORE USING THIS APPLIANCE. Do not place ... edges or corners. Keep cord away from product, and do not allow plug to rotate when in the upright position. • Turn off all parts of cleaner. • Do not leave appliance when plugged in. Brushroll continues to whip when rewinding (cord rewind available on floor. Do not allow...
Product Manual
Page 10
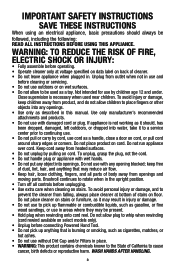
Make sure all parts from images shown. Attach bottom of Powered Hand Tool and pivot into clip until instruction 1.3 1.2 Insert handle section into tool storage area on left back ... back side (C) of dirt cup into vacuum. 1. Powered Hand Tool Clip* E. Wand H. Dusting/Upholstery Tool* G. Screw (for assembly) I F ATTACH HANDLE (varies per model Remove all parts are located before disposing of handle. B C EG H D I . Crevice Tool F. Dirt Cup 1.1 A *Varies per model) Note: Remove the screw located in the vacuum base and set...
Make sure all parts from images shown. Attach bottom of Powered Hand Tool and pivot into clip until instruction 1.3 1.2 Insert handle section into tool storage area on left back ... back side (C) of dirt cup into vacuum. 1. Powered Hand Tool Clip* E. Wand H. Dusting/Upholstery Tool* G. Screw (for assembly) I F ATTACH HANDLE (varies per model Remove all parts are located before disposing of handle. B C EG H D I . Crevice Tool F. Dirt Cup 1.1 A *Varies per model) Note: Remove the screw located in the vacuum base and set...
Product Manual
Page 19
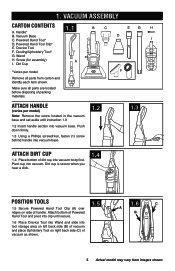
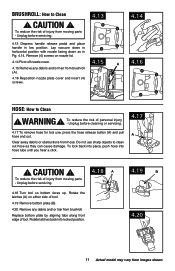
... Media When used and maintained properly, your Filter should not need replacement within the warranty period. Ask for Hoover® Part No. 304087001 ! Your Carbon Filter is available at Hoover. Do not use vacuum without dirt cup or filters in slots, pull filter frame (A) straight out. IMPORTANT...model may take up to Clean ! WARNING ! WARNING ! Hold filter over a trash receptacle and tap out dirt and debris. Ask for Hoover® Part No. 902404001. Dry filter on edge so air circulates on both sides of the Filter made with (3) slots on vacuum. Replace dirt cup...
... Media When used and maintained properly, your Filter should not need replacement within the warranty period. Ask for Hoover® Part No. 304087001 ! Your Carbon Filter is available at Hoover. Do not use vacuum without dirt cup or filters in slots, pull filter frame (A) straight out. IMPORTANT...model may take up to Clean ! WARNING ! WARNING ! Hold filter over a trash receptacle and tap out dirt and debris. Ask for Hoover® Part No. 902404001. Dry filter on edge so air circulates on both sides of the Filter made with (3) slots on vacuum. Replace dirt cup...
Product Manual
Page 22
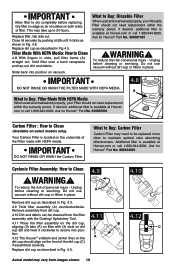
Unplug before servicing. 4.18 A 4.18 Turn tool so bottom faces up. To reduce the risk of tool. To reduce the risk of injury from moving parts - Rotate latches back into hose tube until you hear a click. 4.17 A ! Unplug before cleaning or servicing. 4.17 To remove hose for tool use sharp ...objects to clean out hose as in Fig. 4.14. CAUTION ! Remove (4) screws on either side of injury from moving parts - Do not use , press the hose release button (A) and pull hose end out. CAUTION ! Rotate the latches (A) on nozzle lid. 4.14 Pivot off ...
Unplug before servicing. 4.18 A 4.18 Turn tool so bottom faces up. To reduce the risk of tool. To reduce the risk of injury from moving parts - Rotate latches back into hose tube until you hear a click. 4.17 A ! Unplug before cleaning or servicing. 4.17 To remove hose for tool use sharp ...objects to clean out hose as in Fig. 4.14. CAUTION ! Remove (4) screws on either side of injury from moving parts - Do not use , press the hose release button (A) and pull hose end out. CAUTION ! Rotate the latches (A) on nozzle lid. 4.14 Pivot off ...
Product Manual
Page 23
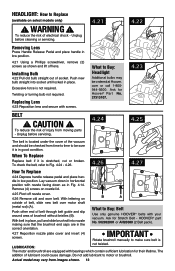
...addition of socket. Twisting or turning bulb not required. CAUTION ! When To Replace Replace belt if it is not required. Ask for Hoover® Part No. 27313107. 4.23 BELT ! Installing Bulb 4.22 Pull old bulb straight out of lubricant could cause damage. Replacing Lens 4.23 ...electrical shock - Unplug before cleaning or servicing. 4.21 4.22 Removing Lens Press Handle Release Pedal and place handle in place. WARNING ! HOOVER® part No. 562932001 or AH20080 (2 Belt pack). Actual model may be checked from time to time to make sure belt is stretched, cut...
...addition of socket. Twisting or turning bulb not required. CAUTION ! When To Replace Replace belt if it is not required. Ask for Hoover® Part No. 27313107. 4.23 BELT ! Installing Bulb 4.22 Pull old bulb straight out of lubricant could cause damage. Replacing Lens 4.23 ...electrical shock - Unplug before cleaning or servicing. 4.21 4.22 Removing Lens Press Handle Release Pedal and place handle in place. WARNING ! HOOVER® part No. 562932001 or AH20080 (2 Belt pack). Actual model may be checked from time to time to make sure belt is stretched, cut...

Product Manual
Page 27
... Mon-Fri 8am-7pm EST. Follow the service center link to Hoover®, Inc., Company in delay. SERVICE To obtain approved Hoover® service and genuine Hoover® parts, locate the nearest Authorized Hoover® Warranty Service Dealer (Depot) by the complete model number ...when requesting information or ordering parts. (The model number appears on the bottom of ...
... Mon-Fri 8am-7pm EST. Follow the service center link to Hoover®, Inc., Company in delay. SERVICE To obtain approved Hoover® service and genuine Hoover® parts, locate the nearest Authorized Hoover® Warranty Service Dealer (Depot) by the complete model number ...when requesting information or ordering parts. (The model number appears on the bottom of ...
Product Manual
Page 30
...assigned. HOW TO MAKE A WARRANTY CLAIM If this product is not an authorized retailer, dealer, or distributor of shipping will provide labor and parts, at www.hoover. WHAT THIS WARRANTY DOES NOT COVER This Warranty does not cover: use of the product in a commercial operation (such as warranted, take...defects in material and workmanship for a full two year from state to authorized service outlets in the United States, U.S. IN NO EVENT WILL HOOVER BE LIABLE FOR ANY SPECIAL, INDIRECT, INCIDENTAL OR CONSEQUENTIAL DAMAGES OF ANY KIND OR NATURE TO OWNER OR ANY PARTY CLAIMING THROUGH OWNER, ...
...assigned. HOW TO MAKE A WARRANTY CLAIM If this product is not an authorized retailer, dealer, or distributor of shipping will provide labor and parts, at www.hoover. WHAT THIS WARRANTY DOES NOT COVER This Warranty does not cover: use of the product in a commercial operation (such as warranted, take...defects in material and workmanship for a full two year from state to authorized service outlets in the United States, U.S. IN NO EVENT WILL HOOVER BE LIABLE FOR ANY SPECIAL, INDIRECT, INCIDENTAL OR CONSEQUENTIAL DAMAGES OF ANY KIND OR NATURE TO OWNER OR ANY PARTY CLAIMING THROUGH OWNER, ...


