
Product Manual
Page 2
Be sure to register your product online at hoover.com. Made in the spaces provided. Please do not return this owner's manual. Please enter the complete model and Manufacturing Code in Mexico Manufacturing code (Label located on back of vacuum) Contents Important Safety Instructions 3 Vacuum Assembly...5 Carton Contents...5 Attach Handle...5 Attach Dirt Cup...5 Position Tools...
Be sure to register your product online at hoover.com. Made in the spaces provided. Please do not return this owner's manual. Please enter the complete model and Manufacturing Code in Mexico Manufacturing code (Label located on back of vacuum) Contents Important Safety Instructions 3 Vacuum Assembly...5 Carton Contents...5 Attach Handle...5 Attach Dirt Cup...5 Position Tools...
Product Manual
Page 5
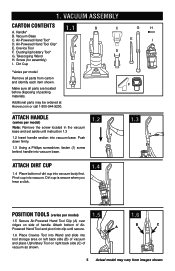
... Wand and slide into tool storage area on left back side (B) of vacuum and place Upholstery Tool on side of vacuum as shown. 5 Actual model may be ordered at Hoover.com or call 1-800-944-9200. Vacuum ASSEMBLY Carton contents 1.1 B C G H A. Dirt Cup *Varies per model) 1.5 1.6 1.5 Secure Air-Powered Hand Tool Clip (A) over ridges on right back...
... Wand and slide into tool storage area on left back side (B) of vacuum and place Upholstery Tool on side of vacuum as shown. 5 Actual model may be ordered at Hoover.com or call 1-800-944-9200. Vacuum ASSEMBLY Carton contents 1.1 B C G H A. Dirt Cup *Varies per model) 1.5 1.6 1.5 Secure Air-Powered Hand Tool Clip (A) over ridges on right back...
Product Manual
Page 6
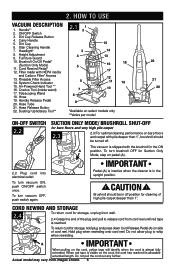
...and pull to whip when rewinding. Brushroll should be in the ON A position. Do not pull the cord out any further. Actual model may vary from cord reel until red tape is in the upright position. ! Height Adjustment 9. Stair Cleaning Handle 7. Cord Rewind ...Pedal* 12. Air-Powered Hand Tool ** 16. Handle Release Pedal 9 20. The vacuum is shipped with the brushroll in off . CAUTION ! Hold plug when rewinding onto cord reel. Dirt Cup Release Button 4. Dirt Cup 15 6. Hose ...
...and pull to whip when rewinding. Brushroll should be in the ON A position. Do not pull the cord out any further. Actual model may vary from cord reel until red tape is in the upright position. ! Height Adjustment 9. Stair Cleaning Handle 7. Cord Rewind ...Pedal* 12. Air-Powered Hand Tool ** 16. Handle Release Pedal 9 20. The vacuum is shipped with the brushroll in off . CAUTION ! Hold plug when rewinding onto cord reel. Dirt Cup Release Button 4. Dirt Cup 15 6. Hose ...
Product Manual
Page 7
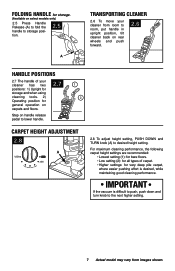
... rear wheels and push forward. 2.6 Handle Positions 2.7 The handle of your cleaner from images shown. IMPORTANT If the vacuum is desired, while maintaining good cleaning performance. FOLDING HANDLE for storage. (Available on select models only) 2.5 Press Handle Release (A) to fold the handle to storage position. 2.5 A Transporting Cleaner 2.6 To move your cleaner has... position for very deep pile carpet, where easier pushing effort is difficult to push, push down and turn knob to the next higher setting. 7 Actual model may vary from room to desired height setting.
... rear wheels and push forward. 2.6 Handle Positions 2.7 The handle of your cleaner from images shown. IMPORTANT If the vacuum is desired, while maintaining good cleaning performance. FOLDING HANDLE for storage. (Available on select models only) 2.5 Press Handle Release (A) to fold the handle to storage position. 2.5 A Transporting Cleaner 2.6 To move your cleaner has... position for very deep pile carpet, where easier pushing effort is difficult to push, push down and turn knob to the next higher setting. 7 Actual model may vary from room to desired height setting.
Product Manual
Page 8
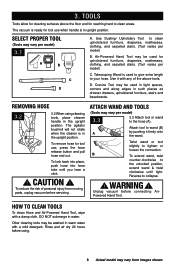
...upright position. Other cleaning tools may vary from moving parts, unplug vacuum before connecting AirPowered Hand Tool. Use Dusting/ Upholstery Tool to the hose (A). Removing Hose 3.2 3.2 When using . 8 Actual model may be used for tool use when handle is in water. ...of personal injury from images shown. WARNING ! To remove hose for upholstered furniture, draperies, mattresses, clothing, and carpeted stairs. (Tool varies per model) 3.1 A B C D A. To reduce the risk of the above the floor and for reaching hard to the unlocked position, extend wand...
...upright position. Other cleaning tools may vary from moving parts, unplug vacuum before connecting AirPowered Hand Tool. Use Dusting/ Upholstery Tool to the hose (A). Removing Hose 3.2 3.2 When using . 8 Actual model may be used for tool use when handle is in water. ...of personal injury from images shown. WARNING ! To remove hose for upholstered furniture, draperies, mattresses, clothing, and carpeted stairs. (Tool varies per model) 3.1 A B C D A. To reduce the risk of the above the floor and for reaching hard to the unlocked position, extend wand...
Product Manual
Page 9
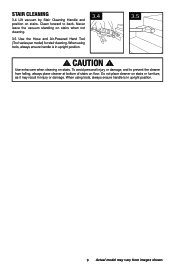
.... Use extra care when cleaning on stairs. When using tools, always ensure handle is in upright position. 9 Actual model may result in upright position. 3.4 3.5 ! CAUTION ! Never leave the vacuum standing on floor. When using tools, always ensure handle is in injury or damage. Do not place cleaner on stairs... place cleaner at bottom of stairs on stairs when not cleaning. 3.5 Use the Hose and Air-Powered Hand Tool (Tool varies per model) for stair cleaning. Clean forward to prevent the cleaner from images shown. To avoid personal injury or damage, and to back.
.... Use extra care when cleaning on stairs. When using tools, always ensure handle is in upright position. 9 Actual model may result in upright position. 3.4 3.5 ! CAUTION ! Never leave the vacuum standing on floor. When using tools, always ensure handle is in injury or damage. Do not place cleaner on stairs... place cleaner at bottom of stairs on stairs when not cleaning. 3.5 Use the Hose and Air-Powered Hand Tool (Tool varies per model) for stair cleaning. Clean forward to prevent the cleaner from images shown. To avoid personal injury or damage, and to back.
Product Manual
Page 10
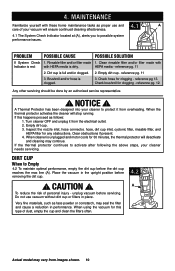
... made 1. NOTICE ! Turn cleaner OFF and unplug it from the electrical outlet. 2. Place the vacuum in the upright position before servicing. CAUTION ! Very fine materials, such as proper use vacuum without dirt cup or filters in performance. Actual model may seal the filter and cause a reduction in place. Empty dirt cup. 3. Clear obstructions...
... made 1. NOTICE ! Turn cleaner OFF and unplug it from the electrical outlet. 2. Place the vacuum in the upright position before servicing. CAUTION ! Very fine materials, such as proper use vacuum without dirt cup or filters in performance. Actual model may seal the filter and cause a reduction in place. Empty dirt cup. 3. Clear obstructions...

Product Manual
Page 11
... used and maintained properly, your Rinsable Filter should be cleaned at least every two months under running water for Hoover® Part No. 303172001. 4.8 A 11 Actual model may take up . CAUTION ! Do not use vacuum without dirt cup or filters in place. 4.6 4.7 What to open . 4.7 Pull on filter by pushing until it clicks...
... used and maintained properly, your Rinsable Filter should be cleaned at least every two months under running water for Hoover® Part No. 303172001. 4.8 A 11 Actual model may take up . CAUTION ! Do not use vacuum without dirt cup or filters in place. 4.6 4.7 What to open . 4.7 Pull on filter by pushing until it clicks...
Product Manual
Page 12
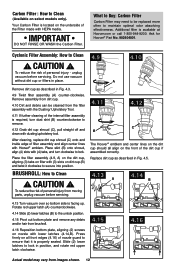
...unlock position. 4.15 Pivot out bottom plate and remove any debris and/or hair from moving parts, unplug vacuum before servicing. Your Carbon Filter is available at Hoover.com or call 1-800-944-9200. To reduce the risk of filter assembly and align center lines with... tool. Cyclonic Filter Assembly: How to lock. unplug vacuum before servicing. 4.11 4.12 C B The Hoover® emblem and center lines on nozzle with (3) slots on select models only). Slide (2) lower latches to secure into position. Ask for Hoover® Part No. 902404001. Remove assembly from dirt ...
...unlock position. 4.15 Pivot out bottom plate and remove any debris and/or hair from moving parts, unplug vacuum before servicing. Your Carbon Filter is available at Hoover.com or call 1-800-944-9200. To reduce the risk of filter assembly and align center lines with... tool. Cyclonic Filter Assembly: How to lock. unplug vacuum before servicing. 4.11 4.12 C B The Hoover® emblem and center lines on nozzle with (3) slots on select models only). Slide (2) lower latches to secure into position. Ask for Hoover® Part No. 902404001. Remove assembly from dirt ...
Product Manual
Page 13
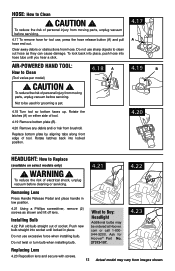
...4.21 Using a Phillips screwdriver, remove (2) screws as they can cause damage. Ask for Hoover® Part No. 27313-107. 4.23 Replacing Lens 4.23 Reposition lens and secure with screws. 13 Actual model may be used for tool use excessive force when installing bulb. HOSE: How to be ...tool. Do not use , press the hose release button (A) and pull hose end out. To reduce the risk of electrical shock, unplug vacuum before cleaning or servicing. 4.21 4.22 Removing Lens Press Handle Release Pedal and place handle in place. CAUTION ! To reduce the risk of...
...4.21 Using a Phillips screwdriver, remove (2) screws as they can cause damage. Ask for Hoover® Part No. 27313-107. 4.23 Replacing Lens 4.23 Reposition lens and secure with screws. 13 Actual model may be used for tool use excessive force when installing bulb. HOSE: How to be ...tool. Do not use , press the hose release button (A) and pull hose end out. To reduce the risk of electrical shock, unplug vacuum before cleaning or servicing. 4.21 4.22 Removing Lens Press Handle Release Pedal and place handle in place. CAUTION ! To reduce the risk of...
Product Manual
Page 14
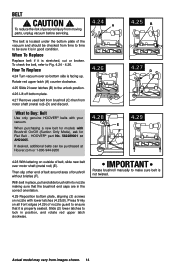
...on all front edges (4.29) of personal injury from time to time to Buy: Belt Use only genuine HOOVER® belts with Brushroll On/Off (Suction Only Mode), ask for models with your vacuum. To reduce the risk of nozzle guard to ensure that the brushroll end caps are in good condition. ..., pull and slide brushroll into nozzle making sure that it is located under the bottom plate of the vacuum and should be checked from moving parts, unplug vacuum before servicing. What to be purchased at Hoover.com or 1-800-944-9200 4.24 4.26 4.28 A E F 4.25 B 4.27 DC 4.29 4.28 With lettering ...
...on all front edges (4.29) of personal injury from time to time to Buy: Belt Use only genuine HOOVER® belts with Brushroll On/Off (Suction Only Mode), ask for models with your vacuum. To reduce the risk of nozzle guard to ensure that the brushroll end caps are in good condition. ..., pull and slide brushroll into nozzle making sure that it is located under the bottom plate of the vacuum and should be checked from moving parts, unplug vacuum before servicing. What to be purchased at Hoover.com or 1-800-944-9200 4.24 4.26 4.28 A E F 4.25 B 4.27 DC 4.29 4.28 With lettering ...

Product Manual
Page 16
... EST. Always identify your vacuum to find the service outlet nearest you need further assistance: To speak with a customer service representative call 1-800-944-9200. Service To obtain approved Hoover® service and genuine Hoover® parts, locate the nearest Authorized Hoover® Warranty Service Dealer (Depot) by the complete model number when requesting information...
... EST. Always identify your vacuum to find the service outlet nearest you need further assistance: To speak with a customer service representative call 1-800-944-9200. Service To obtain approved Hoover® service and genuine Hoover® parts, locate the nearest Authorized Hoover® Warranty Service Dealer (Depot) by the complete model number when requesting information...


