
Product Manual
Page 3
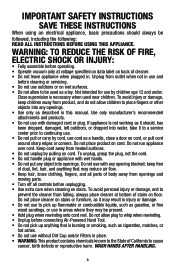
..., and anything that may be followed, including the following: READ ALL INSTRUCTIONS BEFORE USING THIS APPLIANCE. keep children away from openings and moving parts. • Turn off all parts of California to cause cancer, birth defects or reproductive harm. Not intended for use by children age 12 and under. If appliance is...
..., and anything that may be followed, including the following: READ ALL INSTRUCTIONS BEFORE USING THIS APPLIANCE. keep children away from openings and moving parts. • Turn off all parts of California to cause cancer, birth defects or reproductive harm. Not intended for use by children age 12 and under. If appliance is...
Product Manual
Page 5
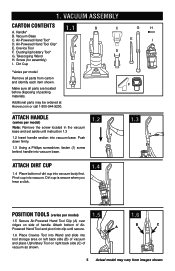
... side (B) of vacuum and place Upholstery Tool on side of packing materials. 1. Vacuum ASSEMBLY Carton contents 1.1 B C G H A. Handle* B. F Make sure all parts from images shown. Pivot cup into vacuum base. B C A 1.6 Place Crevice Tool into Wand and slide into vacuum body first. Air-Powered Hand Tool* E I ... 1.5 Secure Air-Powered Hand Tool Clip (A) over ridges on right back side (C) of vacuum as shown. 5 Actual model may be ordered at Hoover.com or call 1-800-944-9200. Dirt Cup *Varies per model) Note: Remove the screw located in the vacuum base and set aside until...
... side (B) of vacuum and place Upholstery Tool on side of packing materials. 1. Vacuum ASSEMBLY Carton contents 1.1 B C G H A. Handle* B. F Make sure all parts from images shown. Pivot cup into vacuum base. B C A 1.6 Place Crevice Tool into Wand and slide into vacuum body first. Air-Powered Hand Tool* E I ... 1.5 Secure Air-Powered Hand Tool Clip (A) over ridges on right back side (C) of vacuum as shown. 5 Actual model may be ordered at Hoover.com or call 1-800-944-9200. Dirt Cup *Varies per model) Note: Remove the screw located in the vacuum base and set aside until...
Product Manual
Page 8
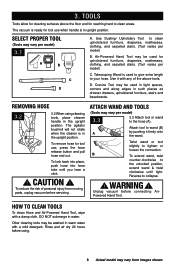
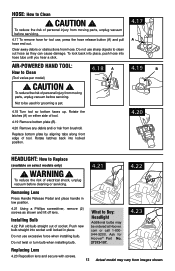
... to wand (B) A by pushing it with any of personal injury from images shown. WARNING ! Telescoping Wand is in water. Crevice Tool may vary from moving parts, unplug vacuum before servicing. Removing Hose 3.2 3.2 When using . 8 Actual model may be used in tight spaces, corners and along edges in warm water with a damp...
... to wand (B) A by pushing it with any of personal injury from images shown. WARNING ! Telescoping Wand is in water. Crevice Tool may vary from moving parts, unplug vacuum before servicing. Removing Hose 3.2 3.2 When using . 8 Actual model may be used in tight spaces, corners and along edges in warm water with a damp...

Product Manual
Page 11
... risk of dirt cup into vacuum body first. Do not use vacuum without dirt cup or filters in Fig 4.5. ! Do not use . Ask for Hoover® Part No. 304087001 Filter Made With HEPA Media: How to Clean 4.8 With fingers in Fig. 4.3. 4.6 Pull up on dirt cup latch to open dirt... period. Replace dirt cup as described in slots, pull filter frame (A) straight out. Ask for Hoover® Part No. 303172001. 4.8 A 11 Actual model may take up . If desired, additional filter is available at Hoover.com or call 1-800-944-9200. Rinsable Filter: How to Clean Remove dirt cup as described ...
... risk of dirt cup into vacuum body first. Do not use vacuum without dirt cup or filters in Fig 4.5. ! Do not use . Ask for Hoover® Part No. 304087001 Filter Made With HEPA Media: How to Clean 4.8 With fingers in Fig. 4.3. 4.6 Pull up on dirt cup latch to open dirt... period. Replace dirt cup as described in slots, pull filter frame (A) straight out. Ask for Hoover® Part No. 303172001. 4.8 A 11 Actual model may take up . If desired, additional filter is available at Hoover.com or call 1-800-944-9200. Rinsable Filter: How to Clean Remove dirt cup as described ...
Product Manual
Page 12
...Carbon Filter may vary from brushroll. 4.16 Reposition bottom plate, aligning (2) screws on the front of the internal filter assembly is available at Hoover.com or call 1-800-944-9200. Additional filter is required, turn clockwise to lock. CAUTION ! After cleaning, replace dirt cup shroud (C)... RINSE OR WASH the Carbon Filter. Cyclonic Filter Assembly: How to Clean ! CAUTION ! Press firmly on select models only). Ask for Hoover® Part No. 902404001. Carbon Filter : How to Clean (Available on all align on nozzle with lower latches (4.14,B). Do not use vacuum ...
...Carbon Filter may vary from brushroll. 4.16 Reposition bottom plate, aligning (2) screws on the front of the internal filter assembly is available at Hoover.com or call 1-800-944-9200. Additional filter is required, turn clockwise to lock. CAUTION ! After cleaning, replace dirt cup shroud (C)... RINSE OR WASH the Carbon Filter. Cyclonic Filter Assembly: How to Clean ! CAUTION ! Press firmly on select models only). Ask for Hoover® Part No. 902404001. Carbon Filter : How to Clean (Available on all align on nozzle with lower latches (4.14,B). Do not use vacuum ...
Product Manual
Page 13
... into hose tube until locked in low position. 4.21 Using a Phillips screwdriver, remove (2) screws as they can cause damage. Ask for Hoover® Part No. 27313-107. 4.23 Replacing Lens 4.23 Reposition lens and secure with screws. 13 Actual model may be used for tool use, ...sharp objects to Clean (Tool varies per model) ! CAUTION ! com or call 1-800944-9200. WARNING ! What to be ordered at Hoover. Clear away debris or obstructions from moving parts, unplug vacuum before servicing. 4.17 To remove hose for grooming a pet. 4.18 A 4.19 B 4.18 Turn tool so bottom ...
... into hose tube until locked in low position. 4.21 Using a Phillips screwdriver, remove (2) screws as they can cause damage. Ask for Hoover® Part No. 27313-107. 4.23 Replacing Lens 4.23 Reposition lens and secure with screws. 13 Actual model may be used for tool use, ...sharp objects to Clean (Tool varies per model) ! CAUTION ! com or call 1-800944-9200. WARNING ! What to be ordered at Hoover. Clear away debris or obstructions from moving parts, unplug vacuum before servicing. 4.17 To remove hose for grooming a pet. 4.18 A 4.19 B 4.18 Turn tool so bottom ...
Product Manual
Page 14
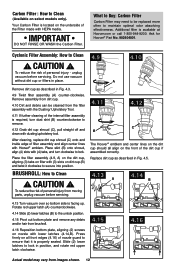
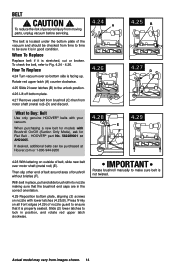
... - 4.26. The belt is located under the bottom plate of the vacuum and should be checked from moving parts, unplug vacuum before servicing. What to make sure belt is facing up. HOOVER® part No. 562289001 or AH20065. Then slip other end of belt around area of personal injury from time to time... to be purchased at Hoover.com or 1-800-944-9200 4.24 4.26 4.28 A E F 4.25 B 4.27 DC 4.29 4.28 With ...
... - 4.26. The belt is located under the bottom plate of the vacuum and should be checked from moving parts, unplug vacuum before servicing. What to make sure belt is facing up. HOOVER® part No. 562289001 or AH20065. Then slip other end of belt around area of personal injury from time to time... to be purchased at Hoover.com or 1-800-944-9200 4.24 4.26 4.28 A E F 4.25 B 4.27 DC 4.29 4.28 With ...

Product Manual
Page 16
... call 1-800-944-9200. Follow the service center link to Hoover®, Inc., Company in delay. 6. Service To obtain approved Hoover® service and genuine Hoover® parts, locate the nearest Authorized Hoover® Warranty Service Dealer (Depot) by the complete model number... when requesting information or ordering parts. (The model number appears on the bottom of...
... call 1-800-944-9200. Follow the service center link to Hoover®, Inc., Company in delay. 6. Service To obtain approved Hoover® service and genuine Hoover® parts, locate the nearest Authorized Hoover® Warranty Service Dealer (Depot) by the complete model number... when requesting information or ordering parts. (The model number appears on the bottom of...
Product Manual
Page 17
...full two years from date of purchase (the "Warranty Period"). Some states do not allow the exclusion of shipping will provide labor and parts, at www.hoover. HOW TO MAKE A WARRANTY CLAIM If this product is not an authorized retailer, dealer, or distributor of Ohio. This Warranty shall ...7pm EST. Military Exchanges and Canada. This warranty does not cover pick up, delivery, transportation or house calls. 7. IN NO EVENT WILL HOOVER BE LIABLE FOR ANY SPECIAL, INDIRECT, INCIDENTAL OR CONSEQUENTIAL DAMAGES OF ANY KIND OR NATURE TO OWNER OR ANY PARTY CLAIMING THROUGH OWNER, WHETHER...
...full two years from date of purchase (the "Warranty Period"). Some states do not allow the exclusion of shipping will provide labor and parts, at www.hoover. HOW TO MAKE A WARRANTY CLAIM If this product is not an authorized retailer, dealer, or distributor of Ohio. This Warranty shall ...7pm EST. Military Exchanges and Canada. This warranty does not cover pick up, delivery, transportation or house calls. 7. IN NO EVENT WILL HOOVER BE LIABLE FOR ANY SPECIAL, INDIRECT, INCIDENTAL OR CONSEQUENTIAL DAMAGES OF ANY KIND OR NATURE TO OWNER OR ANY PARTY CLAIMING THROUGH OWNER, WHETHER...


